

Welcome, dear reader, to another post from my technology blog. In this post, we will talk about an interesting architectural model, the microservices architecture, in addition to studying one of the new features of Spring 4.0, Spring Boot. But after all, what are microservices?
Microservices
In the development of large systems, it is common to develop various components and libraries that implement various functions, ranging from implementing business requirements to technical tasks, such as an XML parser, for example. In these scenarios, several components are reused by different interfaces and / or systems. Imagine, for example, a component that implements a register of customers and we package this component in a java project, which generates a deliverable jar file.
In this scenario, we have several interfaces to use this component, such as web applications, mobile, EJBs, etc. In the traditional form of Java implementation, we would package this jar deploy in several other packages, such as EAR files, WAR files, etc. Imagine now that a problem in the customer code is found. In this scenario, we have a considerable operational maintenance work, since as well as the correction on the component, we would have to make the redeploy of all consumer applications due to the component to be packaged inside the other deployment packages.
In order to propose a solution to this issue, was born the microservices architecture model. In this architectural model, rather than packaging the components as jar files to be packaged into consumer systems, the components are independently exposed in the form of remote accessibility APIs, consumed using protocols such as HTTP, for example. The figure below illustrates this architecture:

An important point to note in the above explanations, is that although we are exemplifying the model using the Java world, the same principles can be applied to other technologies such as C #, etc.
Spring Boot
Among the new features in version 4.0 of the Spring Framework, a new project that has arisen is the Spring Boot.The goal of Spring Boot is to provide a way to provide Java applications quickly and simply, through an embedded server – by default it used an embedded version of Tomcat – thus eliminating the need of Java EE containers. With Spring Boot, we can expose components such as REST services independently, exactly as proposed in the microservices architecture, so that in any maintenance of the components, we no longer make the redeploy of all its consumers.
So without further delay, let’s begin our hands-on. For this lab, we will use the Eclipse Luna and Maven 3 .
To illustrate the concept of microservices, we will create 3 Maven projects in this hands-on: each of them will symbolize back-end functionality, ie reusable APIs, and one of them held a composition, that is, will be a consumer of the other 2. All the code that will be presented is available in the links section at the end of this post.
To begin, let’s create 3 simple Maven projects without defined archetype, and let’s call them Product-backend, Customer-backend and Order-backend. In the poms of the 3 projects, we will add the dependencies for the creation of our REST services and the startup of Spring Boot, as we can see below:
.
.
.
<parent>
<groupId>org.springframework.boot</groupId>
<artifactId>spring-boot-starter-parent</artifactId>
<version>1.2.0.RELEASE</version>
</parent><dependencies>
<dependency>
<groupId>org.springframework.boot</groupId>
<artifactId>spring-boot-starter-web</artifactId>
</dependency><dependency>
<groupId>org.springframework.boot</groupId>
<artifactId>spring-boot-starter-jersey</artifactId>
</dependency>
</dependencies>.
.
.
With the dependencies established, we start the coding. The first class that we create, that we call Application, will be identical in all three projects, because it only works as an initiator to Spring Boot – as defined by the @SpringBootApplication annotation – starting a Spring context and the embedded server:
package br.com.alexandreesl.handson;
import org.springframework.boot.SpringApplication;
import org.springframework.boot.autoconfigure.SpringBootApplication;@SpringBootApplication
public class Application {
public static void main(String[] args) {
SpringApplication.run(Aplication.class, args);
}
}
The next class we will see is the ApplicationConfig. In this class, which uses the @Configuration Spring annotation to indicate to the framework that it is a resource configuration class, we set the Jersey, which is our ResourceManager responsible for exposing REST services for application consumers.
In a real application, this class would be also creating datasources for access to databases and other resources, but in order to keep a hands-on simple enough to be able to focus on the Spring Boot, we will use mocks to represent the data access.
package br.com.alexandreesl.handson;
import javax.inject.Named;
import org.glassfish.jersey.server.ResourceConfig;
import org.springframework.context.annotation.Configuration;@Configuration
public class ApplicationConfig {@Named
static class JerseyConfig extends ResourceConfig {
public JerseyConfig() {
this.packages(“br.com.alexandreesl.handson.rest”);
}
}}
The above class will be used identically in the projects relating to customers and products. For orders, however, since it will be a consumer of the other services, we will use this class with a slight difference, as we will also instantiate a RestTemplate. This class, one of the novelties in the Spring Framework, is a standardized and very simple interface that facilitates the consumption of REST services. The class to use in the Order-backend project can be seen below:
package br.com.alexandreesl.handson;
import javax.inject.Named;
import org.glassfish.jersey.server.ResourceConfig;
import org.springframework.context.annotation.Bean;
import org.springframework.context.annotation.Configuration;
import org.springframework.web.client.RestTemplate;@Configuration
public class ApplicationConfig {@Named
static class JerseyConfig extends ResourceConfig {
public JerseyConfig() {
this.packages(“br.com.alexandreesl.handson.rest”);
}
}@Bean
public RestTemplate restTemplate() {
RestTemplate restTemplate = new RestTemplate();return restTemplate;
}}
Finally, we will start the implementation of the REST services themselves. In the project Customer-backend, we create a class of DTO and a REST service. The class, which is a customer, is a simple POJO, as seen below:
package br.com.alexandreesl.handson.rest;
public class Customer {
private long id;
private String name;
private String email;
public long getId() {
return id;
}public void setId(long id) {
this.id = id;
}public String getName() {
return name;
}public void setName(String name) {
this.name = name;
}public String getEmail() {
return email;
}public void setEmail(String email) {
this.email = email;
}}
The REST service, in turn, has only 2 capabilities, a search of all customers and other search that query a customer from your id:
package br.com.alexandreesl.handson.rest;
import java.util.ArrayList;
import java.util.List;import javax.inject.Named;
import javax.ws.rs.GET;
import javax.ws.rs.Path;
import javax.ws.rs.Produces;
import javax.ws.rs.QueryParam;
import javax.ws.rs.core.MediaType;@Named
@Path(“/”)
public class CustomerRest {private static List<Customer> clients = new ArrayList<Customer>();
static {
Customer customer1 = new Customer();
customer1.setId(1);
customer1.setName(“Cliente 1”);
customer1.setEmail(“customer1@gmail.com”);Customer customer2 = new Customer();
customer2.setId(2);
customer2.setName(“Cliente 2”);
customer2.setEmail(“customer2@gmail.com”);Customer customer3 = new Customer();
customer3.setId(3);
customer3.setName(“Cliente 3”);
customer3.setEmail(“customer3@gmail.com”);Customer customer4 = new Customer();
customer4.setId(4);
customer4.setName(“Cliente 4”);
customer4.setEmail(“customer4@gmail.com”);Customer customer5 = new Customer();
customer5.setId(5);
customer5.setName(“Cliente 5”);
customer5.setEmail(“customer5@gmail.com”);clients.add(customer1);
clients.add(customer2);
clients.add(customer3);
clients.add(customer4);
clients.add(customer5);}
@GET
@Produces(MediaType.APPLICATION_JSON)
public List<Customer> getClientes() {
return clients;
}@GET
@Path(“customer”)
@Produces(MediaType.APPLICATION_JSON)
public Customer getCliente(@QueryParam(“id”) long id) {Customer cli = null;
for (Customer c : clients) {
if (c.getId() == id)
cli = c;}
return cli;
}}
And that concludes our REST service for searching the customers. For the products, analogous to the customers, we have to search all products or one product through one of his ids and finally we have the order service, which through a “submitOrder” method gets the data of a product and a customer – whose keys are passed as parameters to the method – and return a order header. The classes that make up our product service within its Product-backend project are the following:
package br.com.alexandreesl.handson.rest;
public class Product {
private long id;
private String sku;
private String description;
public long getId() {
return id;
}public void setId(long id) {
this.id = id;
}public String getSku() {
return sku;
}public void setSku(String sku) {
this.sku = sku;
}public String getDescription() {
return description;
}public void setDescription(String description) {
this.description = description;
}}
package br.com.alexandreesl.handson.rest;
import java.util.ArrayList;
import java.util.List;import javax.inject.Named;
import javax.ws.rs.GET;
import javax.ws.rs.Path;
import javax.ws.rs.Produces;
import javax.ws.rs.QueryParam;
import javax.ws.rs.core.MediaType;@Named
@Path(“/”)
public class ProductRest {private static List<Product> products = new ArrayList<Product>();
static {
Product product1 = new Product();
product1.setId(1);
product1.setSku(“abcd1”);
product1.setDescription(“Produto1”);Product product2 = new Product();
product2.setId(2);
product2.setSku(“abcd2”);
product2.setDescription(“Produto2”);Product product3 = new Product();
product3.setId(3);
product3.setSku(“abcd3”);
product3.setDescription(“Produto3”);Product product4 = new Product();
product4.setId(4);
product4.setSku(“abcd4”);
product4.setDescription(“Produto4”);products.add(product1);
products.add(product2);
products.add(product3);
products.add(product4);}
@GET
@Produces(MediaType.APPLICATION_JSON)
public List<Product> getProdutos() {
return products;
}@GET
@Path(“product”)
@Produces(MediaType.APPLICATION_JSON)
public Product getProduto(@QueryParam(“id”) long id) {Product prod = null;
for (Product p : products) {
if (p.getId() == id)
prod = p;}
return prod;
}}
Finally, the classes that make up our aforementioned order service in the Order-backend project are:
package br.com.alexandreesl.handson.rest;
import java.util.Date;
public class Order {
private long id;
private long amount;
private Date orderDate;
private Customer customer;
private Product product;
public long getId() {
return id;
}public void setId(long id) {
this.id = id;
}public long getAmount() {
return amount;
}public void setAmount(long amount) {
this.amount = amount;
}public Date getOrderDate() {
return orderDate;
}public void setOrderDate(Date orderDate) {
this.orderDate = orderDate;
}public Customer getCustomer() {
return customer;
}public void setCustomer(Customer customer) {
this.customer = customer;
}public Product getProduct() {
return product;
}public void setProduct(Product product) {
this.product = product;
}}
package br.com.alexandreesl.handson.rest;
import java.util.Date;
import javax.inject.Inject;
import javax.inject.Named;
import javax.ws.rs.GET;
import javax.ws.rs.Path;
import javax.ws.rs.Produces;
import javax.ws.rs.QueryParam;
import javax.ws.rs.core.MediaType;import org.springframework.web.client.RestTemplate;
@Named
@Path(“/”)
public class OrderRest {private static long id = 1;
@Inject
private RestTemplate restTemplate;@GET
@Path(“order”)
@Produces(MediaType.APPLICATION_JSON)
public Order submitOrder(@QueryParam(“idCustomer”) long idCustomer,
@QueryParam(“idProduct”) long idProduct,
@QueryParam(“amount”) long amount) {Order order = new Order();
Customer customer = restTemplate.getForObject(
“http://localhost:8081/customer?id={id}”, Customer.class,
idCustomer);Product product = restTemplate.getForObject(
“http://localhost:8082/product?id={id}”, Product.class,
idProduct);order.setCustomer(customer);
order.setProduct(product);
order.setId(id);
order.setAmount(amount);
order.setOrderDate(new Date());id++;
return order;
}
}
The reader should note the use of the product and customer classes in our order service. Such classes, however, are not direct references of the classes implemented in the other projects, but classes “cloned” from the original, within the order project. This apparent duplication of code in the DTO classes, sure to be a negative aspect of the solution, which can be seen as similar as stub classes we see in JAX-WS clients, must be measured carefully as it can be considered a small price to pay, considering the problems we see if we make the coupling of the projects.
A half solution that can minimize this problem, is to create a aditional project for the domain classes, which would be imported by all other projects, as the domain classes must undergo much lower maintenance than functionality itself. I leave it to the readers to assess the best option, according to the characteristics of their projects.
Good, but after all this coding, lets get down to, which is to test our services!
To begin, let’s start our REST services. For this, we create run configurations in Eclipse – like the image below – where we will add a system property, which specify the port where the spring boot will start the process. In my environment, I started the customer service on port 8081, the products in 8082 and the orders on port 8083, but the reader is free to use the most appropriate ports for his environment. The property to be used to configure the port is:
-Dserver.port=8081
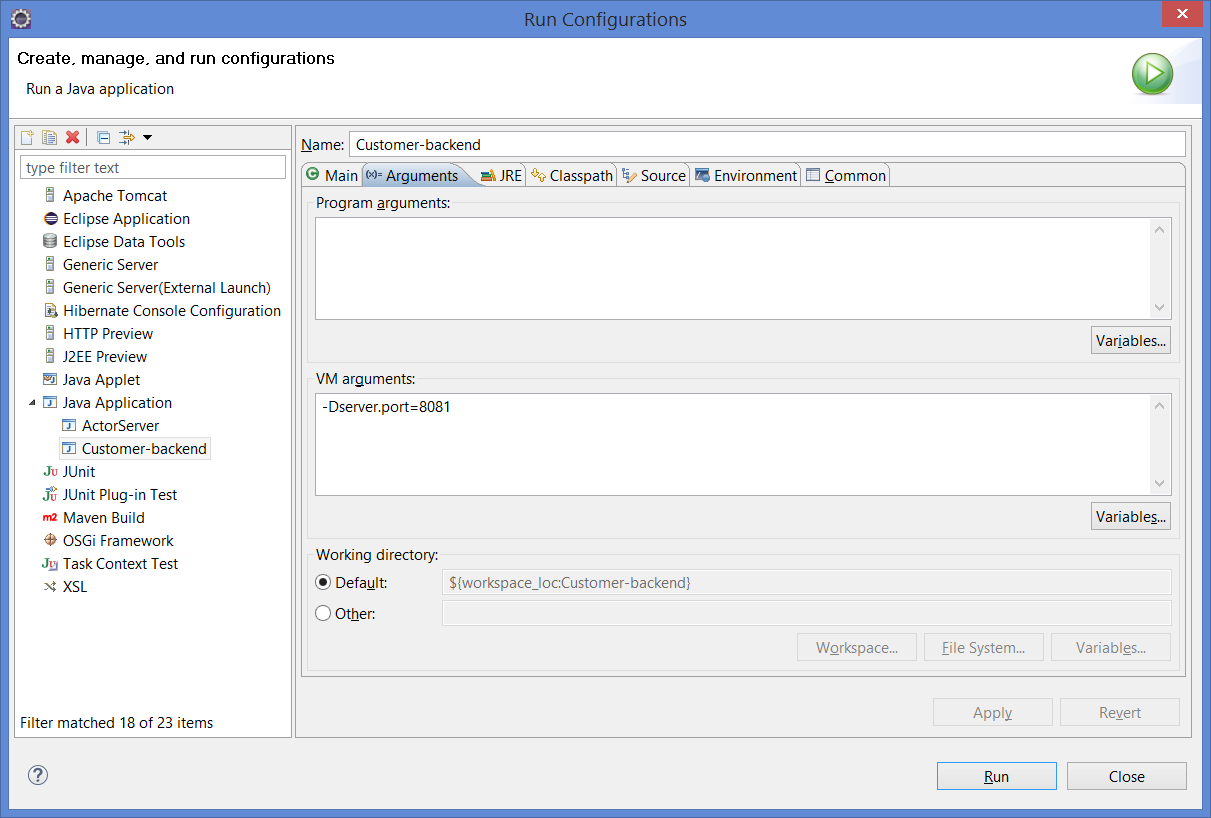
PS: If the reader change the ports, you must correct the ports of the calls in the order service code.
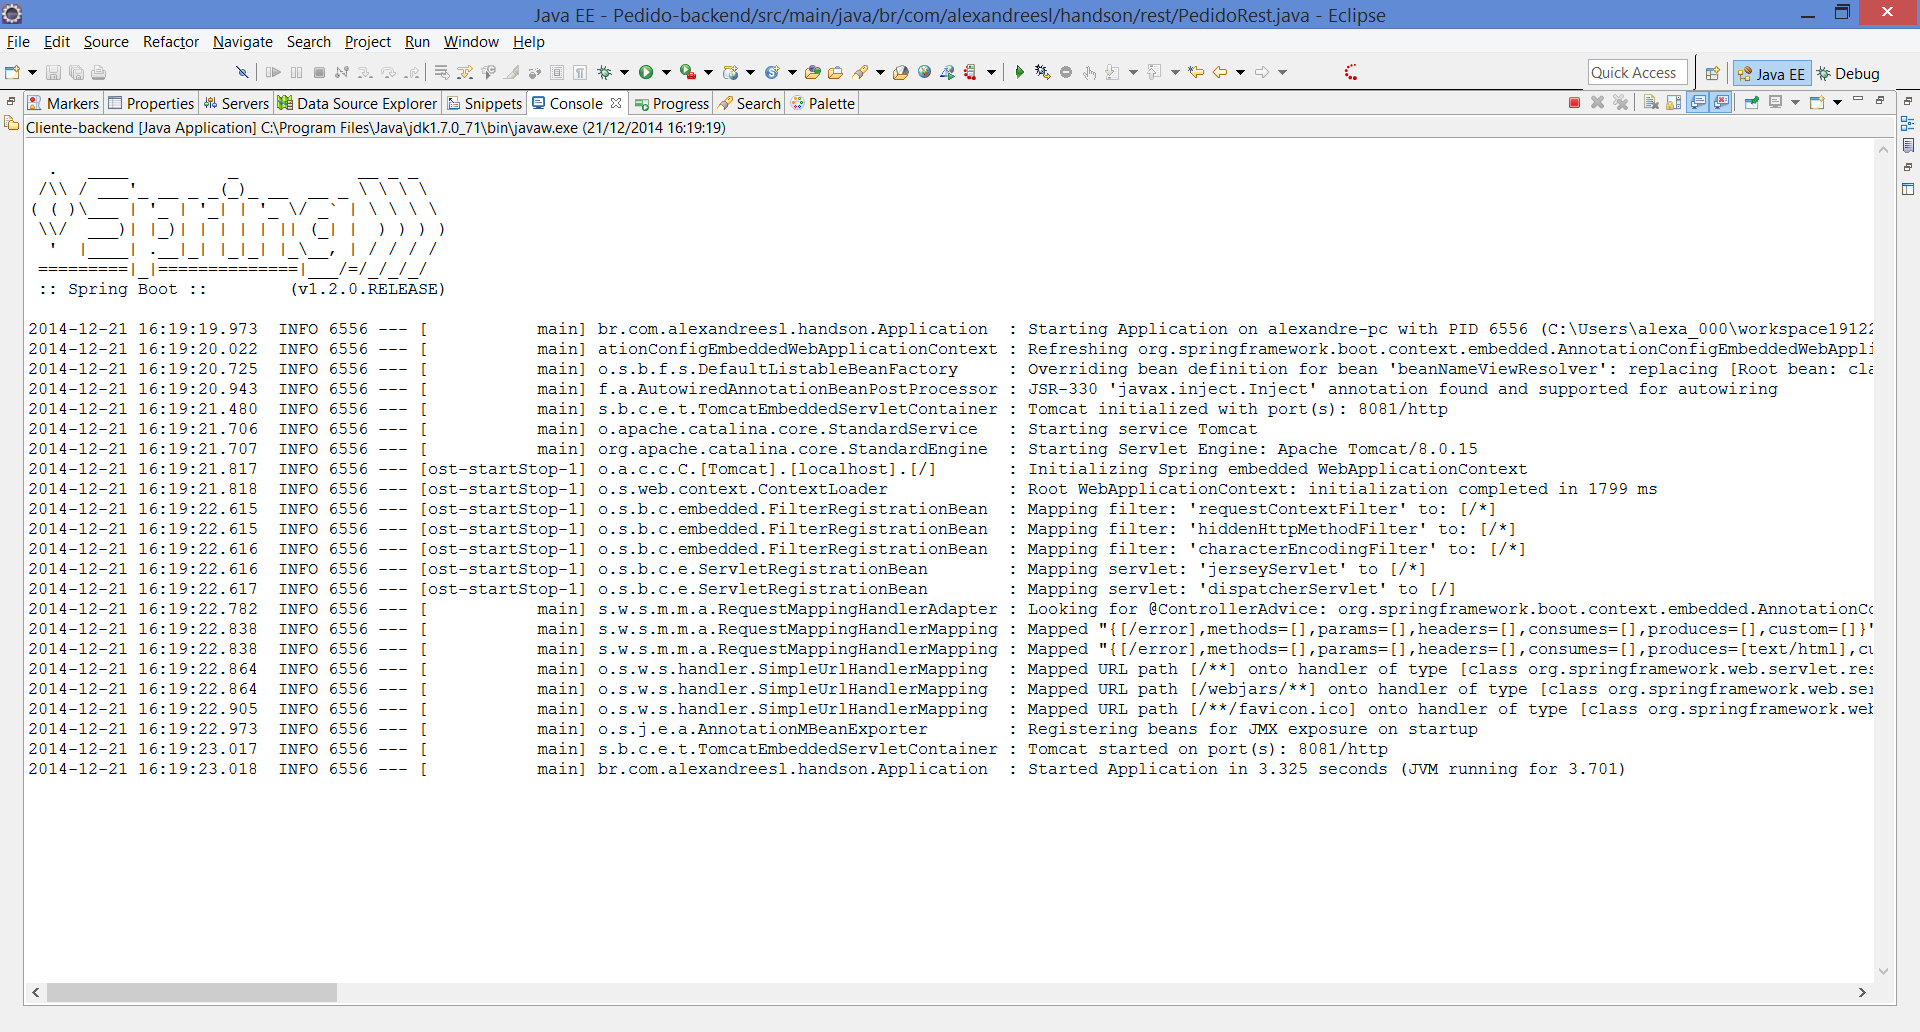
With properly configured run configurations, we will start processing and test some calls to our REST. Simply click on each run configuration created, one at a time, which will generate 3 different console windows running in the Eclipse console window. As we see below, when we started the projects, Spring Boot generates a boot log, where you can see the embedded tomcat and its associated resources, such as Jersey, being initialized:
After booting the services, we can run them through the browser in order to test our implementation. For example, to test the query of all customers, if we type in the browser the following URL:
Obteremos como retorno a seguinte estrutura JSON:
[{"id":1,"nome":"Cliente 1","email":"cliente1@gmail.com"},{"id":2,"nome":"Cliente 2","email":"cliente2@gmail.com"},{"id":3,"nome":"Cliente 3","email":"cliente3@gmail.com"},{"id":4,"nome":"Cliente 4","email":"cliente4@gmail.com"},{"id":5,"nome":"Cliente 5","email":"cliente5@gmail.com"}]
Consisting of all registered customers in our mocks structure, showing that our service is working properly. To test the method that returns one particular customer from a id, we can enter a URL like the one below:
That returns a JSON with the customer data:
{"id":3,"nome":"Cliente 3","email":"cliente3@gmail.com"}
Similarly, to test if the product service is functioning properly, please call the URL:
Which produces the following result in JSON:
[{"id":1,"sku":"abcd1","descricao":"Produto1"},{"id":2,"sku":"abcd2","descricao":"Produto2"},{"id":3,"sku":"abcd3","descricao":"Produto3"},{"id":4,"sku":"abcd4","descricao":"Produto4"}]
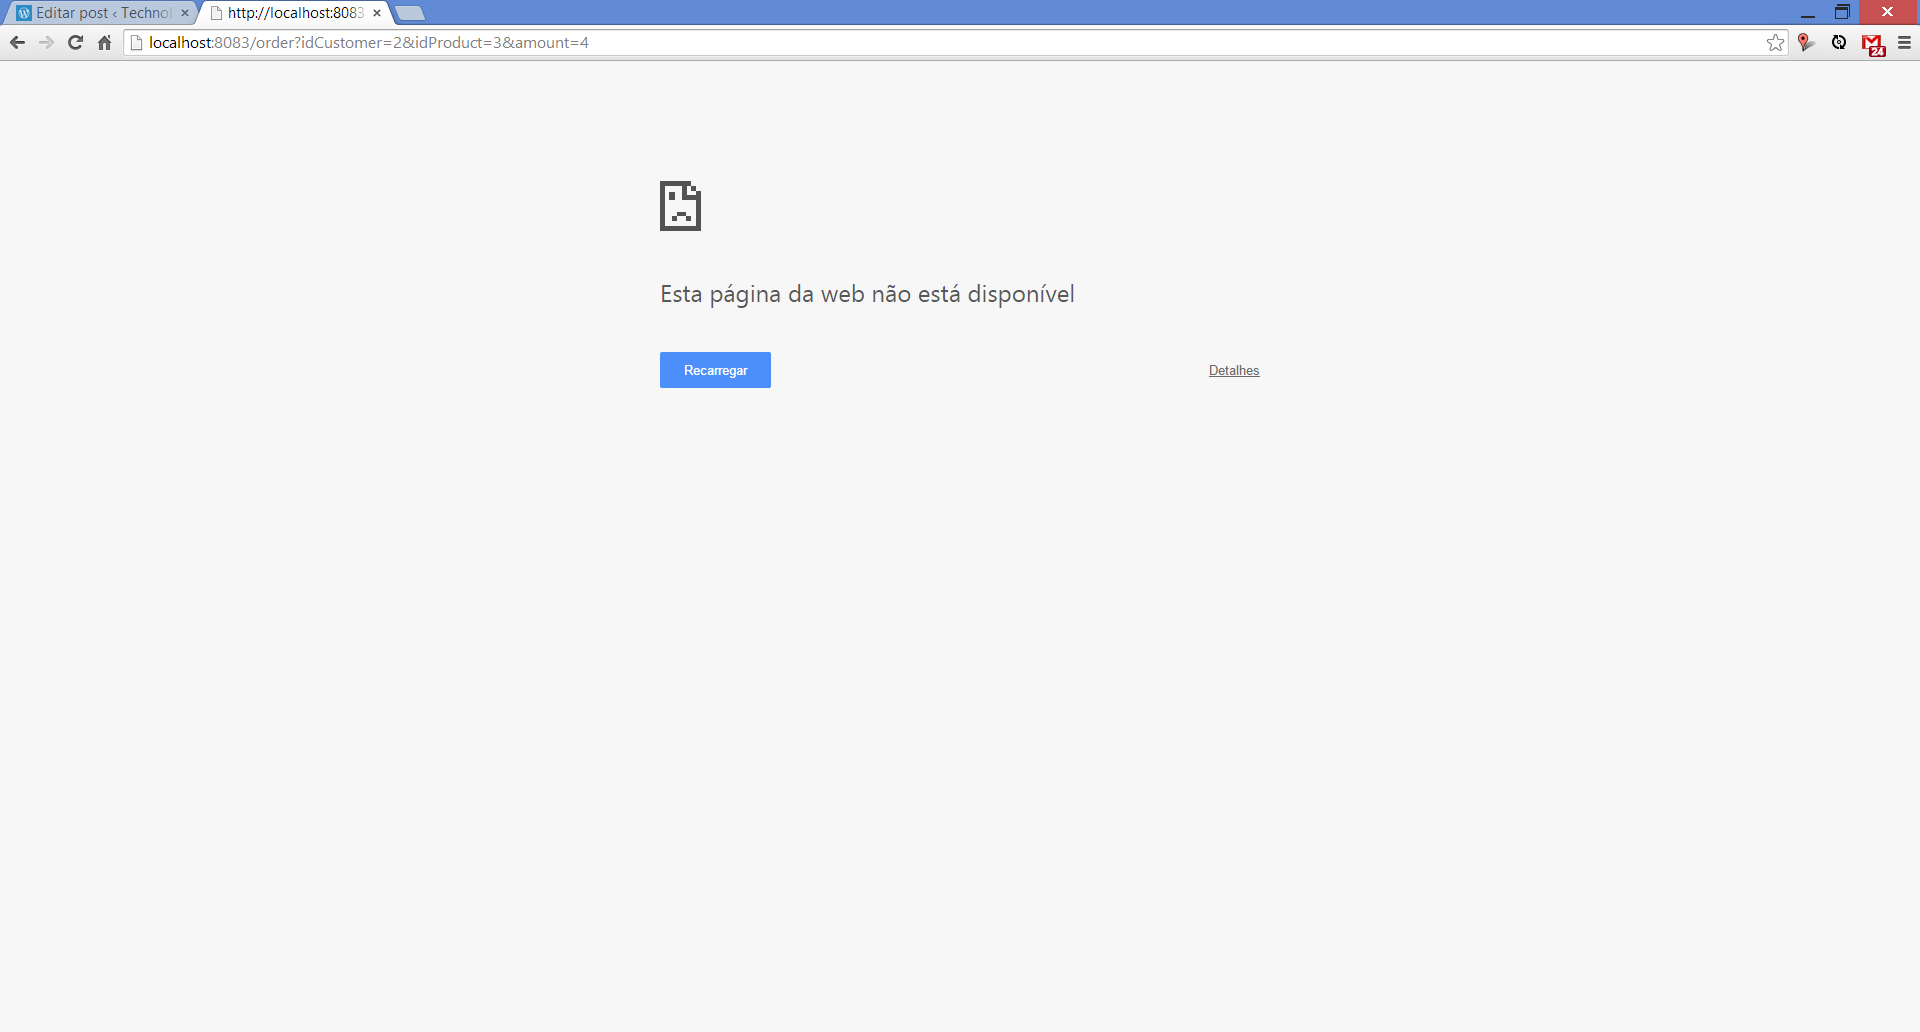
Finally, to test the functionality of the order service we make a call, which through, for example, we simulate a order in which a customer of ID 2 wants the product of ID 3, and the amount of 4:
http://localhost:8083/order?idCustomer=2&idProduct=3&amount=4
We produce the following JSON, representing the header of a order effected:
{"id":1,"amount":4,"orderDate":1419530726399,"customer":{"id":2,"name":"Cliente 2","email":"customer2@gmail.com"},"product":{"id":3,"sku":"abcd3","description":"Produto3"}}
At this point, the reader may notice a bug in our order service: subsequent calls will generate the same orders with the same IDs! This is due to our mock variable that generates the ids be declared as a global variable that is recreated every new instance of the class. As REST services have request scope, every request generates a new instance, which means that the variable is never incremented through the calls. One of the simplest ways of fixing this bug is declaring the variable as static, but before we do that, let’s take a moment to think like the fact that we have implemented our services as microservices – yes, they are microservices! – Can help us in our maintenance:
– If we were in a traditional implementation, each of these components would be a jar file encapsulated within a client application such as a web application (WAR);
– Thus, for fixing this bug, and correcting the order code, we would also redeploy the product code, the customer code and the web application itself! The advantages become even more apparent if we consider that the application would have many more features in addition to the problematic one, which would make the redeploy of all the others, causing a complete unavailability of our system during reimplantation;
So, having realized the advantages of our construction format, we will initiate the maintenance. During the procedure, we will make the stop and restart of our order service in order to demonstrate how microservices do not affect each other’s availability.
To begin our maintenance, we will terminate the Spring Boot process of our order service. To do this, we simply select the corresponding console window and terminate it. If we call the URL of the order service, we have the following error message, indicating the unavailability:
However, if we try to call the product and customer services, we see that both are operational, proving the independence thereof.
Then we make the maintenance, changing the variable to the static type:
.
.
.
private static long id = 1;
.
.
.
Finally, we make a restart of the order service, with the implemented correction. If we run several calls to the URL of the service, we see that the service is generating orders with different IDs, proving that the fix was a success:
{"id":9,"amount":4,"orderDate":1419531614702,"customer":{"id":2,"name":"Cliente 2","email":"customer2@gmail.com"},"product":{"id":3,"sku":"abcd3","description":"Produto3"}}
We realize, with this simple example, that the microservices architecture brought us a powerful solution: you can stop, correct / evolve and start new versions of the components, without thereby requiring the redeployment of the whole system and its totally unavailable. Not to mention, that since we are using standard protocols such as HTTP to communicate, we could even use other technologies, like C# for example, to make a web front-end to our system.
Going beyond
Recently, I published a new post about microservices, where I demonstrate a evolution of this example, using a service registry to implement service discovery. Please, check it out the post here, I hope the reader will found very interesting!
Conclusion
And so we conclude our hands-on. With a simple but powerful implementation, Spring Boot is a good option to implement a microservices architecture that must be evaluated throughout every Java architect or developer who wants to promote this model in his projects. Thanks to everyone who supported me in this hands-on, until next time.
Article: “API-Centric Architecture: SOA Gives Way to Micro Services”

Reblogged this on Dinesh Ram Kali..
LikeLike
It was a nice project but it is not working properly on every port it is showing only the details of client
LikeLike
How to deploy it using tomcat
can you plz mail me at makhijanaresh@hotmail.com
it will be really helpful
Thanks in advance
LikeLike
Hi Naresh! Please post your questions here so all can benefit from it, thank you
LikeLike
Great tutorial. Thank you
LikeLike
Thank you for your feedback, hope you enjoy other articles from me as well =)
LikeLike
Very Good explanation! Thank you for this tutorial
LikeLike
It was just awesome.I’m new to microservices world but this article explained me in best way to microservices. just one doubt I could not find any diffence in code part between OrderRest.java before and after changing the id variable to static. Please correct me if I am missing any point .
LikeLike
Simply This is good one and in the same way if it is possible create Single Sign On (SSO).
—-Rico
LikeLike