MongoDB aggregations: making powerful data-driven applications on MongoDB

Standard

Hello, dear readers! Welcome to my blog. On this post, we will talk about MongoDB aggregations, and how it could help us on developing powerful applications.

NoSQL

NoSQL (non-SQL) stands for databases that uses mechanisms that differ from traditional relational DBs. NoSQL DBs implement eventual consistency, which means there’s no read-after-write guarantee – but with clustering techniques, it is not typically a big deal – but with good clustering support, allows us to deploy robust databases with horizontal scalability and excellent performance, specially for data retrieval.

MongoDB

MongoDB is one of these databases that are classified as as NoSQL. It is document-based, meaning the data is stored as JSON-like objects (called BSONs, that internally are serialized as bytes to storage compression) in groups called collections, that are kind like tables in a database.

Used on thousands of companies across the globe, is one of the most popular NoSQL solutions around the world. It also provides a PAAS solution, called MongoDB Atlas.

Aggregations

Aggregations allows us to make operations upon data, like filtering, grouping, sums, counting, etc. At the end of the aggregation pipeline, we have our final, transformed, dataset with the results we want.

A good analogy to think about MongoDB aggregations is to imagine a conveyor belt in a factory. In this analogy, data are like parts been constructed in a factory: they got different construction stages, such as soldering, post manufactoring, etc. In the end, we have a finished part, ready to be shipped.

Now that we have the concepts effectively grasped, let’s begin to dive on the code!

Lab Setup

First, we need a dataset to make our aggregations. For this lab, we will use a dataset from fivethirtyeight, a popular site with public datasets for use in machine learning projects.

We will use a dataset containing lists of comic book characters from DC and Marvel up to 2014, compiled with their first appearance month/year and number of appearances since their debuts. The dataset is uploaded at the lab’s Github repository, and also can be found here.

The dataset comes in the format of two csv files. To import to MongoDB, we will use mongoimport. This link from Mongo’s documentation instruct how to install Mongo’s database tools.

We will use Docker to instantiate MongoDB database. In the repository we have a Docker Compose file ready to use to create the DB, by running:

docker-compose up -d

After that, we can connect to Mongo using Mongo Shell, by typing:

mongo

Next, let’s add the csvs to a new database called comic-book by inputing (from the project’s root folder):

mongoimport --db comic-book --collection DC --type csv --headerline --ignoreBlanks --file ./data/dc_wiki.csv
mongoimport --db comic-book --collection Marvel --type csv --headerline --ignoreBlanks --file ./data/marvel_wiki.csv

After running, in the shell, we can check everything was imported by running the following commands:

use comic-book
db.DC.findOne()
db.Marvel.findOne()

This would produce results like the following:

Let’s now understanding the meaning of our dataset’s fields. As stated in the dataset’s repository, the fields are:

VariableDefinition
page_idThe unique identifier for that characters page within the wikia
nameThe name of the character
urlslugThe unique url within the wikia that takes you to the character
IDThe identity status of the character (Secret Identity, Public identity, [on marvel only: No Dual Identity])
ALIGNIf the character is Good, Bad or Neutral
EYEEye color of the character
HAIRHair color of the character
SEXSex of the character (e.g. Male, Female, etc.)
GSMIf the character is a gender or sexual minority (e.g. Homosexual characters, bisexual characters)
ALIVEIf the character is alive or deceased
APPEARANCESThe number of appareances of the character in comic books (as of Sep. 2, 2014. Number will become increasingly out of date as time goes on.)
FIRST APPEARANCEThe month and year of the character’s first appearance in a comic book, if available
YEARThe year of the character’s first appearance in a comic book, if available

Now that we have our data ready, let’s begin aggregating!

Our first aggregations

For this lab, we will use Python 3.6. As a first example, let’s search for all Flashes there is on DC comics. For this, we create a generic runner structure, composed of a main script:

import re

from aggregations.aggregations import run


def main():
    run('DC', [{
        '$match': {
            'name': re.compile(r"Flash")
        }
    }])


if __name__ == "__main__":
    main()

And a generic aggregation runner, where we pass the pipeline to be executed as a parameter:

from pymongo import MongoClient
import pprint

client = MongoClient('mongodb://localhost:27017/?readPreference=primary&appname=MongoDB%20Compass&ssl=false')


def run(collection, pipeline):
    result = client['comic-book'][collection].aggregate(
        pipeline
    )

    pprint.pprint(list(result))

After running it, we will get the following results:

[{'ALIGN': 'Good Characters',
  'ALIVE': 'Living Characters',
  'APPEARANCES': 1028,
  'EYE': 'Blue Eyes',
  'FIRST APPEARANCE': '1956, October',
  'HAIR': 'Blond Hair',
  'ID': 'Secret Identity',
  'SEX': 'Male Characters',
  'YEAR': 1956,
  '_id': ObjectId('60358560856a9437c0892dfa'),
  'name': 'Flash (Barry Allen)',
  'page_id': 1380,
  'urlslug': '\\/wiki\\/Flash_(Barry_Allen)'},
 {'ALIGN': 'Good Characters',
  'ALIVE': 'Living Characters',
  'APPEARANCES': 14,
  'FIRST APPEARANCE': '2008, August',
  'SEX': 'Male Characters',
  'YEAR': 2008,
  '_id': ObjectId('60358560856a9437c08934ac'),
  'name': 'Well-Spoken Sonic Lightning Flash (New Earth)',
  'page_id': 87335,
  'urlslug': '\\/wiki\\/Well-Spoken_Sonic_Lightning_Flash_(New_Earth)'},
 {'ALIGN': 'Neutral Characters',
  'ALIVE': 'Living Characters',
  'APPEARANCES': 12,
  'FIRST APPEARANCE': '1998, June',
  'SEX': 'Male Characters',
  'YEAR': 1998,
  '_id': ObjectId('60358560856a9437c08935ac'),
  'name': 'Black Flash (New Earth)',
  'page_id': 22026,
  'urlslug': '\\/wiki\\/Black_Flash_(New_Earth)'},
 {'ALIGN': 'Bad Characters',
  'ALIVE': 'Living Characters',
  'APPEARANCES': 3,
  'FIRST APPEARANCE': '2007, November',
  'ID': 'Secret Identity',
  'SEX': 'Male Characters',
  'YEAR': 2007,
  '_id': ObjectId('60358560856a9437c0893f36'),
  'name': 'Bizarro Flash (New Earth)',
  'page_id': 32435,
  'urlslug': '\\/wiki\\/Bizarro_Flash_(New_Earth)'},
 {'ALIGN': 'Good Characters',
  'ALIVE': 'Living Characters',
  'EYE': 'Green Eyes',
  'FIRST APPEARANCE': '1960, January',
  'HAIR': 'Red Hair',
  'ID': 'Secret Identity',
  'SEX': 'Male Characters',
  'YEAR': 1960,
  '_id': ObjectId('60358560856a9437c08948d3'),
  'name': 'Flash (Wally West)',
  'page_id': 1383,
  'urlslug': '\\/wiki\\/Flash_(Wally_West)'}]

Lol, that’s a lot of Flashes! However, we also got some villains together, such as the strange Bizarro Flash. let’s improve our pipeline by filtering to only show the good guys:

[{
        '$match': {
            'name': re.compile(r"Flash ", flags=re.IGNORECASE),
            'ALIGN': 'Good Characters'
        }
    }]

If we run again, we can see characters such as Bizarro Flash no longer exist in our results.

We also had our first glance at our first pipeline stage, $match. This stage allows us to filter our results, by using the same kind of filtering expressions we can use in normal searches.

In MongoDB’s aggregations, an aggregation pipeline is composed of stages, which are the items inside an array that will be executed by Mongo. The stages are executed from first to last item in the array, with the output of one stage servings as input for the next.

As an example of how a pipeline can have multiple stages and how each stage handles the data from the previous one, let’s use another stage, $project. Project allows us to create new fields by applying operations to it (more in a minute) and also allow us to control which fields we want on our results. Let’s remove all other fields except for the name and first appearance to see this in practice:

[{
        '$match': {
            'name': re.compile(r"Flash ", flags=re.IGNORECASE),
            'ALIGN': 'Good Characters'
        }
    },
    {
        '$project': {
            'FIRST APPEARANCE': 1, 'name': 1, '_id': 0
        }
    }]

When defining which fields to maintain, we use 1 to define a field to be maintained and 0 to define fields that won’t be maintained (only the defined fields will be maintained, the only field we need to use 0 to define we don’t want is the object’s ID field, so we set 0 only for him).

This produces the following:

[{'FIRST APPEARANCE': '1956, October', 'name': 'Flash (Barry Allen)'},
 {'FIRST APPEARANCE': '2008, August',
  'name': 'Well-Spoken Sonic Lightning Flash (New Earth)'},
 {'FIRST APPEARANCE': '1960, January', 'name': 'Flash (Wally West)'}]

Now, let’s make another aggregation. In our dataset, the first appearance is a string following this pattern:

<year> , <month>

Not only that, we also have some “dirty” data, as there is records without this field, or records with just the year in numerical format. We need to do some cleaning, using just characters we have the information and transform the data to a standard numerical field, in order to make it more useful for our use cases.

Now, let’s say we want to know the names of all characters created in the comics silver age (a time-period that goes from 1956 to 1970). To do this, first we create a field with the first appearance’s year, like we said before, and then use the new field to filter only silver age characters.

We already have a field with the year properly defined on the dataset, but for exercise’s sake, let’s suppose we had only this string-formatted field available, in order to examine more features and simulate real-world scenarios where many times data has formatting and correctness issues.

Let’s begin by creating our new field:

[
        {
        '$match': {
            'FIRST APPEARANCE': {'$exists': True}
        }
        },
        {
            '$project': {
                '_id': 0,
                'name': 1,
                'year': {'$toInt': {'$arrayElemAt': [{'$split': [{'$toString': '$FIRST APPEARANCE'}, ","]}, 0]}}
            }
        }
    ]

Lol, that’s some transforming! We filter the records to just use the ones that have the field, and in project stage we make conversions to allows us to extract the year from the field and convert him to a number. This produces something like this fragment:

 ...
 {'name': 'Tempus (New Earth)', 'year': 1997},
 {'name': 'Valkyra (New Earth)', 'year': 1997},
 {'name': 'Spider (New Earth)', 'year': 1997},
 {'name': 'Vayla (New Earth)', 'year': 1997},
 {'name': 'Widow (New Earth)', 'year': 1997},
 {'name': "William O'Neil (New Earth)", 'year': 1997},
 {'name': 'Arzaz (New Earth)', 'year': 1996},
 {'name': 'Download II (New Earth)', 'year': 1996}
...

With everything transformed, we only need to filter the year to get our silver age characters:

        [{
            '$match': {
                'FIRST APPEARANCE': {'$exists': True}
            }
        },
        {
            '$project': {
                '_id': 0,
                'name': 1,
                'year': {'$toInt': {'$arrayElemAt': [{'$split': [{'$toString': '$FIRST APPEARANCE'}, ","]}, 0]}}
            }
        },
        {
            '$match': {
                'year': {"$gte": 1956, "$lte": 1970}
            }
        }]

This produces the following list (just a fragment, due to size):

[{'name': 'Dinah Laurel Lance (New Earth)', 'year': 1969},
 {'name': 'Flash (Barry Allen)', 'year': 1956},
 {'name': 'GenderTest', 'year': 1956},
 {'name': 'Barbara Gordon (New Earth)', 'year': 1967},
 {'name': 'Green Lantern (Hal Jordan)', 'year': 1959},
 {'name': 'Raymond Palmer (New Earth)', 'year': 1961},
 {'name': 'Guy Gardner (New Earth)', 'year': 1968},
 {'name': 'Garfield Logan (New Earth)', 'year': 1965},
 {'name': 'Ralph Dibny (New Earth)', 'year': 1960},
...

Talking about big lists, one feature that is good to keep in mind when aggregating datasets, is that there is a memory limit imposed by MongoDB for doing in-memory aggregation (the default behavior). To allow MongoDB to use disk swap when aggregating, we add the following option when running the pipeline:

result = client['comic-book'][collection].aggregate(
        pipeline, allowDiskUse=True
    )

By running again, we can see everything is still working as expected.

We also can notice the results are not sorted. To sort by the name, we can add a $sort stage:

        [{
            '$match': {
                'FIRST APPEARANCE': {'$exists': True}
            }
        },
        {
            '$project': {
                '_id': 0,
                'name': 1,
                'year': {'$toInt': {'$arrayElemAt': [{'$split': [{'$toString': '$FIRST APPEARANCE'}, ","]}, 0]}}
            }
        },
        {
            '$match': {
                'year': {"$gte": 1956, "$lte": 1970}
            }
        },
        {
            '$sort': {
                'name': 1
            }
        }]

The $sort stage receives fields definitions, where 1 means ascending order and -1 means descending. After running, we can see the results were sorted:

[{'name': 'Abel (New Earth)', 'year': 1969},
 {'name': 'Abel Tarrant (New Earth)', 'year': 1963},
 {'name': 'Abin Sur (New Earth)', 'year': 1959},
 {'name': 'Abnegazar (New Earth)', 'year': 1962},
 {'name': 'Abner Krill (New Earth)', 'year': 1962},
 {'name': 'Ace Arn (New Earth)', 'year': 1965},
 {'name': 'Ace Chance (New Earth)', 'year': 1966},
 {'name': 'Achilles Milo (New Earth)', 'year': 1957},
 {'name': 'Adam Strange (New Earth)', 'year': 1958},
 {'name': 'Agantha (New Earth)', 'year': 1964},
 {'name': 'Ahk-Ton (New Earth)', 'year': 1965},
 {'name': 'Alanna Strange (New Earth)', 'year': 1958},
 {'name': 'Albert Desmond (New Earth)', 'year': 1958},
 {'name': 'Albrecht Raines (New Earth)', 'year': 1958},
 {'name': 'Alpheus Hyatt (New Earth)', 'year': 1962},
 {'name': 'Aluminum (New Earth)', 'year': 1963},
 {'name': 'Amazo (New Earth)', 'year': 1960},
 {'name': 'Amos Fortune (New Earth)', 'year': 1961},
 {'name': 'Anais Guillot (New Earth)', 'year': 1959},
...

Now, let’s suppose we just wanted to count how many characters from silver age are on DC, not know their names or any other data. We could do this by adding a $count stage:

[{
            '$match': {
                'FIRST APPEARANCE': {'$exists': True}
            }
        },
        {
            '$project': {
                '_id': 0,
                'name': 1,
                'year': {'$toInt': {'$arrayElemAt': [{'$split': [{'$toString': '$FIRST APPEARANCE'}, ","]}, 0]}}
            }
        },
        {
            '$match': {
                'year': {"$gte": 1956, "$lte": 1970}
            }
        },
        {
            '$count': 'total'
        }]

Count only ask us to define a name for the count. This would produce the following:

[{'total': 556}]

Grouping data together

Let’s start using Marvel collection now. To know how many characters there are in Marvel according to their aligns (neutral, good or bad), we use a $group stage to group the data by the align and use a accumulator to count the characters:

[
        {
            '$match': {
                'ALIGN': {'$exists': True}
            }
        },
        {
            '$group': {
                '_id': '$ALIGN',
                'count': {'$sum': 1}
            }
        }
    ]

Yes, is simple as that! This produces the following:

[{'_id': 'Good Characters', 'count': 4636},
 {'_id': 'Bad Characters', 'count': 6720},
 {'_id': 'Neutral Characters', 'count': 2208}]

Now, let’s try a different example. We want to count all characters created by Marvel, breaking down by decade.

To make this grouping, we will use the $bucket stage, as follows:

[{
            '$bucket': {
                'groupBy': "$Year",
                'boundaries': [1930, 1940, 1950, 1960, 1970, 1980, 1990, 2000, 2010, 2020],
                'default': "Unknown",
                'output': {
                    'count': {'$sum': 1}
                }
            }
        }]

Here we have a groupBy field to define which field to use as bucket selector. We define boundaries for the buckets and a default in case a bucket can’t be defined. Finally, we have an output, where we define aggregators to be executed for each bucket.

This produces the following results:

[{'_id': 1930, 'count': 69},
 {'_id': 1940, 'count': 1441},
 {'_id': 1950, 'count': 302},
 {'_id': 1960, 'count': 1306},
 {'_id': 1970, 'count': 2234},
 {'_id': 1980, 'count': 2425},
 {'_id': 1990, 'count': 3657},
 {'_id': 2000, 'count': 3086},
 {'_id': 2010, 'count': 1041},
 {'_id': 'Unknown', 'count': 815}]

Another type of bucketing is by using the $bucketAuto stage. This stage allows us to let MongoDB do the grouping for us, without needing to define the boundaries. Let’s try it out with DC:

[{
            '$bucketAuto': {
                'groupBy': "$YEAR",
                'buckets': 10,
                'output': {
                    'count': {'$sum': 1}
                }
            }
        }]

This produces:

[{'_id': {'max': 1965, 'min': None}, 'count': 702},
 {'_id': {'max': 1981, 'min': 1965}, 'count': 703},
 {'_id': {'max': 1987, 'min': 1981}, 'count': 779},
 {'_id': {'max': 1990, 'min': 1987}, 'count': 806},
 {'_id': {'max': 1994, 'min': 1990}, 'count': 707},
 {'_id': {'max': 1998, 'min': 1994}, 'count': 779},
 {'_id': {'max': 2004, 'min': 1998}, 'count': 791},
 {'_id': {'max': 2008, 'min': 2004}, 'count': 752},
 {'_id': {'max': 2011, 'min': 2008}, 'count': 716},
 {'_id': {'max': 2013, 'min': 2011}, 'count': 161}]

By default, Mongo will try to spread the buckets the more evenly as possible. We can define a field called granularity to better restrict how we want to group:

[{
            '$match': {
                'YEAR': {'$exists': True}
            }
        },
        {
            '$bucketAuto': {
                'groupBy': '$YEAR',
                'buckets': 10,
                'granularity': 'E192',
                'output': {
                    'count': {'$sum': 1}
                }
            }
        }]

This defines a preferred time series to round the buckets and calculate the edges. More info can be found at the documentation. One important thing to note is that granularity must only be used on numeric buckets and must not contain data without the field (that’s why we introduced the filter).

This produces:

[{'_id': {'max': 1980.0, 'min': 1930.0}, 'count': 1300},
 {'_id': {'max': 2000.0, 'min': 1980.0}, 'count': 3429},
 {'_id': {'max': 2030.0, 'min': 2000.0}, 'count': 2098}]

Faceting & persisting the results

Now, let’s make a report where we have some of our previous aggregations grouped in a single result, like a report. We can do this by creating facet stages, which act like independent pipelines that will be grouped as a single result at the end.

This can be achieved by adding the following facets:

[
        {
            '$facet': {
                'Silver age characters': [
                    {
                        '$match': {
                            'FIRST APPEARANCE': {'$exists': True}
                        }
                    },
                    {
                        '$project': {
                            '_id': 0,
                            'name': 1,
                            'year': {
                                '$toInt': {'$arrayElemAt': [{'$split': [{'$toString': '$FIRST APPEARANCE'}, ","]}, 0]}}
                        }
                    },
                    {
                        '$match': {
                            'year': {"$gte": 1956, "$lte": 1970}
                        }
                    },
                    {
                        '$sort': {
                            'name': 1
                        }
                    }
                ],
                'Characters by decade': [
                    {
                        '$bucket': {
                            'groupBy': "$YEAR",
                            'boundaries': [1930, 1940, 1950, 1960, 1970, 1980, 1990, 2000, 2010, 2020],
                            'default': "Unknown",
                            'output': {
                                'count': {'$sum': 1}
                            }
                        }
                    }
                ]
            }
        }
    ]

This produces results like the following, running for DC:

[{'Characters by decade': [{'_id': 1930, 'count': 42},
                           {'_id': 1940, 'count': 268},
                           {'_id': 1950, 'count': 121},
                           {'_id': 1960, 'count': 453},
                           {'_id': 1970, 'count': 416},
                           {'_id': 1980, 'count': 1621},
                           {'_id': 1990, 'count': 1808},
                           {'_id': 2000, 'count': 1658},
                           {'_id': 2010, 'count': 440},
                           {'_id': 'Unknown', 'count': 69}],
  'Silver age characters': [{'name': 'Abel (New Earth)', 'year': 1969},
                            {'name': 'Abel Tarrant (New Earth)', 'year': 1963},
                            {'name': 'Abin Sur (New Earth)', 'year': 1959},
                            {'name': 'Abnegazar (New Earth)', 'year': 1962},
                            {'name': 'Abner Krill (New Earth)', 'year': 1962},
                            {'name': 'Ace Arn (New Earth)', 'year': 1965},
...

Now, what if we wanted to persist this report, without having to resort to -re-run the aggregation? For this, we add a $out stage, which persist the aggregation’s results on a collection. Let’s change our pipeline like this:

[
        {
            '$facet': {
                'Silver age characters': [
                    {
                        '$match': {
                            'FIRST APPEARANCE': {'$exists': True}
                        }
                    },
                    {
                        '$project': {
                            '_id': 0,
                            'name': 1,
                            'year': {
                                '$toInt': {'$arrayElemAt': [{'$split': [{'$toString': '$FIRST APPEARANCE'}, ","]}, 0]}}
                        }
                    },
                    {
                        '$match': {
                            'year': {"$gte": 1956, "$lte": 1970}
                        }
                    },
                    {
                        '$sort': {
                            'name': 1
                        }
                    }
                ],
                'Characters by decade': [
                    {
                        '$bucket': {
                            'groupBy': "$YEAR",
                            'boundaries': [1930, 1940, 1950, 1960, 1970, 1980, 1990, 2000, 2010, 2020],
                            'default': "Unknown",
                            'output': {
                                'count': {'$sum': 1}
                            }
                        }
                    }
                ]
            }
        },
        {'$out': 'DC-reports'}
    ]

After running, we can check the DB for the persisted data:

IMPORTANT: All data on the collection will be deleted and replaced by the aggregation’s results upon re-running!

Conclusion

And that concludes our quick tour on MongoDB’s aggregations. Of course, this is just a taste of what we are capable of with the framework. I suggest reading the documentation for learning more features, such as $lookup, that allows us to left-join collections.

With a simple and intuitive interface, is a very robust and powerful solution, that must be explored. Thank you for following me on one more article, until next time.

Akka Streams: developing robust applications using Scala

Standard

Hi, dear readers! Welcome to my blog. A long time ago, I wrote a post about the actor model and how to use Akka to implement solutions using actors. If the reader doesn’t read the post, it can be found here. Now, more than 4 years later – how fast time goes! – it is time to revisit this world, with a much better understanding and maturity. At the time, I used good old Java to do the task.

There’s nothing wrong with using Java, but if you really want to delve on Akka, then Scala is the language of choice, especially if we want to use Akka, a project specially tailored to develop data flows that could do tasks such as system integrations.

With non-blocking IO and parallelism embedded at his core – and encouraged to be used on our custom code by following their good practices! – Akka streams allow us to develop really fast applications that can easily scale. From my personal experience, it is a  specially good option for integrating with Apache Kafka.

So, without further delay, let’s begin our journey!

Actor Model

The actor model was already explained in my previous post so we won’t waste much time with this explanation. To sum it up, we have a system where actors work with each other asynchronously, creating a system where tasks are broken down on multiple steps by different actors, each one of them communicating by a personal queue (mailbox) that enqueues messages to be processed by the actors. This way, we have a scalable solution, where tasks are done in parallel.

Akka quick recap

Actors

Actors are the core components of an actor system. An actor consists of a program unit that implements logic based on messages it receives from his mailbox.

When developing Akka applications on Scala, an actor must implement a receive method, where will create logic for different types of messages it can receive. Each time a message arrives at the mailbox, the dispatcher delivers the message to the actor. It is important to notice it, however, that it is the actor which asks for the next message, as it completes processing the current message – by default, each actor process just one message a time -, this way avoiding an actor to be overloaded. This technique is called back-pressure, which we will talk more about it in the next sections.

ActorSystem

The actor system comprehends the whole actor solution. It is composed of actors, dispatchers, and mailboxes.

Applications can have multiple actor systems inside. Also, it is possible to define actor systems to be linked together remotely, forming a cluster.

Execution Context (Dispatchers)

Execution contexts, also known as dispatchers, are responsible for serving actors with messages by delivering the messages to the mailboxes.

Dispatchers are also responsible for allocating the actors themselves, including details such as parallel actor execution, using strategies such as thread pools, for example. A dispatcher can be defined globally for the whole system or defined at actor level.

An important note regarding performance with dispatchers is that they run the actors inside thinner layers that are memory-optimized, so memory consumption inside Akka solutions is lower than in traditional Java applications.

One interesting thing to notice on actor instantiation is how Akka treats actor references. When asking for an actor to be created inside a system, Akka will create an actor reference, which can be used to send messages to it.

These messages are sent using remote calls, even when the actor system is been used all locally. This guarantees that when using actor systems remotely, such as in a cluster, for example, there will be no difference in the code.

Mailboxes are, like the name suggests, repositories to messages that it will be processed by actors. Mailboxes can have different strategies to treat messages, such as unbounded lists, single and multi-consumer, priority queues and more.

Actor Supervisors & Lifecycle

When creating actors, we can create them at the system level or create them inside another actor. When creating inside an actor, we call the parent actor a Supervisor and the actors created inside are called Child Actors (when creating an actor at the system level, also known as Top-level Actors, they also are child actors, in this case from a reserved actor from Akka itself).

Every actor has a lifecycle: it can be started, on which case is running, stopped when an unrecoverable failure occurs and restarted or resumed, depending on the circumstances of the failure.

Supervisors are actors responsible for deciding for their child actors what to do when one of them faces a failure. It is possible to simply stop the actor, restart him, or resume (the main difference between restart and resume is that resources are freed on a restart, while on a resume the actor simply resumes his execution).

These decisions are called Supervisor Policies. These policies can also be set to behavior as one-for-one or all-for-one, meaning that when an error occurs on one child actor, the policy will be applied to all actors bellow (for example, all actors would restart) or just to the failed actor.

And that concludes our quick recap of Akka. Now, let’s begin our talk about Akka Stream.

Stream concepts

A stream is composed of tasks that must be done – continuously or not – in order to do a process. Each stream must have a Source, which is the beginning, a Flow composed of multiple tasks that can run at parallel depending on the needs and a Sink, which is the stream’s end.

Actor materialization

Akka Streams runs on top of Akka. That means when a stream is started, internally Akka Streams creates an actor system with actors responsible for running the tasks of the stream.

The responsibility for doing this task is of the Actor Materializer, that creates (materializes) the resources need to run the stream. One interesting thing is that it is possible to explicitly define materializing points on our flow.

These points are used by Akka streams to define points where it will group the tasks from the flow to run on separated actors, so it is a good technique to keep it in mind when doing stream tunning.

Sources

Sources are flow’s beginnings. A source is used for defining an entrypoint for data, be a finite datasource, such as a file, to an infinite one, such as a Kafka topic, for example. It is possible to zip multiple source definitions on a single combined source for processing, but still, a flow can have only one source.

Flows

Flows are the middle of the stream. One flow can have an infinite number of tasks (steps), that range from data transformation to enrichment by calling external resources.

Sinks

Sinks are flow’s endings. Analogous to sources, sinks can have multiple types of destinations, such as files, Kafka topics, REST endpoints, etc. Likewise the source, flows can also have only one sink.

Graphs

When modeling an Akka stream, as seen previously, we define a source, a sink and several flows in between. All of this generates a graph, where each node represents a task on the stream.

When instantiating a stream, a runnable graph is created, which represents a blueprint for executions. After executing the stream with the run() method for example (there’s also a runWith(Sink) method that accepts a sink as a parameter) the runnable graph is materialized and executed.

During our lab, we will see Graph Stages. Graph stages are like “boxes” that group tasks together, making them look like a single node in the final graph.

Back-pressure

One very important concept when learning about Akka streams is back-pressure. Typically, on a producer-consumer architecture, the producer will keep sending data to the consumer, without really knowing if the consumer is capable of keeping it up with the load or not. This can create a problem where a producer overloads a consumer, generating all kinds of errors and slowness.

With back-pressure, this approach is reversed. Now, it is the consumer that dictates when to receive a new message, by pulling new data at his rhythm. while no new message is asked, the producer keeps waiting for a signal and only then it starts pushing messages again.

The image below illustrates the concept in action:

graph_stage_conceptual

Stream error handling

Of course, just like with an actor system, streams also can fail. Just like with actors, error handling is also done with supervisors, that defines policies for a stream to resume, stop or restart depending on the error.

Streams also support a recovery configuration, that allows us, for example, to chain another stream execution in case of error after several retries.

Alpakka project

The Alpakka project is an integration library composed of several components that allow us to quickly deploy integrations between several technologies, such as files, REST endpoints and even AWS technologies such as Amazon Kinesis. During the course of our lab, we will use resources from this project, so stay tuned for more!

The project documentation can be found in:

https://developer.lightbend.com/docs/alpakka/current/

Lab

Pre-requisites

So, without further delay, let’s begin! This lab requires that the reader already have some knowledge of Scala and Akka. On my blog, it is possible to read my previous post on Akka, alongside my series about the Scala language.

Creating the project & infrastructure code

To create the project, let’s begin by just creating the sbt file that will hold our project’s dependencies.  We will start by creating a folder that will hold our project (all sources for the lab can be found here) and type the following on a file called build.sbt:

name := "Akka-stream-lab"
version := "1.0"
scalaVersion := "2.12.5"

enablePlugins(JavaAppPackaging)

mainClass in Compile := Some("Main")

lazy val Versions = new {
  val akkaVersion = "2.5.11"
}

lazy val akkaDependencies = Seq(
  "com.lightbend.akka" %% "akka-stream-alpakka-csv" % "0.8",
  "com.typesafe.akka" %% "akka-stream-kafka" % "0.22",
  "com.typesafe.akka" %% "akka-actor" % Versions.akkaVersion,
  "com.typesafe.akka" %% "akka-stream" % Versions.akkaVersion,
  "com.typesafe.akka" %% "akka-slf4j" % Versions.akkaVersion,
  "com.typesafe.akka" %% "akka-testkit" % Versions.akkaVersion % Test,
  "com.typesafe.akka" %% "akka-stream-testkit" % Versions.akkaVersion % Test,
  "com.typesafe.akka" %% "akka-testkit" % Versions.akkaVersion % Test
)

lazy val testDependencies = Seq(
  "org.scalacheck" %% "scalacheck" % "1.13.4" % Test,
  "org.scalamock" %% "scalamock" % "4.1.0" % Test,
  "org.mockito" % "mockito-core" % "2.19.0" % Test,
  "org.scalatest" %% "scalatest" % "3.0.5" % Test
)

lazy val loggingDependencies = Seq(
  "ch.qos.logback" % "logback-classic" % "1.2.3",
  "com.typesafe.scala-logging" %% "scala-logging" % "3.9.0",
  "org.slf4j" % "slf4j-api" % "1.7.25"
)

lazy val otherDependencies = Seq(
  "io.spray" %% "spray-json" % "1.3.5"
)

libraryDependencies ++= (
  akkaDependencies++
  loggingDependencies++
  testDependencies++
  otherDependencies
  )

As can be seen above, not only we defined a sbt project, but also included dependencies for Akka and logging, alongside Akka Streams itself. We also added a packaging plugin to simplify our use when running the project from command-line.

In order to use the plugin, we need to add it to sbt project’s definition. To do that, we create a project folder and inside create an plugins.sbt file, with the following:


logLevel := Level.Warn

addSbtPlugin("com.typesafe.sbt" % "sbt-native-packager" % "1.3.2")

Finally, we create our main Scala object that will be the App launcher for our project. We create a Scala source folder and add a Main.scala file, containing the following:


import akka.actor.ActorSystem

object Main extends App {
implicit val system: ActorSystem = ActorSystem("akka-streams-lab")
}

Our first version is very simple: It simply creates a new actor system. Of course, during our lab, it will receive more code to evolve to our final solution.

Concluding the setup, this would be the first structure of our project when seen (some other files, such as sbt’s build.properties, are created automatically when running the project using sbt):

Screen Shot 2018-12-23 at 15.44.04

This image is taken from Intellij, which I recommend as the IDE for the lab.

Without spoiling too much, as we can see in our next section, we will need some infrastructure code that will set it up a Kafka cluster for our use in the lab. For this, we will use Docker Compose.

So, let’s begin by creating a docker-compose.yml file, that will create our Kafka cluster. The file will be as follows:


version: '2'
services:
  zookeeper:
    image: wurstmeister/zookeeper:3.4.6
    ports:
      - 2181:2181
  kafka:
    image: wurstmeister/kafka:1.1.0
    ports:
      - 9092:9092
    environment:
      KAFKA_ADVERTISED_HOST_NAME: localhost
      KAFKA_CREATE_TOPICS: "accounts:1:1"
      KAFKA_ZOOKEEPER_CONNECT: zookeeper:2181

In this simple docker-compose file, we create an embedded cluster with a broker node and a Zookeeper node and also create a accounts topic at startup. To test it out our code, with docker up and running, we can start a cluster by running:


docker-compose up -d

Finally, let’s create a logback config file for our logging. To do this, let’s create a file called logback.xml inside resources folder and enter the following:

%d{HH:mm:ss.SSS} [%thread] %-5level %logger{36} – %msg%n

That’s it! now that we have our infrastructure code ready, let’s begin the actual coding.

Lab’s use case

In our lab, we will create 2 streams. One of them will read data from a file and publish to a Kafka topic. The other one will read from this same topic and save the message on other files, this way demonstrating the flow of data from a point A to a point B.

Creating the first stream

Let’s begin by creating the first stream, which is a simple stream that will read data (accounts in our case) from a file and send to Kafka. At first, let’s code the stream in the main code itself and evolve as we develop.

First, we create a file called input1.csv and add the following:

“COD”,”NAME”,”DOCUMENT”,”AGE”,”CIVIL_STATUS”,”PHONE”,”BIRTHDAY”,”HOME_COUNTRY”,”HOME_STATE”,”HOME_CITY”,”HOME_STREET”,”HOME_STREETNUM”,”HOME_NEIGHBORHOOD”
1,”alexandre eleuterio santos lourenco 1″,”43456754356″,36,”Single”,”+5511234433443″,”21/06/1982″,”Brazil”,”São Paulo”,”São Paulo”,”false st”,3134,”neigh 1″
2,”alexandre eleuterio santos lourenco 2″,”43456754376″,37,”Single”,”+5511234433444″,”21/06/1983″,”Brazil”,”São Paulo”,”São Paulo”,”false st”,3135,”neigh 1″

That will be the csv input file for our first stream. Next, we create a case class Account to encapsulate the data from the file:


package com.alexandreesl.model

case class Account(cod: Long, name: String, document: String,
age: Int, civilStatus: String,
                   phone: String, birthday: String,
country: String, state: String,
                   city: String, street: String,
streetNum: Long, neighBorhood: String)

We also create an object to allow JSON marshaling/unmarshalling when sending/receiving messages in Kafka:


package com.alexandreesl.json

import com.alexandreesl.model.Account
import spray.json.DefaultJsonProtocol

object JsonParsing extends DefaultJsonProtocol {

  implicit val accountFormat = jsonFormat13(Account)

}

Finally, we code the stream that reads from the file and publishes to Kafka (don’t you worry, we will refactor later):


import java.nio.file.Paths

import akka.actor.ActorSystem
import akka.kafka.ProducerSettings
import akka.kafka.scaladsl.Producer
import akka.stream.scaladsl.{FileIO, Flow, Framing}
import akka.stream.{ActorMaterializer, ActorMaterializerSettings}
import akka.util.ByteString
import com.alexandreesl.model.Account
import com.typesafe.scalalogging.Logger
import org.apache.kafka.common.serialization.StringSerializer
import org.slf4j.LoggerFactory
import spray.json._
import com.alexandreesl.json.JsonParsing._
import org.apache.kafka.clients.producer.ProducerRecord
object Main extends App {

implicit val system: ActorSystem = ActorSystem("akka-streams-lab")
implicit val materializer: ActorMaterializer = ActorMaterializer(ActorMaterializerSettings(system))
implicit val ec = system.dispatcher
private val logger = Logger(LoggerFactory.getLogger("Main"))
val config = system.settings.config.getConfig("akka.kafka.producer")
val producerSettings =
ProducerSettings(config, new StringSerializer, new StringSerializer)
.withBootstrapServers("localhost:9092")

logger.info("Starting streams...")

private def convertToClass(csv: Array[String]): Account = {
Account(csv(0).toLong,
csv(1), csv(2),
csv(3).toInt, csv(4),
csv(5), csv(6),
csv(7), csv(8),
csv(9), csv(10),
csv(11).toLong, csv(12))
}

private val flow = Flow[String].filter(s => !s.contains("COD"))
.map(line => {
convertToClass(line.split(","))
})

FileIO.fromPath(Paths.get("input1.csv"))
.via(Framing.delimiter(ByteString("\n"), 4096)
.map(_.utf8String))
.via(flow)
.map(value => new ProducerRecord[String, String]("accounts", value.toJson.compactPrint))
.runWith(Producer.plainSink(producerSettings))

logger.info("Stream system is initialized!")

}

As we can see, the code is pretty straight-forward. We just added a stream that reads from a csv file and dispatches the lines to Kafka. To see the messages on Kafka, first, we start the application – don’t forget to run docker compose up first! -, and them we can use a shell inside the broker’s container, as follows:

docker exec -t -i akka-stream-lab_kafka_1 /opt/kafka/bin/kafka-console-consumer.sh –bootstrap-server :9092 –topic accounts –from-beginning

This will produce an output as follows:

{“age”:36,”birthday”:”\”21/06/1982\””,”city”:”\”São Paulo\””,”civilStatus”:”\”Single\””,”cod”:1,”country”:”\”Brazil\””,”document”:”\”43456754356\””,”name”:”\”alexandre eleuterio santos lourenco 1\””,”neighBorhood”:”\”neigh 1\””,”phone”:”\”+5511234433443\””,”state”:”\”São Paulo\””,”street”:”\”false st\””,”streetNum”:3134}
{“age”:37,”birthday”:”\”21/06/1983\””,”city”:”\”São Paulo\””,”civilStatus”:”\”Single\””,”cod”:2,”country”:”\”Brazil\””,”document”:”\”43456754376\””,”name”:”\”alexandre eleuterio santos lourenco 2\””,”neighBorhood”:”\”neigh 1\””,”phone”:”\”+5511234433444\””,”state”:”\”São Paulo\””,”street”:”\”false st\””,”streetNum”:3135}

Now that we have coded our first stream, let’s create our second stream. Don’t you worry about the messing code right now, we will refactor later when implementing error handling using actors.

Creating the second Stream

Now, let’s create our second stream. This stream will read from Kafka and generate two files, one with personal data and another with address data.

For this, we will use a graph stage, that will make the file write in parallel. We will disable autocommit for Kafka consumption and commit only at the end.

Before creating the stage, let’s do our first refactoring, by moving the Account case class to a GraphMessages object, which will hold all case classes we will use on our coding:

package com.alexandreesl.graph

import akka.kafka.ConsumerMessage

object GraphMessages {

  case class Account(cod: Long, name: String, document: String,
                     age: Int, civilStatus: String,
                     phone: String, birthday: String,
                     country: String, state: String,
                     city: String, street: String,
                     streetNum: Long, neighBorhood: String)

  case class InputMessage(acc: Account,
                          offset: ConsumerMessage.CommittableOffset)

  case class AccountPersonalData(cod: Long, name: String,
                                 document: String, age: Int,
                                 civilStatus: String,
                                 phone: String, birthday: String)

  case class AccountAddressData(cod: Long, country: String,
                                state: String, city: String,
                                street: String, streetNum: Long,
                                neighBorhood: String)

}

We also update our Json protocol accordingly, since we will use JSON marshaling for the other classes as well:

package com.alexandreesl.json

import com.alexandreesl.graph.GraphMessages.{Account, AccountAddressData, AccountPersonalData}
import spray.json.DefaultJsonProtocol

object JsonParsing extends DefaultJsonProtocol {

  implicit val accountFormat = jsonFormat13(Account)
  implicit val accountPersonalFormat = jsonFormat7(AccountPersonalData)
  implicit val accountAddressFormat = jsonFormat7(AccountAddressData)

}

Finally, let’s create our graph stage. Notice the ~> symbol? That symbol is used inside the graph stage builder to create the stage flow. This allows us to code flows in a visual manner, making a lot simpler to design stream flows.

package com.alexandreesl.graph

import java.nio.file.{Paths, StandardOpenOption}

import akka.actor.ActorSystem
import akka.kafka.ConsumerMessage
import akka.stream.{ActorMaterializer, FlowShape}
import akka.stream.scaladsl.{Broadcast, FileIO, Flow, GraphDSL, Source, Zip}
import akka.util.ByteString
import com.alexandreesl.graph.GraphMessages.{Account, AccountAddressData, AccountPersonalData, InputMessage}
import spray.json._
import com.alexandreesl.json.JsonParsing._

object AccountWriterGraphStage {

  val personal = Paths.get("personal.csv")
  val address = Paths.get("address.csv")

  def graph(implicit system: ActorSystem, materializer: ActorMaterializer) =
Flow.fromGraph(GraphDSL.create() { implicit builder =>

    import GraphDSL.Implicits._

    val flowPersonal = Flow[InputMessage].map(msg => {
      Source.single(AccountPersonalData(msg.acc.cod,
        msg.acc.name, msg.acc.document, msg.acc.age,
msg.acc.civilStatus, msg.acc.phone,
msg.acc.birthday).toJson.compactPrint + "\n")
        .map(t => ByteString(t))
        .runWith(FileIO.toPath(personal,
Set(StandardOpenOption.CREATE, StandardOpenOption.APPEND)))
      msg.acc
    })

    val flowAddress = Flow[InputMessage].map(msg => {
      Source.single(AccountAddressData(msg.acc.cod,
        msg.acc.country, msg.acc.state,
msg.acc.city, msg.acc.street, msg.acc.streetNum,
msg.acc.neighBorhood).toJson.compactPrint + "\n")
        .map(t => ByteString(t))
        .runWith(FileIO.toPath(address,
Set(StandardOpenOption.CREATE, StandardOpenOption.APPEND)))
      msg.offset
    })

    val bcastJson = builder.add(Broadcast[InputMessage](2))
    val zip = builder.add(Zip[Account, ConsumerMessage.CommittableOffset])

    bcastJson ~> flowPersonal ~> zip.in0
    bcastJson ~> flowAddress ~> zip.in1

    FlowShape(bcastJson.in, zip.out)

  })

}

On our stage, we created two flows that executed in parallel a broadcast, each one passing through one value from the original input message. In the end, we use zip to generate a tuple from the two objects that will be passed to the next stage. Finally, let’s create our stream, which will be using the graph stage as part of the stream. I promise this will be the last time we will see that big messy main object: next section we will start refactoring.

import java.nio.file.Paths

import akka.actor.ActorSystem
import akka.kafka.{ConsumerSettings, ProducerSettings, Subscriptions}
import akka.kafka.scaladsl.{Consumer, Producer}
import akka.stream.scaladsl.{FileIO, Flow, Framing, Sink}
import akka.stream.{ActorMaterializer, ActorMaterializerSettings}
import akka.util.ByteString
import com.alexandreesl.graph.AccountWriterGraphStage
import com.alexandreesl.graph.GraphMessages.{Account, InputMessage}
import com.typesafe.scalalogging.Logger
import org.apache.kafka.common.serialization.{StringDeserializer, StringSerializer}
import org.slf4j.LoggerFactory
import spray.json._
import com.alexandreesl.json.JsonParsing._
import org.apache.kafka.clients.consumer.ConsumerConfig
import org.apache.kafka.clients.producer.ProducerRecord

import scala.concurrent.Future

object Main extends App {

  implicit val system: ActorSystem = ActorSystem("akka-streams-lab")
  implicit val materializer: ActorMaterializer = ActorMaterializer(ActorMaterializerSettings(system))
  implicit val ec = system.dispatcher
  private val logger = Logger(LoggerFactory.getLogger("Main"))
  val configProducer = system.settings.config.getConfig("akka.kafka.producer")
  val producerSettings =
    ProducerSettings(configProducer, new StringSerializer, new StringSerializer)
      .withBootstrapServers("localhost:9092")
  val configConsumer = system.settings.config.getConfig("akka.kafka.consumer")
  val consumerSettings =
    ConsumerSettings(configConsumer, new StringDeserializer, new StringDeserializer)
      .withBootstrapServers("localhost:9092")
      .withGroupId("group1")
      .withProperty(ConsumerConfig.AUTO_OFFSET_RESET_CONFIG, "earliest")

  logger.info("Starting streams...")

  private def convertToClass(csv: Array[String]): Account = {
    Account(csv(0).toLong,
      csv(1), csv(2),
      csv(3).toInt, csv(4),
      csv(5), csv(6),
      csv(7), csv(8),
      csv(9), csv(10),
      csv(11).toLong, csv(12))
  }

  private val flow = Flow[String].filter(s => !s.contains("COD"))
    .map(line => {
      convertToClass(line.split(","))
    })

  FileIO.fromPath(Paths.get("input1.csv"))
    .via(Framing.delimiter(ByteString("\n"), 4096)
      .map(_.utf8String))
    .via(flow)
    .map(value => new ProducerRecord[String, String]("accounts", value.toJson.compactPrint))
    .runWith(Producer.plainSink(producerSettings))

  Consumer
    .committableSource(consumerSettings, Subscriptions.topics("accounts"))
    .mapAsync(10)(msg =>
      Future.successful(InputMessage(msg.record.value.parseJson.convertTo[Account], msg.committableOffset))
    ).via(AccountWriterGraphStage.graph)
    .mapAsync(10) { tuple =>
      val acc = tuple._1
      logger.info(s"persisted Account: $acc")
      tuple._2.commitScaladsl()
    }.runWith(Sink.ignore)

  logger.info("Stream system is initialized!")

}

That’s it! since we started both streams in the main application, it is possible to test the stream simply by running the application, which will make the first stream to enqueue 2 messages, that it will be dequeued by the other stream. If we see the logs, we will see the following:

[INFO] [12/27/2018 23:59:52.395] [akka-streams-lab-akka.actor.default-dispatcher-3] [SingleSourceLogic(akka://akka-streams-lab)] Assigned partitions: Set(accounts-0). All partitions: Set(accounts-0)
23:59:52.436 [akka-streams-lab-akka.actor.default-dispatcher-2] INFO Main – persisted Account: Account(1,”alexandre eleuterio santos lourenco 1″,”43456754356″,36,”Single”,”+5511234433443″,”21/06/1982″,”Brazil”,”São Paulo”,”São Paulo”,”false st”,3134,”neigh 1″)
23:59:52.449 [akka-streams-lab-akka.actor.default-dispatcher-2] INFO Main – persisted Account: Account(2,”alexandre eleuterio santos lourenco 2″,”43456754376″,37,”Single”,”+5511234433444″,”21/06/1983″,”Brazil”,”São Paulo”,”São Paulo”,”false st”,3135,”neigh 1″)

And if we inspect the files, we will see that it wrote the data accordingly, as we can see below:

personal.csv:

{“age”:36,”birthday”:”\”21/06/1982\””,”civilStatus”:”\”Single\””,”cod”:1,”document”:”\”43456754356\””,”name”:”\”alexandre eleuterio santos lourenco 1\””,”phone”:”\”+5511234433443\””}
{“age”:37,”birthday”:”\”21/06/1983\””,”civilStatus”:”\”Single\””,”cod”:2,”document”:”\”43456754376\””,”name”:”\”alexandre eleuterio santos lourenco 2\””,”phone”:”\”+5511234433444\””}

address.csv:

{“city”:”\”São Paulo\””,”cod”:1,”country”:”\”Brazil\””,”neighBorhood”:”\”neigh 1\””,”state”:”\”São Paulo\””,”street”:”\”false st\””,”streetNum”:3134}
{“city”:”\”São Paulo\””,”cod”:2,”country”:”\”Brazil\””,”neighBorhood”:”\”neigh 1\””,”state”:”\”São Paulo\””,”street”:”\”false st\””,”streetNum”:3135}

Now, let’s refactor this code to be more maintainable and introduce error handling.

Implementing error handling

In order to easier error handling, we will move our streams to actors. Them we will create a supervisor, defining what to do when an error occurs.

Let’s begin by creating the first actor, called KafkaImporterActor  and move the stream:


package com.alexandreesl.actor

import java.nio.file.Paths

import akka.actor.{Actor, ActorLogging, ActorSystem, Props}
import akka.kafka.ProducerSettings
import akka.kafka.scaladsl.Producer
import akka.stream.ActorMaterializer
import akka.stream.scaladsl.{FileIO, Flow, Framing}
import akka.util.ByteString
import com.alexandreesl.actor.KafkaImporterActor.Start
import com.alexandreesl.graph.GraphMessages.Account
import com.alexandreesl.json.JsonParsing._
import org.apache.kafka.clients.producer.ProducerRecord
import org.apache.kafka.common.serialization.StringSerializer
import spray.json._

import scala.concurrent.ExecutionContextExecutor

class KafkaImporterActor extends Actor with ActorLogging {

implicit val actorSystem: ActorSystem = context.system
implicit val materializer: ActorMaterializer = ActorMaterializer()
implicit val dispatcher: ExecutionContextExecutor = context.system.dispatcher

private def convertToClass(csv: Array[String]): Account = {
Account(csv(0).toLong,
csv(1), csv(2),
csv(3).toInt, csv(4),
csv(5), csv(6),
csv(7), csv(8),
csv(9), csv(10),
csv(11).toLong, csv(12))
}

private val flow = Flow[String].filter(s => !s.contains("COD"))
.map(line => {
convertToClass(line.split(","))
})
private val configProducer = actorSystem.settings.config.getConfig("akka.kafka.producer")
private val producerSettings =
ProducerSettings(configProducer, new StringSerializer, new StringSerializer)
.withBootstrapServers("localhost:9092")

override def preStart(): Unit = {
self ! Start
}

override def receive: Receive = {
case Start =>
FileIO.fromPath(Paths.get("input1.csv"))
.via(Framing.delimiter(ByteString("\n"), 4096)
.map(_.utf8String))
.via(flow)
.map(value => new ProducerRecord[String, String]("accounts", value.toJson.compactPrint))
.runWith(Producer.plainSink(producerSettings))

}

}

object KafkaImporterActor {

val name = "Kafka-Importer-actor"

def props = Props(new KafkaImporterActor)

case object Start

}

On this actor, we just moved our configurations and created a receive method. On that method, we created a message case that it is fired at actor startup, making the actor starting up the stream as soon it is instantiated.

Now, let’s do the same to the other stream:


package com.alexandreesl.actor

import akka.actor.{Actor, ActorLogging, ActorSystem, Props}
import akka.kafka.{ConsumerSettings, Subscriptions}
import akka.kafka.scaladsl.Consumer
import akka.stream.ActorMaterializer
import akka.stream.scaladsl.Sink
import com.alexandreesl.actor.KafkaExporterActor.Start
import com.alexandreesl.graph.AccountWriterGraphStage
import com.alexandreesl.graph.GraphMessages.{Account, InputMessage}
import org.apache.kafka.clients.consumer.ConsumerConfig
import org.apache.kafka.common.serialization.StringDeserializer
import spray.json._
import com.alexandreesl.json.JsonParsing._

import scala.concurrent.{ExecutionContextExecutor, Future}

class KafkaExporterActor extends Actor with ActorLogging {

implicit val actorSystem: ActorSystem = context.system
implicit val materializer: ActorMaterializer = ActorMaterializer()
implicit val dispatcher: ExecutionContextExecutor = context.system.dispatcher
private val configConsumer = actorSystem.settings.config.getConfig("akka.kafka.consumer")
private val consumerSettings =
ConsumerSettings(configConsumer, new StringDeserializer, new StringDeserializer)
.withBootstrapServers("localhost:9092")
.withGroupId("group1")
.withProperty(ConsumerConfig.AUTO_OFFSET_RESET_CONFIG, "earliest")

override def preStart(): Unit = {
self ! Start
}

override def receive: Receive = {
case Start =>
Consumer
.committableSource(consumerSettings, Subscriptions.topics("accounts"))
.mapAsync(10)(msg =>
Future.successful(InputMessage(msg.record.value.parseJson.convertTo[Account], msg.committableOffset))
).via(AccountWriterGraphStage.graph)
.mapAsync(10) { tuple =>
val acc = tuple._1
log.info(s"persisted Account: $acc")
tuple._2.commitScaladsl()
}.runWith(Sink.ignore)

}

}

object KafkaExporterActor {

val name = "Kafka-Exporter-actor"

def props = Props(new KafkaExporterActor)

case object Start

}

Finally, as we moved the code to actors, we now can simplify the main object to be just this:


import akka.actor.ActorSystem
import com.alexandreesl.actor.{KafkaExporterActor, KafkaImporterActor}
import com.typesafe.scalalogging.Logger
import org.slf4j.LoggerFactory

object Main extends App {

implicit val system: ActorSystem = ActorSystem("akka-streams-lab")
private val logger = Logger(LoggerFactory.getLogger("Main"))

logger.info("Starting streams...")

system.actorOf(KafkaImporterActor.props, KafkaImporterActor.name)
system.actorOf(KafkaExporterActor.props, KafkaExporterActor.name)

logger.info("Stream system is initialized!")

}

If we run the application again, we will see that it runs just like before, proving our refactoring was a success.

Now that our code is better organized, let’s introduce a supervisor to guarantee error handling. We will define a supervisor strategy in our actors and backoff policies to make the actors restart gradually slower as errors repeat, for example, to wait for Kafka to recover from a shutdown.

To do this, we change our main object code like this:


import akka.actor.{ActorSystem, OneForOneStrategy, Props, SupervisorStrategy}
import akka.pattern.{Backoff, BackoffSupervisor}
import com.alexandreesl.actor.{KafkaExporterActor, KafkaImporterActor}
import com.typesafe.scalalogging.Logger
import org.slf4j.LoggerFactory

import scala.concurrent.duration._

object Main extends App {

implicit val system: ActorSystem = ActorSystem("akka-streams-lab")
private val logger = Logger(LoggerFactory.getLogger("Main"))

logger.info("Starting streams...")

private val supervisorStrategy = OneForOneStrategy() {
case ex: Exception =>
logger.info(s"exception: $ex")
SupervisorStrategy.Restart

}
private val importerProps: Props = BackoffSupervisor.props(
Backoff.onStop(
childProps = KafkaImporterActor.props,
childName = KafkaImporterActor.name,
minBackoff = 3.seconds,
maxBackoff = 30.seconds,
randomFactor = 0.2
).withSupervisorStrategy(supervisorStrategy)
)
private val exporterProps: Props = BackoffSupervisor.props(
Backoff.onStop(
childProps = KafkaExporterActor.props,
childName = KafkaExporterActor.name,
minBackoff = 3.seconds,
maxBackoff = 30.seconds,
randomFactor = 0.2
).withSupervisorStrategy(supervisorStrategy)
)

system.actorOf(importerProps, "Kafka-importer")
system.actorOf(exporterProps, "Kafka-exporter")

logger.info("Stream system is initialized!")

}

On our code, we now defined backoff policies that start restarting after 3 seconds, all up to 30 seconds, randomly scaling up the time between retries after each retry. As supervisor policy, we defined a OneForOne strategy, meaning that if one of the actors restart, only the faulty actor will be affected by the policy.

Finally, we define a simple policy where any errors that occur will be logged and the actor will be restarted. Since errors in the stream will also escalate to the encapsulating actor, this means that errors in the stream will also make the actor fail, causing a restart.

To make this escalation to work,  we need to change our actors to make the errors inside the streams to propagate. To do this, we change the actors as follows, adding code to check the status from the stream’s futures:

KafkaImporterActor


package com.alexandreesl.actor

import java.nio.file.Paths

import akka.actor.{Actor, ActorLogging, ActorSystem, PoisonPill, Props}
import akka.kafka.ProducerSettings
import akka.kafka.scaladsl.Producer
import akka.stream.ActorMaterializer
import akka.stream.scaladsl.{FileIO, Flow, Framing}
import akka.util.ByteString
import com.alexandreesl.actor.KafkaImporterActor.Start
import com.alexandreesl.graph.GraphMessages.Account
import com.alexandreesl.json.JsonParsing._
import org.apache.kafka.clients.producer.ProducerRecord
import org.apache.kafka.common.serialization.StringSerializer
import spray.json._

import scala.concurrent.ExecutionContextExecutor
import scala.util.{Failure, Success}

class KafkaImporterActor extends Actor with ActorLogging {

implicit val actorSystem: ActorSystem = context.system
implicit val materializer: ActorMaterializer = ActorMaterializer()
implicit val dispatcher: ExecutionContextExecutor = context.system.dispatcher

private def convertToClass(csv: Array[String]): Account = {
Account(csv(0).toLong,
csv(1), csv(2),
csv(3).toInt, csv(4),
csv(5), csv(6),
csv(7), csv(8),
csv(9), csv(10),
csv(11).toLong, csv(12))
}

private val flow = Flow[String].filter(s => !s.contains("COD"))
.map(line => {
convertToClass(line.split(","))
})
private val configProducer = actorSystem.settings.config.getConfig("akka.kafka.producer")
private val producerSettings =
ProducerSettings(configProducer, new StringSerializer, new StringSerializer)
.withBootstrapServers("localhost:9092")

override def preStart(): Unit = {
self ! Start
}

override def receive: Receive = {
case Start =>
val done = FileIO.fromPath(Paths.get("input1.csv"))
.via(Framing.delimiter(ByteString("\n"), 4096)
.map(_.utf8String))
.via(flow)
.map(value => new ProducerRecord[String, String]("accounts", value.toJson.compactPrint))
.runWith(Producer.plainSink(producerSettings))
done onComplete {
case Success(_) =>
log.info("I completed successfully, I am so happy :)")
case Failure(ex) =>
log.error(ex, "I received a error! Goodbye cruel world!")
self ! PoisonPill
}

}

}

object KafkaImporterActor {

val name = "Kafka-Importer-actor"

def props = Props(new KafkaImporterActor)

case object Start

}

KafkaExporterActor


package com.alexandreesl.actor

import akka.actor.{Actor, ActorLogging, ActorSystem, PoisonPill, Props}
import akka.kafka.{ConsumerSettings, Subscriptions}
import akka.kafka.scaladsl.Consumer
import akka.stream.ActorMaterializer
import akka.stream.scaladsl.Sink
import com.alexandreesl.actor.KafkaExporterActor.Start
import com.alexandreesl.graph.AccountWriterGraphStage
import com.alexandreesl.graph.GraphMessages.{Account, InputMessage}
import org.apache.kafka.clients.consumer.ConsumerConfig
import org.apache.kafka.common.serialization.StringDeserializer
import spray.json._
import com.alexandreesl.json.JsonParsing._

import scala.concurrent.{ExecutionContextExecutor, Future}
import scala.util.{Failure, Success}

class KafkaExporterActor extends Actor with ActorLogging {

implicit val actorSystem: ActorSystem = context.system
implicit val materializer: ActorMaterializer = ActorMaterializer()
implicit val dispatcher: ExecutionContextExecutor = context.system.dispatcher
private val configConsumer = actorSystem.settings.config.getConfig("akka.kafka.consumer")
private val consumerSettings =
ConsumerSettings(configConsumer, new StringDeserializer, new StringDeserializer)
.withBootstrapServers("localhost:9092")
.withGroupId("group1")
.withProperty(ConsumerConfig.AUTO_OFFSET_RESET_CONFIG, "earliest")

override def preStart(): Unit = {
self ! Start
}

override def receive: Receive = {
case Start =>
val done = Consumer
.committableSource(consumerSettings, Subscriptions.topics("accounts"))
.mapAsync(10)(msg =>
Future.successful(InputMessage(msg.record.value.parseJson.convertTo[Account], msg.committableOffset))
).via(AccountWriterGraphStage.graph)
.mapAsync(10) { tuple =>
val acc = tuple._1
log.info(s"persisted Account: $acc")
tuple._2.commitScaladsl()
}.runWith(Sink.ignore)
done onComplete {
case Success(_) =>
log.info("I completed successfully, I am so happy :)")
case Failure(ex) =>
log.error(ex, "I received a error! Goodbye cruel world!")
self ! PoisonPill
}

}

}

object KafkaExporterActor {

val name = "Kafka-Exporter-actor"

def props = Props(new KafkaExporterActor)

case object Start

}

Finally, let’s test it out. We begin by shutting down Kafka without stopping our application, by running:

docker-compose down

If we look at the logs, we will see the streams will start complaining about not connecting to Kafka. After some time, we will get an actor terminated error, caused by the poison pill we make it swallow:

[INFO] [12/28/2018 22:23:54.236] [akka-streams-lab-akka.actor.default-dispatcher-4] [akka://akka-streams-lab/system/kafka-consumer-1] Message [akka.kafka.KafkaConsumerActor$Stop$] without sender to Actor[akka://akka-streams-lab/system/kafka-consumer-1#1868012916] was not delivered. [2] dead letters encountered. If this is not an expected behavior, then [Actor[akka://akka-streams-lab/system/kafka-consumer-1#1868012916]] may have terminated unexpectedly, This logging can be turned off or adjusted with configuration settings ‘akka.log-dead-letters’ and ‘akka.log-dead-letters-during-shutdown’.
[ERROR] [12/28/2018 22:23:54.236] [akka-streams-lab-akka.actor.default-dispatcher-5] [akka://akka-streams-lab/user/Kafka-exporter/Kafka-Exporter-actor] I received a error! Goodbye cruel world!
akka.kafka.ConsumerFailed: Consumer actor terminated
at akka.kafka.internal.SingleSourceLogic.$anonfun$preStart$1(SingleSourceLogic.scala:66)
at akka.kafka.internal.SingleSourceLogic.$anonfun$preStart$1$adapted(SingleSourceLogic.scala:53)
at akka.stream.stage.GraphStageLogic$StageActor.internalReceive(GraphStage.scala:230)
at akka.stream.stage.GraphStageLogic$StageActor.$anonfun$callback$1(GraphStage.scala:198)
at akka.stream.stage.GraphStageLogic$StageActor.$anonfun$callback$1$adapted(GraphStage.scala:198)
at akka.stream.impl.fusing.GraphInterpreter.runAsyncInput(GraphInterpreter.scala:454)
at

If we just keep watching, we will see this cycle endless repeating, as streams are restarted, they fail to connect to Kafka and the poison pill is swallowed again.

To make the application come back again, let’s restart our Kafka cluster with:

docker-compose up -d

We will see that after Kafka returns, the streams will resume to normal.

And that concludes our error handling code. Of course, that it is not all we can do in this field. Another interesting error handling technique that can be used in some cases is recovering, where we can define another stream to be executed in case of a failure, as a circuit breaker. This can be seen in more detail here.

Finally, let’s test our Package plugin, by running the code in the terminal. Let’s open a terminal and run the following:

sbt stage

This will prepare our application, including a shell script to run the application. We can run it by typing:

./target/universal/stage/bin/akka-stream-lab

After entering, we will see that our application will run just like in Intellij:

Screen Shot 2019-01-01 at 12.12.15

Automated testing the stream

Finally, to wrap it up, we will see how to test our streams. Automated tests are important to code’s sturdiness, also allowing CI pipelines to be implemented efficiently.

Streams can be tested by using probes to run the streams and check the results. Let’s start by creating a test for the converter flow that generates accounts from csv lines – the rest of the code would just be testing third-party libraries so we will focus on our own code only  – and next, we will test our graph stage.

On our tests, we will use several traits to add support to several features we will/can use. It is good practice to join all traits inside a single one so our test classes won’t have a big single line of trait declarations.

So let’s begin by creating our trait:


package com.alexandreesl.test

import org.scalatest.{BeforeAndAfter, BeforeAndAfterAll, Matchers, WordSpecLike}

trait TestEnvironment extends WordSpecLike with Matchers 

with BeforeAndAfter with BeforeAndAfterAll

Before coding the test, we will move the flow on KafkaImporterActor to the object companion, this way allowing us to reference in the test:


package com.alexandreesl.actor

import java.nio.file.Paths

import akka.actor.{Actor, ActorLogging, ActorSystem, PoisonPill, Props}
import akka.kafka.ProducerSettings
import akka.kafka.scaladsl.Producer
import akka.stream.ActorMaterializer
import akka.stream.scaladsl.{FileIO, Flow, Framing}
import akka.util.ByteString
import com.alexandreesl.actor.KafkaImporterActor.Start
import com.alexandreesl.graph.GraphMessages.Account
import com.alexandreesl.json.JsonParsing._
import org.apache.kafka.clients.producer.ProducerRecord
import org.apache.kafka.common.serialization.StringSerializer
import spray.json._

import scala.concurrent.ExecutionContextExecutor
import scala.util.{Failure, Success}

class KafkaImporterActor extends Actor with ActorLogging {

implicit val actorSystem: ActorSystem = context.system
implicit val materializer: ActorMaterializer = ActorMaterializer()
implicit val dispatcher: ExecutionContextExecutor = context.system.dispatcher

private val configProducer = actorSystem.settings.config.getConfig("akka.kafka.producer")
private val producerSettings =
ProducerSettings(configProducer, new StringSerializer, new StringSerializer)
.withBootstrapServers("localhost:9092")

override def preStart(): Unit = {
self ! Start
}

override def receive: Receive = {
case Start =>
val done = FileIO.fromPath(Paths.get("input1.csv"))
.via(Framing.delimiter(ByteString("\n"), 4096)
.map(_.utf8String))
.via(KafkaImporterActor.flow)
.map(value => new ProducerRecord[String, String]("accounts", value.toJson.compactPrint))
.runWith(Producer.plainSink(producerSettings))
done onComplete {
case Success(_) =>
log.info("I completed successfully, I am so happy :)")
case Failure(ex) =>
log.error(ex, "I received a error! Goodbye cruel world!")
self ! PoisonPill
}

}

}

object KafkaImporterActor {

private def convertToClass(csv: Array[String]): Account = {
Account(csv(0).toLong,
csv(1), csv(2),
csv(3).toInt, csv(4),
csv(5), csv(6),
csv(7), csv(8),
csv(9), csv(10),
csv(11).toLong, csv(12))
}

val flow = Flow[String].filter(s => !s.contains("COD"))
.map(line => {
convertToClass(line.split(","))
})

val name = "Kafka-Importer-actor"

def props = Props(new KafkaImporterActor)

case object Start

}

Next, we will implement an different equals method on Account class so it will work properly in test assertations:


package com.alexandreesl.graph

import akka.kafka.ConsumerMessage

object GraphMessages {

case class Account(cod: Long, name: String, document: String, age: Int, civilStatus: String,
phone: String, birthday: String, country: String, state: String,
city: String, street: String, streetNum: Long, neighBorhood: String) {
override def equals(that: Any): Boolean =
that match {
case that: Account => that.canEqual(this) && that.cod == this.cod
case _ => false
}
}

case class InputMessage(acc: Account, offset: ConsumerMessage.CommittableOffset)

case class AccountPersonalData(cod: Long, name: String, document: String, age: Int, civilStatus: String,
phone: String, birthday: String)

case class AccountAddressData(cod: Long, country: String, state: String,
city: String, street: String, streetNum: Long, neighBorhood: String)

}

Finally, let’s code the test:


package com.alexandreesl.test.importer

import akka.actor.ActorSystem
import akka.stream.ActorMaterializer
import akka.stream.scaladsl.{Sink, Source}
import akka.testkit.{TestKit, TestProbe}
import com.alexandreesl.actor.KafkaImporterActor
import com.alexandreesl.graph.GraphMessages.Account
import com.alexandreesl.test.TestEnvironment

import scala.concurrent.duration._

class KafkaImporterActorSpec extends TestKit(ActorSystem("MyTestSystem")) with TestEnvironment {
implicit val materializer = ActorMaterializer()
implicit val ec = system.dispatcher

override def afterAll() = TestKit.shutdownActorSystem(system)

"A csv line in a file " when {
val csv = "1,\"alexandre eleuterio santos lourenco 1\",\"43456754356\",36,\"Single\",\"+5511234433443\",\"21/06/1982\",\"Brazil\",\"São Paulo\",\"São Paulo\",\"false st\",3134,\"neigh 1\""

" should convert to Account case class " in {

val probe = TestProbe()

Source.single(csv)
.via(KafkaImporterActor.flow)
.to(Sink.actorRef(probe.ref, "completed"))
.run()

probe.expectMsg(2.seconds, Account(1, "alexandre eleuterio santos lourenco 1",
"43456754356", 36, "Single", "+5511234433443", "21/06/1982",
"Brazil", "São Paulo", "São Paulo", "false st", 3134, "neigh 1"))
probe.expectMsg(2.seconds, "completed")

}

}

}

On this code, we create a probe that waits for a message containing the Account converted from the flow and a “completed” message, that the sink will emit at the end. The 2 seconds timeout is to control how much time the probe will wait for a message to come.

Now, let’s code our second test. Before writing the test itself, let’s make a little refactoring on KafkaExporterActor, by exposing a part of the stream to the spec. This way we will test all our custom code:


package com.alexandreesl.actor

import akka.actor.{Actor, ActorLogging, ActorSystem, PoisonPill, Props}
import akka.kafka.{ConsumerSettings, Subscriptions}
import akka.kafka.scaladsl.Consumer
import akka.stream.ActorMaterializer
import akka.stream.scaladsl.{Flow, Sink}
import com.alexandreesl.actor.KafkaExporterActor.Start
import com.alexandreesl.graph.AccountWriterGraphStage
import com.alexandreesl.graph.GraphMessages.{Account, InputMessage}
import org.apache.kafka.clients.consumer.ConsumerConfig
import org.apache.kafka.common.serialization.StringDeserializer
import spray.json._
import com.alexandreesl.json.JsonParsing._
import com.typesafe.scalalogging.Logger
import org.slf4j.LoggerFactory

import scala.concurrent.{ExecutionContextExecutor, Future}
import scala.util.{Failure, Success}

class KafkaExporterActor extends Actor with ActorLogging {

implicit val actorSystem: ActorSystem = context.system
implicit val materializer: ActorMaterializer = ActorMaterializer()
implicit val dispatcher: ExecutionContextExecutor = context.system.dispatcher
private val configConsumer = actorSystem.settings.config.getConfig("akka.kafka.consumer")
private val consumerSettings =
ConsumerSettings(configConsumer, new StringDeserializer, new StringDeserializer)
.withBootstrapServers("localhost:9092")
.withGroupId("group1")
.withProperty(ConsumerConfig.AUTO_OFFSET_RESET_CONFIG, "earliest")

override def preStart(): Unit = {
self ! Start
}

override def receive: Receive = {
case Start =>
val done = Consumer
.committableSource(consumerSettings, Subscriptions.topics("accounts"))
.mapAsync(10)(msg =>
Future.successful(InputMessage(msg.record.value.parseJson.convertTo[Account], msg.committableOffset))
)
.via(KafkaExporterActor.flow)
.runWith(Sink.ignore)
done onComplete {
case Success(_) =>
log.info("I completed successfully, I am so happy :)")
case Failure(ex) =>
log.error(ex, "I received a error! Goodbye cruel world!")
self ! PoisonPill
}

}

}

object KafkaExporterActor {

private val logger = Logger(LoggerFactory.getLogger("KafkaExporterActor"))

def flow()(implicit actorSystem: ActorSystem,
materializer: ActorMaterializer) =
Flow[InputMessage].via(AccountWriterGraphStage.graph)
.mapAsync(10) { tuple =>
val acc = tuple._1
logger.info(s"persisted Account: $acc")
tuple._2.commitScaladsl()
}

val name = "Kafka-Exporter-actor"

def props = Props(new KafkaExporterActor)

case object Start

}

Finally, let’s code our test:


package com.alexandreesl.test.exporter

import akka.Done
import akka.actor.ActorSystem
import akka.kafka.ConsumerMessage.CommittableOffset
import akka.stream.ActorMaterializer
import akka.stream.scaladsl.{Sink, Source}
import akka.testkit.{TestKit, TestProbe}
import com.alexandreesl.actor.KafkaExporterActor
import com.alexandreesl.graph.GraphMessages.{Account, InputMessage}
import com.alexandreesl.test.TestEnvironment
import org.mockito.Mockito.{times, verify, when}
import org.scalatest.mockito.MockitoSugar.mock

import scala.concurrent.Future
import scala.concurrent.duration._

class KafkaExporterActorSpec extends TestKit(ActorSystem("MyTestSystem")) with TestEnvironment {
implicit val materializer = ActorMaterializer()
implicit val ec = system.dispatcher

override def afterAll() = TestKit.shutdownActorSystem(system)

"A Account object " when {

val offset = mock[CommittableOffset]
when(offset commitScaladsl) thenReturn Future.successful(Done)
val account = Account(1, "alexandre eleuterio santos lourenco 1",
"43456754356", 36, "Single", "+5511234433443", "21/06/1982",
"Brazil", "São Paulo", "São Paulo", "false st", 3134, "neigh 1")
val inputMessage = InputMessage(account, offset)

" should pass through the graph stage " in {

val probe = TestProbe()
Source.single(inputMessage)
.via(KafkaExporterActor.flow)
.to(Sink.actorRef(probe.ref, "completed"))
.run()

probe.expectMsg(2.seconds, Done)
probe.expectMsg(2.seconds, "completed")
verify(offset, times(1)) commitScaladsl

}

}

}

On this code, again we wait for the probe to receive messages. In this case, we first receive the Done object from Kafka commit – in this case, we create a mock object in order to allow us to run tests without Kafka – and next receive our good old “completed” message. Finally, we test if our mock was called, to assure that the flow is committing messages back to Kafka after processing.

Of course, this was just a tiny taste of what can be done with Akka’s Testkit. The probe we used just for sinks can also be used for sources as well and just like we test streams, it is also possible to test actors communicating with each other in an actor solution, for example.

In the references section, it is possible to get links to all documentation supplied to this and other subjects observed on this article.

Going beyond

Of course, this brief article can’t possibly talk about every detail of Akka and Akka Streams. From subjects not talked here we can spotlight a few:

  • Akka FSM (Finite State Machine): It allows us to implement state machines on actors solutions;
  • Akka HTTP: Allows us to call and expose HTTP endpoints;
  • Akka persistence: Allows us to implement a persistence layer on messages flowing through Akka, in order to implement better recoverability in case of failures;
  • Akka Event Bus: A built-in publisher-subscriber event bus inside Akka, Allows us to implement broadcasting of messages inside actor solutions.

In the references section, it is possible to find links for this and more!

Thanks

Special thanks to Iago David Santos (LinkedIn), which revised this article and pointed some things. Thanks, Iago!

Conclusion

And that concludes our article. With a great toolkit and sturdiness, Akka Streams is a great tool to be considered when coding integrations, APIs and more. Thank you for following me again on this article, until next time!

Continue reading

Kafka: implementing stream architectures

Standard

Hi, dear readers! Welcome to my blog. On this post, we will learn about Apache Kafka, a distributed messaging system which is being used on lots of streaming solutions.

This article will be divided on several sections, allowing the reader to not only understand the concepts behind but also a lab to exercise the concepts in practice. So, without further delay, let’s begin!

Kafka architecture

Overview

Kafka is a distributed messaging system created by Linkedin. On Kafka, we have stream data structures called topics, which can be consumed by several clients, organized on consumer groups. This topics are stored on a Kafka cluster, where which node is called a broker.

Kafka’s ecosystem also need a Zookeeper cluster in order to run. Zookeeper is a key-value  storage solution, which on Kafka’s context is used to store metadata. Several operations such as topic creation are done on Zookeeper, instead of in the brokers.

The main difference from Kafka to other messaging solutions that utilizes classic topic structures is that on Kafka we have offsets. Offsets act like cursors, pointing to the last location a consumer and/or producer has reached consuming/producing messages for a given topic on a given partition.

Partitions on Kafka are like shards on some NOSQL databases: they divide the data, organizing by partition and/or message keys (more about this when we talk about ingesting data on Kafka).

So, on Kafka, we have producers ingesting data, controlled by producer offsets, while we have consumers consuming data from topics, also with their offsets. The main advantages on this approach are:

  • Data can be read and replayed by consumers, since there’s no link between consumed data and produced data. This also allows to implement solutions with back-pressure, that is, solutions where consumers can poll data according to their processing limits;
  • Data can be retained for more time, since on streams, different from classic topics, data is not removed from the structure after been sent to all consumers. It is also possible to compress the data on the stream, allowing Kafka clusters to retain lots of data on their streams;

Kafka’s offsets explained

The following  diagram illustrates a Kafka topic on the run:

kafka-diagram-1

Kafka Topic producer/consumer offsets

On the diagram, we can see a topic with 2 partitions. Each little rectangle represents a offset pointing to a location on the topic. On the producer side, we can see 2 offsets pointing to the topic’s head, showing our producer ingesting data on topic.

On Kafka, each partition is assigned to a broker and each broker is responsible for delivering production/consumption for that partition. The broker responsible for this is called a partition leader on Kafka.

How many partitions are needed for a topic? The main factor for this point is the desired throughput for production/consumption. Several factors are key for the throughput, such as the producer ack type, number of replicas etc.

Too much partitions are also something to take care when planning a new topic, as too much partitions can hinder availability and end-to-end latency, alongside memory consumption on the client side – remember that both producer and consumer can operate with several partitions at the same time. This article is a excellent reference for this matter.

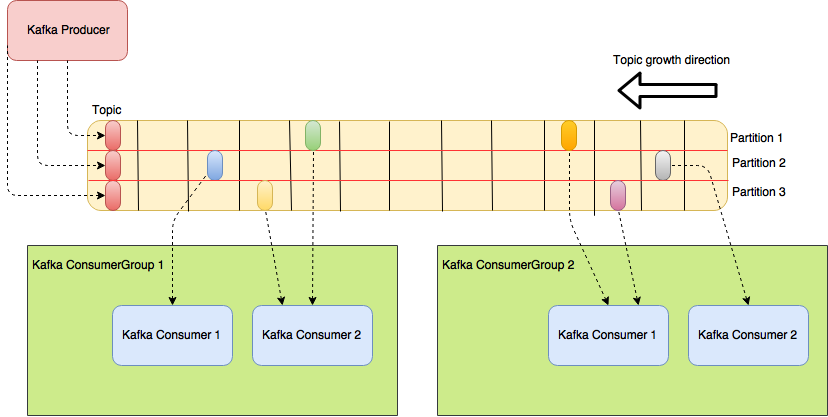
On the consumer side, we see some interesting features. Each consumer has his own offset, consuming data from just one partition. This is a important concept on Kafka: each consumer is responsible for consuming one partition on Kafka and each consumer group consumes the data individually, that is, there is no relation between the consumption of one group and the others.

We can see this on the diagram, where the offsets from one group are on different positions from the others. All Kafka offsets are stored on a internal topic inside Kafka’s cluster, both producer and consumer offsets. Offsets are committed (updated) on the cluster using auto-commit or by committing manually on code, analogous as relational database commits. We will see more about this when coding our own consumer.

What happens when there’s more partitions than consumers? When this happens, Kafka’s delivers data from more then one partition to the same consumer, as we can see bellow. It is important to note that it is possible to increase the number of consumers on a group, avoiding this situation altogether:

kafka-diagram-2

The same consumer consuming from more then one partition on Kafka

One important thing to notice is what happens on the opposite situation, when there is less partitions than consumers configured:

kafka-diagram-3

Idle consumers on Kafka

As we can see, on this case, we end up with idle consumers, that won’t process any messages until a new partition is created. This is important to keep in mind when setting a new consumer on Kafka, as increasing too much the number of consumers will just end up with idle resources not been used at all.

One of the key features on Kafka is that it guarantees message ordering. This ordering is done on the messages within the same partition, but not on the whole topic. That means that when we consume data from Kafka with our consumers, the data across the partitions is read on parallel, but data from the same partition is read with a single thread, guaranteeing the order.

IMPORTANT: As stated on Kafka’s documentation, it is not recommended to process data coming from Kafka in parallel, as it will scramble the messages order. The recommended way to scale the solution is by adding more partitions, as it will add more threads to process data on parallel, without losing the ordering inside the partitions.

Partitions on Kafka are always written on a single mount point on disk. They are written on files, that are splitted when they reach a certain amount of data, or a certain time period – 1GB or 1 week of data respectively by default, whatever  it comes first – that are called log segments. The more recent log segment, that represents the data ingested up to the head of the stream is called active segment and it is never deleted. The older segments are removed from disk according to the retention policies configured.

Replicas

In order to guarantee data availability, Kafka works with replicas. When creating a topic, we define how much replicas we want  to have for each partition on the topic. If we configure we want 3 replicas, for example, that means that for a topic with 2 partitions, we will have 6 replicas from that topic, plus the 2 active partitions.

Kafka replicates the data just like we would do by hand: brokers that are responsible for maintaining the replicas – called partition followers – will subscribe for the topic and keep reading data from the partition leader and writing to their replicas. Followers that have data up-to-date with the leader are called In-Synch replicas. Replicas can become out of synch for example due to network issues, that causes the synching process to be slow and lag behind the leader to a unacceptable point.

Rebalance

When a rebalance occurs, for example if a broker is down, all the writing/reading from partitions that broker was a partition leader are ceased. The cluster elects a new partition leader, from one of the IS (In-Synch) replicas, and so the writing/reading is resumed.

During this period, applications that were using the old leader to publish data will receive a specific error when trying to use the partition, indicating that a rebalance is occurring (unless we configure the producer to just deliver the messages without any acknowledgment, which we will see in more detail on the next sections). On the consumer side, it is possible to implement a rebalance listener, which can clean up the work for when the partition is available again.

It is important to notice that, as a broker is down, it could be possible that some messages won’t be committed, causing messages to be processed twice when the partition processing is resumed.

What happens if a broker is down and no IS replicas are available? That depends on what we configured on the cluster. If unclean election is disabled, then all processing is suspended on that partition, until the broker that was down comes back again. If unclean election is enabled, then one of the brokers that were a follower is elected as leader.

Off course, each option has his advantages: without unclean election, we can lose the partition in case we can’t restart the lost broker, but with unclean election, we risk losing some messages, since their offsets will be overwritten by the new leader, when new data arrives at the partition.

If the old leader comes back again, it will resume the partition’s processing as a new follower, and it will not insert the lost messages in case of a unclean election.

Kafka’s producer explained

On this section, we will learn the internals that compose a Kafka producer, responsible for sending messages to Kafka topics. When working with the producer, we create ProducerRecords, that we send to Kafka by using the producer.

Producer architecture

Kafka producer internal structure is divided as we can see on the following diagram:

kafka-producer

Kafka Producer internal details

As we can see, there is a lot going on when producing messages to Kafka. First, as said before, we create a ProducerRecord, that consist of 3 sections:

  • Partition Key: The partition key is a optional field. If it is passed, it indicates the partition that it must be sent the message too;
  • Message Key: The message key is a required field. If no partition key is passed, the partitioner will use this field to determine on which partition it will send the message. Kafka guarantees that all messages for a same given message key will always be sent to the same partition – as long as the number of partitions on a topic stay the same;
  • Value (payload): The value field is a required field and, as obvious, is the message itself that must be sended;

All the fields from the ProducerRecord must be serialized to byte arrays before sent to Kafka, so that’s exactly what is done by the Serializer at the first step of our sending – we will see later on our lab that we always define a serializer for our keys and  value – , after that, the records are sent to the Partitioner, that determines the partition to send the message.

The Partitioner then send the message to bulk processes, running on different threads, that “stack” the messages until a threshold is reached – a certain number of bytes or a certain time without new messages, whatever  it comes first – and finally, after the threshold is reached, the messages are sent to the Kafka broker.

Let’s keep in mind  that, as we saw before, brokers are elected as partition leaders for partitions on topics, so when sending the messages, they are sent directly to the partition leader’s broker.

Acknowledgment types

Kafka’s producer works with 3 types of acks (acknowledgments) that a message has been successfully sent. The types are:

  • ack=0: The producer just send the message and don’t wait for a confirmation, even from the partition leader. Of course, this is fastest option to deliver messages, but there is also risk of message loss;
  • ack=1: The producer waits for the partition leader to reply that wrote the message before moving on. This option is more safe, however, there is also some degree of risk, since a partition leader can go down just after the acknowledgement without repassing the message to any replica;
  • ack=all: The producer waits for the partition leader and all IS replicas to write before moving on. This option is naturally the safest of all, but there is also the disadvantage of possible performance issues, due to waiting for all network replication to occur before continuing. This aggravates when there is no IS replicas at the moment, as it will hold the production until at least one replica is made;

Which one to use? That depends on the characteristics of the solution we are working with. A ack=0 could be useful on a solution that works with lots of messages that are not critic in case of losses – monitoring events, for example, are short-lived information that could be lost at certain degree – unlike, for example, bank account transactions, where ack=all is a must, since message losses are unacceptable on this kind of application.

Producer configurations

There are several configurations that could be made on the producer. Here we have some of the more basic and interesting ones to know:

  • bootstrap.servers: A list of Kafka brokers for the producer to communicate with. This list is updated automatically when brokers are added/removed from the cluster, but it is advised to set at least 2 brokers, as the producer won’t start if just one broker is set and the broker is down;
  • key.serializer: The serializer that it will be used when transforming the keys to byte arrays. Of course, the serializer class will depend on the keys type been used;
  • value.serializer: The serializer that it will be used to transform the message to a byte array. When using complex types such as Java objects, it is possible to use one of the several out-of-box serializers, or implement your own;
  • acks: This is where we define the acknowledgement type, as we saw previously;
  • batch.size: This is the amount of memory the bulk process will wait to stack it up until reached to send the message batches;
  • linger.ms: The amount of time, in milliseconds, the producer will wait for new messages, before sending the messages it has buffered. Of course, if the batch.size is reached first, then the message batch is sent before reaching this threshold;
  • max.in.flight.requests.per.connection: This parameters defines how many messages the producer will send before waiting for responses from Kafka (if ack is not set as 0, of course). As stated on Kafka’s documentation, this configuration must be set to 1 to guarantee the messages on Kafka will be written at the same order  they are sent by the producer;
  • client.id: This parameter can be set with any string value and identifies the producer on the Kafka cluster. It is used by the cluster to build metrics and logging;
  • compression.type: This parameter define a compression to be used on messages, before they are sent to Kafka. It supports snappy, gzip and lz4 formats. By default, no compression is used;
  • retries: This parameter defines how many times the producer will retry sending a message to a broker, before notifying the application that a error has occurred;
  • retry.backoff.ms: This parameter defines how many milliseconds the producer will wait between the retries. By default, the time is 100ms;

Kafka’s consumer explained

On this section, we will learn the internals that compose a Kafka consumer, responsible for reading messages from Kafka topics.

Consumer architecture

Kafka consumer internal structure is divided as we can see on the following diagram:

kafka-consumer-3

Kafka consumer internal details

When we request a Kafka broker to create a consumer group for one or more topics, the broker creates a Consumer Group Coordinator. Each broker has a group coordinator for the partitions it is the partition leader.

This component is responsible for deciding which consumer will be responsible for consuming which partitions, by the rules we talked about on the offsets section. It is also responsible for checking consumers health, by establishing heartbeat frequencies to be sent at intervals. If a consumer fails to send heartbeats, it is considered unhealthy, so Kafka delegates the partitions assigned to that consumer to another one.

The consumer, on his turn, uses a deserializer to convert the messages from byte arrays to the required types. Like with the producer, we can also use several different types of out-of-box deserializers, as well as creating our own.

IMPORTANT: Kafka consumer must always run on the main thread. If you try to create a consumer and delegate to run on another thread, there’s a check on the consumer that will thrown a error. This is due to Kafka consumer not been thread safe. The recommended way to scale a application that consumes from Kafka is by creating new application instances, each one running his own consumer on the same consumer group.

One important point to take note is that, when a message is delivered to Kafka, it only becomes available to consume after it is properly replicated to all IS replicas for his respective partition. This is important to ensure data availability, but it also means that messages can take a significant amount of time to be delivered for consuming.

Kafka works with the concept of back-pressure. This means that applications are responsible for asking for new chunks of messages to process, allowing clients to process data at their paces.

Commit strategies

kafka works with 3 commit strategies, to know:

  • Auto-commit: On this strategy, messages are marked as committed as soon as they are successfully consumed from the broker. The downside of this approach is that messages that were not processed correctly could be lost due to already been committed;
  • Synchronous manual commit: On this strategy, messages are manually committed synchronously. This is the safest option, but has the downside of hindering the performance, as commits become more slow;
  • Asynchronous manual commit: On this strategy, messages are manually committed asynchronously. This option has better performance then the previous one as commits are done on a separate thread, but there is also some level of risk that messages won’t been committed due to some problem, resulting on messages been processed more then once;

Like when we talked about acknowledgement types, the best commit strategy to be used depends on the characteristics of the solution been implemented.

Consumer configurations

There are several configurations that could be made on the consumer. Here we have some of the more basic and interesting ones to know:

  • fetch.min.bytes: This defines the minimum amount of bytes a consumer wants to receive from a bulk of messages. The consumer will wait for this minimum to be reached, or a time limit to process messages, as defined on other config;
  • max.partition.fetch.bytes: As opposite to the previous config, this defines the maximum size, in bytes, that we want to receive on the chunk of data we asked for Kafka. As previously, if the time limit is reached first, Kafka will sent the messages it have;
  • fetch.max.wait.ms: As we talked on previous configs, this is the property that we define the time limit, on milliseconds, for Kafka to wait for more messages to fetch, before sending what it have to the consumer application;
  • auto.offset.reset: This defines what the consumer will do when first reading from a partition it never readed before or it has a invalid commit offset, for example if a consumer was down for so long that his last committed offset has already been purged from the partition. The default is latest, which means it will start reading from the newest records. The other option is earliest, on that case, the consumer will read all messages from the partition, since the beginning;
  • session.timeout.ms: This property defines the time limit for which a consumer must sent a heartbeat to still be considered healthy. The default is 3 seconds.

IMPORTANT: heartbeats are sent at each polling and/or commits made by the consumer. This means that, on the poll loop, we must be careful with the processing time, as if it passes the session timeout period, Kafka will consider the consumer unhealthy and it will redeliver the messages to another consumer.

Hands-on

Well, that was a lot to cover. Now that we learned Kafka main concepts, let’s begin our hands-on Kafka and learn what we talked in practice!

Set up

Unfortunately, there is no official  Kafka Docker image. So, for our lab, we will use Zookeeper and Kafka images provided by wurstmeister (thanks, man!). At the end, we can see links for his images.

Also at the end of the article, we can find a repository with the sources for this lab. There is also a docker compose stack that could be found there to get a Kafka cluster up and running. This is the stack:

version: '2'
services:
zookeeper:
image: wurstmeister/zookeeper
ports:
- "2181:2181"
kafka:
image: wurstmeister/kafka
ports:
- "9092"
environment:
KAFKA_ADVERTISED_HOST_NAME: ${MY_IP}
KAFKA_ZOOKEEPER_CONNECT: zookeeper:2181
KAFKA_DELETE_TOPIC_ENABLE: "true"

volumes:
- /var/run/docker.sock:/var/run/docker.sock

In order to run a cluster with 3 nodes, we can run the following commands:

export MY_IP=`ip route get 1 | awk '{print $NF;exit}'`
docker-compose up -d --scale kafka=3

To stop it, just run:

docker-compose stop

On our repo’s lab there is also a convenient bash script that set up a 3 node Kafka cluster without the need to enter the commands above every time.

Coding the producer

Now that we have our environment, let’s begin our lab. First, we need to create our topic. To create a topic, we need to use a shell inside one of the brokers, pointing Zookeeper address as a parameter – some operations, such as topic CRUD operations, are done pointing to Zookeeper instead of Kafka. There is plans to move all operations to be done on brokers directly on next releases – alongside other parameters. Assuming we have a terminal with MY_IP environment variable set, this can be done using the following command:

docker exec -t -i kafkalab_kafka_1 /opt/kafka/bin/kafka-topics.sh 
--create --zookeeper ${MY_IP}:2181 --replication-factor 1 
--partitions 2 --topic test

PS: All commands assume the name of the Kafka containers follows docker compose naming standards. If running on the lab repo, it will be created as kafkalab_kafka_1,kafkalab_kafka_2,etc

On the previous command, we created a topic named test with replication factor of 1 and 2 partitions. We can check if the topic was created by running the list topics command, as follows:

docker exec -t -i kafkalab_kafka_1 /opt/kafka/bin/kafka-topics.sh 
--list --zookeeper ${MY_IP}:2181

This will return a list of topics that exist on Zookeeper, on this case, “test”.

Now, let’s create a producer. All code on this lab will be done on Java, using Kafka’s APIs. After creating a Java project, we will code our own producer wrapper. Let’s begin by creating the wrapper itself:

package com.alexandreesl.producer;

import java.net.InetAddress;
import java.net.UnknownHostException;
import java.util.Properties;
import org.apache.kafka.clients.producer.KafkaProducer;
import org.apache.kafka.clients.producer.ProducerRecord;

public class MyProducer {


  private KafkaProducer producer;


  public MyProducer() throws UnknownHostException {

    InetAddress ip = InetAddress.getLocalHost();

    StringBuilder builder = new StringBuilder();
    builder.append(ip.getHostAddress());
    builder.append(":");
    builder.append("");
    builder.append(",");
    builder.append(ip.getHostAddress());
    builder.append(":");
    builder.append("");

    Properties kafkaProps = new Properties();
    kafkaProps.put("bootstrap.servers", builder.toString());
    kafkaProps.put("key.serializer", 
"org.apache.kafka.common.serialization.StringSerializer");
    kafkaProps.put("value.serializer", 
"org.apache.kafka.common.serialization.StringSerializer");
    kafkaProps.put("acks", "all");
    producer = new KafkaProducer<String, String>(kafkaProps);

  }


  public void sendMessage(String topic, String key, String message) 
throws Exception {

    ProducerRecord<String, String> record = 
new ProducerRecord<>(topic,
        key, message);
    try {
      producer.send(record).get();
    } catch (Exception e) {
      throw e;
    }

  }
}

The code is very simple. We just defined the addresses from 2 brokers of our cluster – docker composer will automatically define ports for the brokers, so we need to change the ports accordingly to our environment first – ,  key and value serializers and set the acknowledgement type, on our case all, marking that we want all  replicas to be made before confirming the commit.

PS: Did you noticed the get() method been called after send()? This is because the send method is asynchronous by default. As we want to wait for Kafka to write the message before ending, we call get() to make the call synchronous.

The main class that uses our wrapper class is as follows:

package com.alexandreesl;

import com.alexandreesl.producer.MyProducer;

public class Main {

  public static void main(String[] args) throws Exception {

    MyProducer producer = new MyProducer();

    producer.sendMessage("test", "mysuperkey", "my value");


  }

}

As we can see, is a very simple class, just instantiate the class and use it.  If we run it, we will see the following output on terminal, with Kafka’s commit Id at the end, showing our producer is correctly implemented:

[main] INFO org.apache.kafka.clients.producer.ProducerConfig - 
ProducerConfig values: [main] 
INFO org.apache.kafka.clients.producer.ProducerConfig - 
ProducerConfig values:  
acks = all batch.size = 16384 
bootstrap.servers = [192.168.10.107:32813, 192.168.10.107:32814] 
buffer.memory = 33554432 client.id =  
compression.type = none 
connections.max.idle.ms = 540000 
enable.idempotence = false 
interceptor.classes = null 
key.serializer = class 
org.apache.kafka.common.serialization.StringSerializer 
linger.ms = 0 max.block.ms = 60000 
max.in.flight.requests.per.connection = 5 
max.request.size = 1048576 
metadata.max.age.ms = 300000 
metric.reporters = [] 
metrics.num.samples = 2 
metrics.recording.level = INFO 
metrics.sample.window.ms = 30000 
partitioner.class = class 
org.apache.kafka.clients.producer.internals.DefaultPartitioner 
receive.buffer.bytes = 32768 
reconnect.backoff.max.ms = 1000 
reconnect.backoff.ms = 50 
request.timeout.ms = 30000 
retries = 0 
retry.backoff.ms = 100 
sasl.jaas.config = null 
sasl.kerberos.kinit.cmd = /usr/bin/kinit 
sasl.kerberos.min.time.before.relogin = 60000 
sasl.kerberos.service.name = null 
sasl.kerberos.ticket.renew.jitter = 0.05 
sasl.kerberos.ticket.renew.window.factor = 0.8 
sasl.mechanism = GSSAPI 
security.protocol = PLAINTEXT 
send.buffer.bytes = 131072 
ssl.cipher.suites = null 
ssl.enabled.protocols = [TLSv1.2, TLSv1.1, TLSv1] 
ssl.endpoint.identification.algorithm = null 
ssl.key.password = null ssl.keymanager.algorithm = SunX509 
ssl.keystore.location = null ssl.keystore.password = null 
ssl.keystore.type = JKS 
ssl.protocol = TLS ssl.provider = null 
ssl.secure.random.implementation = null 
ssl.trustmanager.algorithm = PKIX 
ssl.truststore.location = null 
ssl.truststore.password = null 
ssl.truststore.type = JKS 
transaction.timeout.ms = 60000 
transactional.id = null value.serializer = class 
org.apache.kafka.common.serialization.StringSerializer

[main] INFO org.apache.kafka.common.utils.AppInfoParser - 
Kafka version : 0.11.0.2
[main] INFO org.apache.kafka.common.utils.AppInfoParser - 
Kafka commitId : 73be1e1168f91ee2

Process finished with exit code 0

Now that we have our producer implemented, let’s move on to the consumer.

Coding the consumer

Now, let’s code our consumer. First, we create a consumer wrapper, like the following:

package com.alexandreesl.consumer;

import java.net.InetAddress;
import java.net.UnknownHostException;
import java.util.Collections;
import java.util.Properties;
import org.apache.kafka.clients.consumer.ConsumerRecord;
import org.apache.kafka.clients.consumer.ConsumerRecords;
import org.apache.kafka.clients.consumer.KafkaConsumer;

public class MyConsumer {

  private KafkaConsumer<String, String> consumer;

  public MyConsumer() throws UnknownHostException {

    InetAddress ip = InetAddress.getLocalHost();

    StringBuilder builder = new StringBuilder();
    builder.append(ip.getHostAddress());
    builder.append(":");
    builder.append("");
    builder.append(",");
    builder.append(ip.getHostAddress());
    builder.append(":");
    builder.append("");

    Properties kafkaProps = new Properties();
    kafkaProps.put("bootstrap.servers", builder.toString());
    kafkaProps.put("group.id", "MyConsumerGroup");
    kafkaProps.put("key.deserializer", 
"org.apache.kafka.common.serialization.StringDeserializer");
    kafkaProps
        .put("value.deserializer", 
"org.apache.kafka.common.serialization.StringDeserializer");
    consumer = new KafkaConsumer<String, String>(kafkaProps);

  }

  public void consume(String topic) {

    consumer.subscribe(Collections.singletonList(topic));

    try {
      while (true) {
        ConsumerRecords<String, String> records = consumer.poll(100);
        for (ConsumerRecord<String, String> record : records) {
          System.out.println("Key: " + record.key());
          System.out.println("Value: " + record.value());
        }
      }
    } finally {
      consumer.close();
    }


  }

}

On wrapper, we subscribed to our test topic, configuring a ConsumerGroup ID and deserializers for our messages. When we call the subscribe method,  ConsumerGroupCoordinators are updated on the brokers, making the cluster allocate partitions for us on topics we asked for consumption, as long as there is no more consumers than partitions, like we talked about previously.

Then, we create the consume method, which has a infinite loop to keep consuming messages from topic. On our case, we just keep calling the poll method, which returns a List of messages – on default settings, up to 100 messages -, print keys and values of messages and keep polling. At the end, we close the connection.

On our example, we can notice we didn’t explicit commit the messages at any point. This is because we are using default settings, so it is doing auto-commit. As we talked previously, using auto-commit can be a option on some solutions, depending on the situation.

Now, let’s change our main class to allow us to produce and consume using the same program and also allowing to input messages to produce. We do this by adding some input parameters, as follows:

package com.alexandreesl;

import com.alexandreesl.consumer.MyConsumer;
import com.alexandreesl.producer.MyProducer;
import java.util.Scanner;

public class Main {

  public static void main(String[] args) throws Exception {

    Scanner scanner = new Scanner(System.in);

    System.out.println("Please select operation" + " 
(1 for producer, 2 for consumer) :");

    String operation = scanner.next();

    System.out.println("Please enter topic name :");

    String topic = scanner.next();

    if (operation.equals("1")) {

      MyProducer producer = new MyProducer();

      System.out.println("Please enter key :");

      String key = scanner.next();

      System.out.println("Please enter value :");

      String value = scanner.next();

      producer.sendMessage(topic, key, value);
    } else if (operation.equals("2")) {

      MyConsumer consumer = new MyConsumer();

      consumer.consume(topic);


    }


  }

}

If we run our code, we will see some interesting output on console, such as the consumer joining the ConsumerGroupCoordinator and been assigned to partitions. At the end it will print the messages we send as the producer, proving our coding was successful.

[main] INFO org.apache.kafka.clients.consumer.internals.AbstractCoordinator -
 Discovered coordinator 192.168.10.107:32814 (id: 2147482646 rack: null) 
for group MyConsumerGroup.
[main] INFO org.apache.kafka.clients.consumer.internals.ConsumerCoordinator - 
Revoking previously assigned partitions [] for group MyConsumerGroup
[main] INFO org.apache.kafka.clients.consumer.internals.AbstractCoordinator - 
(Re-)joining group MyConsumerGroup 
[main] INFO org.apache.kafka.clients.consumer.internals.AbstractCoordinator - 
Successfully joined group MyConsumerGroup with generation 2 
[main] INFO org.apache.kafka.clients.consumer.internals.ConsumerCoordinator - 
Setting newly assigned partitions [test-1, test-0] for group MyConsumerGroup 
Key: mysuperkey 
Value: my value

Manual committing

Now that we know the basis to producing/consuming Kafka streams, let’s dive in on more details about Kafka’s consumer. We saw previously that our example used default auto-commit to commit offsets after reading. We do this by changing the code as follows:

package com.alexandreesl.consumer;

import java.net.InetAddress;
import java.net.UnknownHostException;
import java.util.Collections;
import java.util.Properties;
import org.apache.kafka.clients.consumer.ConsumerRecord;
import org.apache.kafka.clients.consumer.ConsumerRecords;
import org.apache.kafka.clients.consumer.KafkaConsumer;

public class MyConsumer {

  private KafkaConsumer<String, String> consumer;

  public MyConsumer() throws UnknownHostException {

    InetAddress ip = InetAddress.getLocalHost();

    StringBuilder builder = new StringBuilder();
    builder.append(ip.getHostAddress());
    builder.append(":");
    builder.append("");
    builder.append(",");
    builder.append(ip.getHostAddress());
    builder.append(":");
    builder.append("");

    Properties kafkaProps = new Properties();
    kafkaProps.put("bootstrap.servers", builder.toString());
    kafkaProps.put("group.id", "MyConsumerGroup");
    kafkaProps.put("key.deserializer", 
"org.apache.kafka.common.serialization.StringDeserializer");
    kafkaProps
        .put("value.deserializer", 
"org.apache.kafka.common.serialization.StringDeserializer");
    kafkaProps.put("enable.auto.commit", "false");
    consumer = new KafkaConsumer<String, String>(kafkaProps);

  }

  public void consume(String topic) {

    consumer.subscribe(Collections.singletonList(topic));

    try {
      while (true) {
        ConsumerRecords<String, String> records = consumer.poll(100);
        for (ConsumerRecord<String, String> record : records) {
          System.out.println("Key: " + record.key());
          System.out.println("Value: " + record.value());


        }

        consumer.commitSync();

      }
    } finally {
      consumer.close();
    }


  }

}

If we run our code, we will see that it will continue to consume messages, as expected:

Please select operation (1 for producer, 2 for consumer) :2
Please enter topic name :test
[main] INFO org.apache.kafka.clients.consumer.ConsumerConfig - 
ConsumerConfig values:  auto.commit.interval.ms = 5000 
auto.offset.reset = latest 
bootstrap.servers = [192.168.10.107:32771, 192.168.10.107:32772] 
check.crcs = true client.id =  
connections.max.idle.ms = 540000 
enable.auto.commit = true 
exclude.internal.topics = true 
fetch.max.bytes = 52428800 
fetch.max.wait.ms = 500 
fetch.min.bytes = 1 
group.id = MyConsumerGroup 
heartbeat.interval.ms = 3000 
interceptor.classes = null 
internal.leave.group.on.close = true 
isolation.level = read_uncommitted 
key.deserializer = class 
org.apache.kafka.common.serialization.StringDeserializer 
max.partition.fetch.bytes = 1048576 
max.poll.interval.ms = 300000 
max.poll.records = 500 
metadata.max.age.ms = 300000 
metric.reporters = [] 
metrics.num.samples = 2 
metrics.recording.level = INFO 
metrics.sample.window.ms = 30000 
partition.assignment.strategy = 
[class org.apache.kafka.clients.consumer.RangeAssignor] 
receive.buffer.bytes = 65536 reconnect.backoff.max.ms = 1000 
reconnect.backoff.ms = 50 request.timeout.ms = 305000 
retry.backoff.ms = 100 sasl.jaas.config = null

sasl.kerberos.kinit.cmd = /usr/bin/kinit 
sasl.kerberos.min.time.before.relogin = 60000 
sasl.kerberos.service.name = null 
sasl.kerberos.ticket.renew.jitter = 0.05 
sasl.kerberos.ticket.renew.window.factor = 0.8 
sasl.mechanism = GSSAPI security.protocol = PLAINTEXT 
send.buffer.bytes = 131072 session.timeout.ms = 10000 
ssl.cipher.suites = null ssl.enabled.protocols = [TLSv1.2, TLSv1.1, TLSv1] 
ssl.endpoint.identification.algorithm = null ssl.key.password = null 
ssl.keymanager.algorithm = SunX509 
ssl.keystore.location = null 
ssl.keystore.password = null 
ssl.keystore.type = JKS ssl.protocol = TLS ssl.provider = null 
ssl.secure.random.implementation = null 
ssl.trustmanager.algorithm = PKIX ssl.truststore.location = null 
ssl.truststore.password = null ssl.truststore.type = JKS 
value.deserializer = class 
org.apache.kafka.common.serialization.StringDeserializer
[main] INFO org.apache.kafka.common.utils.AppInfoParser - 
Kafka version : 0.11.0.2[main] INFO org.apache.kafka.common.utils.AppInfoParser - 
Kafka commitId : 73be1e1168f91ee2
[main] INFO org.apache.kafka.clients.consumer.internals.AbstractCoordinator -
 Discovered coordinator 192.168.10.107:32773 
(id: 2147482645 rack: null) for group MyConsumerGroup.
[main] INFO org.apache.kafka.clients.consumer.internals.ConsumerCoordinator -
 Revoking previously assigned partitions [] for group MyConsumerGroup
[main] INFO org.apache.kafka.clients.consumer.internals.AbstractCoordinator -
 (Re-)joining group MyConsumerGroup
[main] INFO org.apache.kafka.clients.consumer.internals.AbstractCoordinator -
 Successfully joined group MyConsumerGroup with generation 6
[main] INFO org.apache.kafka.clients.consumer.internals.ConsumerCoordinator -
 Setting newly assigned partitions [test-1, test-0] 
for group MyConsumerGroup
Key: key
Value: value
Key: my
Value: key

On our example, we used synch committing, that is, the main thread is blocked waiting for the commit before start reading the next batch of messages. We can change this just by changing the commit method, as follows:

public void consume(String topic) {

  consumer.subscribe(Collections.singletonList(topic));

  try {
    while (true) {
      ConsumerRecords<String, String> records = consumer.poll(100);
      for (ConsumerRecord<String, String> record : records) {
        System.out.println("Key: " + record.key());
        System.out.println("Value: " + record.value());


      }

      consumer.commitAsync();

    }
  } finally {
    consumer.close();
  }


}

One last thing to check before we move on is committing specific offsets. On our previous examples, we committed all messages at once. If we wanted to do, for example, a asynch commit as messages are processed, we can do the following:

public void consume(String topic) {

  consumer.subscribe(Collections.singletonList(topic));

  try {
    while (true) {
      ConsumerRecords<String, String> records = consumer.poll(100);
      for (ConsumerRecord<String, String> record : records) {
        System.out.println("Key: " + record.key());
        System.out.println("Value: " + record.value());

        HashMap<TopicPartition, OffsetAndMetadata> offsets = 
new HashMap<>();

        offsets.put(new TopicPartition(record.topic(), record.partition()),
            new OffsetAndMetadata(record.offset() + 1, "no metadata"));

        consumer.commitAsync(offsets, null);


      }


    }
  } finally {
    consumer.close();
  }


}

Assigning to specific partitions

On our examples, we delegate to Kafka which partitions the consumers will consume. If we want to specify the partitions a consumer will be assigned to, we can use the assign method.

It is important to notice that this approach is not very recommended, as consumers won’t be replaced automatically by others when going down, neither new partitions will be added for consuming before been explicit assigned to a consumer.

On the example bellow, we do this, by marking that we want just to consume messages from one partition:

public void consume(String topic) {

  List partitions = new ArrayList<>();

  List partitionInfos = null;
  partitionInfos = consumer.partitionsFor(topic);
  if (partitionInfos != null) {
    partitions.add(
        new TopicPartition(partitionInfos.get(0).topic(), 
partitionInfos.get(0).partition()));

  }
  consumer.assign(partitions);

  try {
    while (true) {
      ConsumerRecords<String, String> records = consumer.poll(100);

      for (ConsumerRecord<String, String> record : records) {
        System.out.println("Key: " + record.key());
        System.out.println("Value: " + record.value());

        HashMap<TopicPartition, OffsetAndMetadata> offsets = new HashMap<>();

        offsets.put(new TopicPartition(record.topic(), record.partition()),
            new OffsetAndMetadata(record.offset() + 1, "no metadata"));

        consumer.commitAsync(offsets, null);


      }


    }
  } finally {
    consumer.close();
  }


}

Consumer rebalance

When consuming from a topic, we can scale consumption by adding more instances of our application, by parallelizing the processing. Let’s see this on practice.

First, let’s start a consumer. After initializing, we can see it joined both partitions from our topic:

[main] INFO org.apache.kafka.clients.consumer.internals.AbstractCoordinator -
 Discovered coordinator 192.168.10.107:32772 (id: 2147482645 rack: null) 
for group MyConsumerGroup. 
[main] INFO org.apache.kafka.clients.consumer.internals.ConsumerCoordinator -
 Revoking previously assigned partitions [] 
for group MyConsumerGroup [main] INFO 
org.apache.kafka.clients.consumer.internals.AbstractCoordinator - 
(Re-)joining group MyConsumerGroup 
[main] INFO org.apache.kafka.clients.consumer.internals.AbstractCoordinator -
 Successfully joined group MyConsumerGroup with generation 18 
[main] INFO org.apache.kafka.clients.consumer.internals.ConsumerCoordinator -
 Setting newly assigned partitions [test-1, test-0] for group 
MyConsumerGroup

Now, let’s start another consumer. We will see that, as soon it joins the ConsumerGroupCoordinator, it will be assigned to one of the partitions:

[main] INFO org.apache.kafka.clients.consumer.internals.AbstractCoordinator -
 Discovered coordinator 192.168.10.107:32772 
(id: 2147482645 rack: null) 
for group MyConsumerGroup. 
[main] INFO org.apache.kafka.clients.consumer.internals.ConsumerCoordinator -
 Revoking previously assigned partitions [] for group MyConsumerGroup 
[main] INFO org.apache.kafka.clients.consumer.internals.AbstractCoordinator -
 (Re-)joining group MyConsumerGroup 
[main] INFO org.apache.kafka.clients.consumer.internals.AbstractCoordinator -
 Successfully joined group MyConsumerGroup with generation 19 
[main] INFO org.apache.kafka.clients.consumer.internals.ConsumerCoordinator -
 Setting newly assigned partitions [test-0] for group MyConsumerGroup

And if we see our old consumer, we will see that will be now reading from the other partition only:

[main] INFO org.apache.kafka.clients.consumer.internals.AbstractCoordinator -
 (Re-)joining group MyConsumerGroup 
[main] INFO org.apache.kafka.clients.consumer.internals.AbstractCoordinator -
 Successfully joined group MyConsumerGroup with generation 19 
[main] INFO org.apache.kafka.clients.consumer.internals.ConsumerCoordinator -
 Setting newly assigned partitions [test-1] for group MyConsumerGroup

This show us the power of Kafka ConsumerGroup Coordinator, that takes care of everything for us.

But, it is important to notice that, on real scenarios, we can implement listeners that are invoked when partitions are revoked to other consumers due to rebalance and before a partition starts consumption on his new consumer. This can be done by implementing the ConsumerRebalanceListener interface, as follows:

package com.alexandreesl.listener;

import java.util.Collection;
import org.apache.kafka.clients.consumer.ConsumerRebalanceListener;
import org.apache.kafka.common.TopicPartition;

public class MyConsumerRebalanceInterface implements 
ConsumerRebalanceListener {

  @Override
  public void onPartitionsRevoked(Collection partitions) {
    System.out.println("I am losing the following partitions:");
    for (TopicPartition partition : partitions) {
      System.out.println(partition.partition());
    }
  }

  @Override
  public void onPartitionsAssigned(Collection partitions) {
    System.out.println("I am starting on the following partitions:");
    for (TopicPartition partition : partitions) {
      System.out.println(partition.partition());
    }
  }
}

Of course, this is just a mock implementation. On a real implementation, we would be doing tasks such as committing offsets – if we buffered our commits on blocks before committing instead of committing one by one, that would turn out to be a necessity -, closing connections, etc.

We add our new listener by passing him as parameter to the subscribe() method, as follows:

public void consume(String topic) {

  consumer.subscribe(Collections.singletonList(topic), 
new MyConsumerRebalanceInterface());

  try {
    while (true) {
      ConsumerRecords<String, String> records = consumer.poll(100);

      for (ConsumerRecord<String, String> record : records) {
        System.out.println("Key: " + record.key());
        System.out.println("Value: " + record.value());

        HashMap<TopicPartition, OffsetAndMetadata> offsets = new HashMap<>();

        offsets.put(new TopicPartition(record.topic(), record.partition()),
            new OffsetAndMetadata(record.offset() + 1, "no metadata"));

        consumer.commitAsync(offsets, null);


      }


    }
  } finally {
    consumer.close();
  }


}

Now, let’s terminate all our previously started consumers and start them again. When starting the first consumer, we will see the following outputs on terminal:

[main] INFO org.apache.kafka.clients.consumer.internals.AbstractCoordinator -
 Discovered coordinator 192.168.10.107:32772 (id: 2147482645 rack: null) 
for group MyConsumerGroup. 
[main] INFO org.apache.kafka.clients.consumer.internals.ConsumerCoordinator -
 Revoking previously assigned partitions [] for group 
MyConsumerGroup I am losing the following partitions: 
[main] INFO org.apache.kafka.clients.consumer.internals.AbstractCoordinator -
 (Re-)joining group MyConsumerGroup 
I am starting on the following partitions:
 1 0 
[main] INFO org.apache.kafka.clients.consumer.internals.AbstractCoordinator - 
Successfully joined group MyConsumerGroup with generation 21 
[main] INFO org.apache.kafka.clients.consumer.internals.ConsumerCoordinator -
 Setting newly assigned partitions [test-1, test-0] 
for group MyConsumerGroup

That shows our listener was invoked. Let’s now start the second consumer and see what happens:

I am losing the following partitions: 
[main] INFO org.apache.kafka.clients.consumer.internals.AbstractCoordinator -
 Discovered coordinator 192.168.10.107:32772 
(id: 2147482645 rack: null) for group MyConsumerGroup. 
[main] INFO org.apache.kafka.clients.consumer.internals.ConsumerCoordinator -
 Revoking previously assigned partitions [] for group 
MyConsumerGroup 
[main] INFO org.apache.kafka.clients.consumer.internals.AbstractCoordinator -
 (Re-)joining group MyConsumerGroup 
[main] INFO org.apache.kafka.clients.consumer.internals.AbstractCoordinator -
 Successfully joined group MyConsumerGroup with generation 22 
[main] INFO org.apache.kafka.clients.consumer.internals.ConsumerCoordinator -
 Setting newly assigned partitions [test-0] 
for group MyConsumerGroup 
I am starting on the following partitions: 0

And finally, if we see the first consumer, we will see that both revoked and reassigned partitions were printed on console, showing our listener was implemented correctly:

[main] INFO org.apache.kafka.clients.consumer.internals.AbstractCoordinator -
 (Re-)joining group MyConsumerGroup 
I am losing the following partitions: 1 0 
[main] INFO org.apache.kafka.clients.consumer.internals.AbstractCoordinator -
 Successfully joined group MyConsumerGroup with generation 22 
[main] INFO org.apache.kafka.clients.consumer.internals.ConsumerCoordinator -
 Setting newly assigned partitions [test-1] 
for group MyConsumerGroup 
I am starting on the following partitions: 1

PS: Kafka works rebalancing by revoking all partitions and redistributing them. That’s why we see the first consumer losing all partitions before been reassigned to one of the old ones.

Log compaction

Log compaction is a powerful cleanup feature of Kafka. With log compaction, we define a  point from which messages from a same key on a same partition are compacted so only the more recent message is retained.

This is done by setting configurations that establish a compaction entry point and a retention entry point. This entry points consists of time periods, from which Kafka allow messages to keep coming from the producers, but at the same time removing old messages that doesn’t matter anymore. The following diagram explain the system on practice:

kafka-compaction

Kafka log compaction explained

In order to configure log compaction, we need to introduce some configurations both on cluster and topic. For the cluster, we change our docker compose YAML as follows:

version: '2'
services:
  zookeeper:
    image: wurstmeister/zookeeper
    ports:
      - "2181:2181"
  kafka:
    image: wurstmeister/kafka
    ports:
      - "9092"
    environment:
      KAFKA_ADVERTISED_HOST_NAME: ${MY_IP}
      KAFKA_ZOOKEEPER_CONNECT: zookeeper:2181
      KAFKA_DELETE_TOPIC_ENABLE: "true"
      KAFKA_LOG_CLEANER_ENABLED: "true"

    volumes:
      - /var/run/docker.sock:/var/run/docker.sock

This change is needed due to log cleaning not been enabled by default on Kafka. Then, we change our topic configuration with the following new entries:

docker exec -t -i kafkalab_kafka_1 /opt/kafka/bin/kafka-configs.sh 
--zookeeper ${MY_IP}:2181 --entity-type topics --entity-name test --alter 
--add-config min.compaction.lag.ms=1800000,delete.retention.ms=172800000,
cleanup.policy=compact

On the command above, we set the compaction entry point – min.compaction.lag.ms – to 30 minutes, so all messages from the head of the stream to 30 minutes after will be on the dirty section. The other config stablished a retention period of 48 hours, so from 30 minutes up to 48 hours, all messages will be on the clean section, where compaction will occur. Messages older than 48 hours will be removed from the stream.

Lastly, we configured the cleanup policy, making compaction enabled. We can check our configs were successfully set by using the following command:

docker exec -t -i kafkalab_kafka_1 /opt/kafka/bin/kafka-configs.sh 
--zookeeper ${MY_IP}:2181 --entity-type topics --entity-name test --describe

Which will produce the following output:

Configs for topic 'test' are 
min.compaction.lag.ms=1800000,delete.retention.ms=172800000,
cleanup.policy=compact

One last thing we need to know before moving on to our next topic is that compaction also allows messages to be removed. If we want a message to be completely removed from our stream, all we need to do is send a message with his key, but with null as value. When sent this way with compaction enabled, it will remove all messages from the stream. This kind of messages are called tombstones on Kafka.

Kafka connect

Kafka connect is a integration framework, like others such as Apache Camel, that ships with Kafka – but runs on a cluster of his own – and allows us to quickly develop integrations from/to Kafka to other systems. It is maintained by Confluence.

This framework deserves a article of his own, so it won’t be covered here. If the reader wants to know more about it, please go to the following link:

https://docs.confluent.io/current/connect/intro.html

Kafka Streams

Kafka Streams is a framework shipped with Kafka that allows us to implement stream applications using Kafka. By stream applications, that means applications that have streams as input and output as well, consisting typically of operations such as aggregation, reduction, etc.

A typical example of a stream application is reading data from 2 different streams and producing a aggregated result from the two on a third stream.

This framework deserves a article of his own, so it won’t be covered here. If the reader wants to know more about it, please go to the following link:

https://kafka.apache.org/documentation/streams/

Kafka MirrorMaker

Kafka MirrorMaker is a tool that allows us to mirror Kafka clusters, by making copies from a source cluster to a target cluster, as messages goes in. As with Kafka connect and Streams, is a tool that deserves his own article, so it won’t be covered here. More information about it could be found on the following link:

https://cwiki.apache.org/confluence/pages/viewpage.action?pageId=27846330

Kafka administration

Now that we covered most of the developing code to use Kafka, let’s see how to administrate a Kafka cluster. All commands for Kafka administration are done by their shell scripts, like we did previously on our study.

Kafka CRUD topic operations

Let’s begin with basic topic operations. Like we saw before, topics can be created with the following command:

docker exec -t -i kafkalab_kafka_1 /opt/kafka/bin/kafka-topics.sh 
--create --zookeeper ${MY_IP}:2181 --replication-factor 1 --partitions 2 
--topic test

Changing topics – not configurations, like we saw on log compaction, but the topic itself, such as the number of partitions  – are done with the same shell, just changing some options:

docker exec -t -i kafkalab_kafka_1 /opt/kafka/bin/kafka-topics.sh 
--alter --zookeeper ${MY_IP}:2181 --partitions 4 --topic test

IMPORTANT: changing partition numbers on topics also can change partition logic, meaning messages that always were sent to a same partition A can be now always sent to a partition B. This is important to watch out as can lead to message ordering issues if not taken with care.

We can search for topics by using the list command, like we did before:

docker exec -t -i kafkalab_kafka_1 /opt/kafka/bin/kafka-topics.sh 
--list --zookeeper ${MY_IP}:2181

If we want to delete a topic, we issue the following command. Take note that, if the configuration delete.topic.enabled is not set, the topic will just be marked for deletion, not removed:

docker exec -t -i kafkalab_kafka_1 /opt/kafka/bin/kafka-topics.sh 
--delete --zookeeper ${MY_IP}:2181 --topic test

Other Kafka admin operations

Let’s now see other Kafka admin operations. First, let’s create a new topic to test it out:

docker exec -t -i kafkalab_kafka_1 /opt/kafka/bin/kafka-topics.sh 
--create --zookeeper ${MY_IP}:2181 --replication-factor 1 
--partitions 3 --topic mytopic

The first operation we will see is preferred replica election. When Kafka creates a topic, at first, the partition leaders are spread out as evenly as possible, reducing impact risks on nodes going down. However, after some time, this distribution could be compromised, due to nodes going down and up several times, inducing on several rebalances. This could be specially problematic on a small cluster.

The preferred replica election operation tries to rebalance a topic to as closest as possible to his original partition leader distribution, solving the distribution problem. This is done with the following command:

docker exec -t -i kafkalab_kafka_1 
/opt/kafka/bin/kafka-preferred-replica-election.sh 
--zookeeper ${MY_IP}:2181

IMPORTANT: This command triggers rebalances on all topics from the cluster, so it must be used with care.

We can also trigger rebalance for just one topic, by writing a JSON file like this:

{
  "partitions": [
    {
      "partition": 1,
      "topic": "mytopic"
    },
    {
      "partition": 2,
      "topic": "mytopic"
    },
    {
      "partition": 3,
      "topic": "mytopic"
    }
  ]
}

And running the command like this:

docker exec -t -i kafkalab_kafka_1 
/opt/kafka/bin/kafka-preferred-replica-election.sh 
--zookeeper ${MY_IP}:2181 
--path-to-json-file rebalance-example.json

PS: Before running the command, it is necessary to copy the file to the container where it will run the command.

Another useful command is reassigning of replicas. This is useful, for example, if we want to isolate a broker from the cluster, that it will be removed for maintenance, or if a new broker is added and need to receive his share of topics in order to balance the cluster.

The first step is to generate a file that will be used to request a proposal to partition moves. We write the following file, calling “partition-req.json”:

{
 "topics": [
 {
 "topic": "mytopic"
 }
 ],
 "version": 1
}

On our stack, we have only 3 nodes, so reassign proposal can fail due to the cluster been so small. We change our start cluster shell as follows and run again:

#!/usr/bin/env bash

export MY_IP=`ip route get 1 | awk '{print $NF;exit}'`
docker-compose up -d --scale kafka=6

We then execute the following command. Remember to copy the file to the container first:

docker exec -t -i kafkalab_kafka_1 
/opt/kafka/bin/kafka-reassign-partitions.sh 
--zookeeper ${MY_IP}:2181 --generate 
--topics-to-move-json-file partition-req.json 
--broker-list 1004,1005,1006

IMPORTANT: We can copy the file as follows:

docker cp partition-req.json kafkalab_kafka_1:/partition-req.json

On the command above, we ask Kafka that we want to redistribute the replica set from the current brokers to the brokers 1004,1005 and 1006. We receive the following output, with the actual distribution and a proposed one:

Current partition replica assignment 
{"version":1,"partitions":[{"topic":"mytopic","partition":2,"replicas":[1001]
,"log_dirs":["any"]},{"topic":"mytopic","partition":1,"replicas":[1003],
"log_dirs":["any"]},{"topic":"mytopic","partition":0,"replicas":[1002],
"log_dirs":["any"]}]}

Proposed partition reassignment configuration 
{"version":1,"partitions":[{"topic":"mytopic","partition":2,"replicas":[1005]
,"log_dirs":["any"]},
{"topic":"mytopic","partition":1,"replicas":[1004],
"log_dirs":["any"]},{"topic":"mytopic","partition":0,"replicas":[1006],
"log_dirs":["any"]}]}

The first JSON can be saved for rolling back, in case anything goes wrong. Let’s save the second JSON on a file called replica-proposal.json:

{"version":1,"partitions":[{"topic":"mytopic","partition":2,
"replicas":[1005],"log_dirs":["any"]},
{"topic":"mytopic","partition":1,"replicas":[1004]
,"log_dirs":["any"]},{"topic":"mytopic","partition":0
,"replicas":[1006],"log_dirs":["any"]}]}

Finally, we run the replica assignment command, using the proposed distribution file as parameter – don’t forget to copy the file to the container first -, as follows:

docker exec -t -i kafkalab_kafka_1 
/opt/kafka/bin/kafka-reassign-partitions.sh 
--zookeeper ${MY_IP}:2181 --execute 
--reassignment-json-file replica-proposal.json

We will receive a output like this:

Current partition replica assignment {"version":1,"partitions":
[{"topic":"mytopic","partition":2,"replicas":[1001],"log_dirs":["any"]}
,{"topic":"mytopic","partition":1,"replicas":[1003],"log_dirs":["any"]}
,{"topic":"mytopic","partition":0,"replicas":[1002],"log_dirs":["any"]}]}

Save this to use as the --reassignment-json-file option during rollback

Successfully started reassignment of partitions.

This means that reassigning is been performed. During this phase, Kafka will redistribute the replicas and copy all data across the new brokers, so depending on the amount of data, this operation can take a lot of time. We can check the status of reassignment by running:

docker exec -t -i kafkalab_kafka_1 
/opt/kafka/bin/kafka-reassign-partitions.sh 
--zookeeper ${MY_IP}:2181 --verify 
--reassignment-json-file replica-proposal.json

When reassignment is finished, we will see the following:

Status of partition reassignment: 

Reassignment of partition mytopic-2 completed successfully

Reassignment of partition mytopic-1 completed successfully

Reassignment of partition mytopic-0 completed successfully

We can also check the status of our topics by running the describe command, as follows:

docker exec -t -i kafkalab_kafkadocker exec -t -i 
kafkalab_kafka_1 /opt/kafka/bin/kafka-topics.sh 
--zookeeper ${MY_IP}:2181 --describe

After our reassignment, it will output something like this:

Topic:mytopic PartitionCount:3 ReplicationFactor:1 Configs:

Topic: mytopicPartition: 0Leader: 1006Replicas: 1006Isr: 1006

Topic: mytopicPartition: 1Leader: 1004Replicas: 1004Isr: 1004

Topic: mytopicPartition: 2Leader: 1005Replicas: 1005Isr: 1005

Topic:test PartitionCount:2 ReplicationFactor:1 Configs:

Topic: testPartition: 0Leader: 1003Replicas: 1003Isr: 1003

Topic: testPartition: 1Leader: 1001Replicas: 1001Isr: 1001

Kafka offset lag

Kafka’s offset lag refers to a situation where we have consumers lagging behind the head of a stream. Let’s revisit one of our diagrams from the offsets explained section:

kafka-diagram-3

Consumers lagging behind on a stream

As we can see on the diagram above, we have 2 consumers groups in a stream. Consumer group 1 is 3 messages from the stream’s head, while consumer group 2 is 8 messages away. This difference between head and current position of a consumer on a stream is called offset lag.

The causes for a offset lag may vary, ranging from network problems to issues on the consumer application itself. It is important to keep this lag in check by monitoring it. One good tool for this is Burrow, provided by Linkedin. More information about it could be found on the following link:

https://github.com/linkedin/Burrow

Testing the cluster

It is important to test our cluster configuration, in order to verify how the cluster will behave on several situations, such as when brokers goes down – with partition leaderships or not -, new brokers goes in, etc.

We can code our own tests for this intent using the VerifiableProducer and VerifiableConsumer interfaces on Apache Kafka’s APIs. The usage for this interfaces are essentially the same as the original ones we saw on our lab.

There is also a read-to-use bash version of this interfaces, that can be used to make some testing. For example, if we wanted to test our cluster by sending 200000 messages to mytopic, we can something like this:

docker exec -t -i kafkalab_kafka_1 
/opt/kafka/bin/kafka-verifiable-producer.sh 
--topic mytopic --max-messages 200000 
--broker-list 
 ${MY_IP}:<a broker port>,${MY_IP}:<a broker port>

This will produce a output like the following:

{"timestamp":1516571263855,"name":"startup_complete"}

{"timestamp":1516571264213,"name":"producer_send_success","key":null,"value":"0","offset":0,"topic":"mytopic","partition":1}

{"timestamp":1516571264216,"name":"producer_send_success","key":null,"value":"3","offset":1,"topic":"mytopic","partition":1}

{"timestamp":1516571264216,"name":"producer_send_success","key":null,"value":"6","offset":2,"topic":"mytopic","partition":1}

{"timestamp":1516571264216,"name":"producer_send_success","key":null,"value":"9","offset":3,"topic":"mytopic","partition":1}

{"timestamp":1516571264216,"name":"producer_send_success","key":null,"value":"12","offset":4,"topic":"mytopic","partition":1}

{"timestamp":1516571264216,"name":"producer_send_success","key":null,"value":"15","offset":5,"topic":"mytopic","partition":1}

{"timestamp":1516571264217,"name":"producer_send_success","key":null,"value":"18","offset":6,"topic":"mytopic","partition":1}

{"timestamp":1516571264217,"name":"producer_send_success","key":null,"value":"21","offset":7,"topic":"mytopic","partition":1}

{"timestamp":1516571264218,"name":"producer_send_success","key":null,"value":"24","offset":8,"topic":"mytopic","partition":1}

{"timestamp":1516571264218,"name":"producer_send_success","key":null,"value":"27","offset":9,"topic":"mytopic","partition":1}

{"timestamp":1516571264218,"name":"producer_send_success","key":null,"value":"30","offset":10,"topic":"mytopic","partition":1}

{"timestamp":1516571264219,"name":"producer_send_success","key":null,"value":"33","offset":11,"topic":"mytopic","partition":1}

{"timestamp":1516571264220,"name":"producer_send_success","key":null,"value":"36","offset":12,"topic":"mytopic","partition":1}

{"timestamp":1516571264220,"name":"producer_send_success","key":null,"value":"39","offset":13,"topic":"mytopic","partition":1}

{"timestamp":1516571264220,"name":"producer_send_success","key":null,"value":"42","offset":14,"topic":"mytopic","partition":1}

{"timestamp":1516571264221,"name":"producer_send_success","key":null,"value":"45","offset":15,"topic":"mytopic","partition":1}

{"timestamp":1516571264224,"name":"producer_send_success","key":null,"value":"48","offset":16,"topic":"mytopic","partition":1}

{"timestamp":1516571264225,"name":"producer_send_success","key":null,"value":"51","offset":17,"topic":"mytopic","partition":1}

{"timestamp":1516571264225,"name":"producer_send_success","key":null,"value":"54","offset":18,"topic":"mytopic","partition":1}

...omitted...

{"timestamp":1516571272789,"name":"producer_send_success","key":null,"value":"199980","offset":66660,"topic":"mytopic","partition":1}

{"timestamp":1516571272789,"name":"producer_send_success","key":null,"value":"199983","offset":66661,"topic":"mytopic","partition":1}

{"timestamp":1516571272789,"name":"producer_send_success","key":null,"value":"199986","offset":66662,"topic":"mytopic","partition":1}

{"timestamp":1516571272789,"name":"producer_send_success","key":null,"value":"199989","offset":66663,"topic":"mytopic","partition":1}

{"timestamp":1516571272789,"name":"producer_send_success","key":null,"value":"199992","offset":66664,"topic":"mytopic","partition":1}

{"timestamp":1516571272789,"name":"producer_send_success","key":null,"value":"199995","offset":66665,"topic":"mytopic","partition":1}

{"timestamp":1516571272789,"name":"producer_send_success","key":null,"value":"199998","offset":66666,"topic":"mytopic","partition":1}

{"timestamp":1516571272803,"name":"shutdown_complete"}

{"timestamp":1516571272805,"name":"tool_data","sent":200000,"acked":200000,"target_throughput":-1,"avg_throughput":22346.368715083798}

And similarly, we can test the consumer by running something like this:

docker exec -t -i kafkalab_kafka_1 
/opt/kafka/bin/kafka-verifiable-consumer.sh 
--topic mytopic --max-messages 1000 
--group-id testing 
--broker-list ${MY_IP}:<a broker port>,${MY_IP}:<a broker port>

Which will output something like this:

{"timestamp":1516571973384,"name":"startup_complete"}

{"timestamp":1516571973534,"name":"partitions_revoked","partitions":[]}

{"timestamp":1516571973557,"name":"partitions_assigned","partitions":[{"topic":"mytopic","partition":2},{"topic":"mytopic","partition":1},{"topic":"mytopic","partition":0}]}

{"timestamp":1516571973669,"name":"records_consumed","count":500,"partitions":[{"topic":"mytopic","partition":1,"count":500,"minOffset":66667,"maxOffset":67166}]}

{"timestamp":1516571973680,"name":"offsets_committed","offsets":[{"topic":"mytopic","partition":1,"offset":67167}],"success":true}

{"timestamp":1516571973687,"name":"records_consumed","count":500,"partitions":[{"topic":"mytopic","partition":1,"count":500,"minOffset":67167,"maxOffset":67666}]}

{"timestamp":1516571973690,"name":"offsets_committed","offsets":[{"topic":"mytopic","partition":1,"offset":67667}],"success":true}

{"timestamp":1516571973692,"name":"records_consumed","count":500,"partitions":[]}

{"timestamp":1516571973692,"name":"offsets_committed","offsets":[],"success":true}

{"timestamp":1516571973694,"name":"records_consumed","count":500,"partitions":[]}

{"timestamp":1516571973694,"name":"offsets_committed","offsets":[],"success":true}

{"timestamp":1516571973696,"name":"records_consumed","count":500,"partitions":[]}

{"timestamp":1516571973696,"name":"offsets_committed","offsets":[],"success":true}

{"timestamp":1516571973697,"name":"records_consumed","count":500,"partitions":[]}

{"timestamp":1516571973697,"name":"offsets_committed","offsets":[],"success":true}

{"timestamp":1516571973698,"name":"records_consumed","count":500,"partitions":[]}

{"timestamp":1516571973699,"name":"offsets_committed","offsets":[],"success":true}

{"timestamp":1516571973700,"name":"records_consumed","count":500,"partitions":[]}

{"timestamp":1516571973700,"name":"offsets_committed","offsets":[],"success":true}

{"timestamp":1516571973701,"name":"records_consumed","count":500,"partitions":[]}

{"timestamp":1516571973702,"name":"offsets_committed","offsets":[],"success":true}

{"timestamp":1516571973702,"name":"records_consumed","count":500,"partitions":[]}

{"timestamp":1516571973703,"name":"offsets_committed","offsets":[],"success":true}

{"timestamp":1516571973704,"name":"records_consumed","count":500,"partitions":[]}

{"timestamp":1516571973704,"name":"offsets_committed","offsets":[],"success":true}

{"timestamp":1516571973705,"name":"records_consumed","count":500,"partitions":[]}

{"timestamp":1516571973705,"name":"offsets_committed","offsets":[],"success":true}

{"timestamp":1516571973706,"name":"records_consumed","count":500,"partitions":[]}

{"timestamp":1516571973706,"name":"offsets_committed","offsets":[],"success":true}

{"timestamp":1516571973708,"name":"records_consumed","count":500,"partitions":[]}

{"timestamp":1516571973708,"name":"offsets_committed","offsets":[],"success":true}

{"timestamp":1516571973709,"name":"records_consumed","count":500,"partitions":[]}

{"timestamp":1516571973709,"name":"offsets_committed","offsets":[],"success":true}

{"timestamp":1516571973710,"name":"records_consumed","count":500,"partitions":[]}

{"timestamp":1516571973711,"name":"offsets_committed","offsets":[],"success":true}

{"timestamp":1516571973714,"name":"records_consumed","count":500,"partitions":[]}

{"timestamp":1516571973714,"name":"offsets_committed","offsets":[],"success":true}

{"timestamp":1516571973715,"name":"records_consumed","count":500,"partitions":[]}

{"timestamp":1516571973715,"name":"offsets_committed","offsets":[],"success":true}

{"timestamp":1516571973716,"name":"records_consumed","count":500,"partitions":[]}

{"timestamp":1516571973716,"name":"offsets_committed","offsets":[],"success":true}
...omitted...

Conclusion

And that concludes our study of Apache Kafka. I hope to have passed for the reader a solid explanation of Kafka core concepts, as well as directions for complementary studies on his different usages and applications. Thank you for following me on this post, until next time.

Continue reading

Social media and sentimental analysis: knowing your clients

Standard

Hi, dear readers! Welcome to another post of my blog. On this post, we will talk about social media and sentimental analysis, seeing how she is revolutionizing the way companies are targeting their clients.

Social media

Undoubtedly, there is no doubt about the importance of social media on the modern life. As a example of the power that social media has today, we can say about the recent protests on Brazil against the president and her government’s corruption, which leaded thousands of people to the streets across the country, all organized by Facebook!

Today, social media has a very strong power of influence in the masses, reflecting the tastes and opinions of thousands of people. All of this gigantic amount of information is a gold mine to the companies, just waiting to be tapped.

Just imagine that you are the director of a area responsible for developing new products for a gaming company. Now, imagine if you could use the social medias to analyse the reactions of the players to the trailers and news your company releases on the internet. That information could be crucial to discover, for example, that your brand new shinning multiplayer mode is angering your audience, because of a new weapon your development team thought it would be awesome, but to the players feel extreme unbalanced.

Now imagine that you are responsible for the public relations of a oil company. Imagine that a ecological NGO start launching a “attack” at your company’s image on the social networks, saying that your refinery’s locations are bad for the ecosystems, despise your company’s efforts on reforestation. Without a proper tool to quickly analyse the data flowing on the social networks, it may be too late to revert the damage on the company’s image, with hundreds of people “flagellating” your company on the Internet. This may not seen important at first, until you realize that some companies you provide your fuel start buying less from you, because they are worried with their own image on the market, by associating themselves with you. More and more, the companies are realizing the importance of how positive is the image of their brands on the eyes of their customers, a term also known as “brand health”.

This “brand’s health” metric is very important on the marketing area, already influencing several companies to enter on the social media monitoring field, providing partial or even complete solutions to a brand’s health monitoring tool, many times on a SAAS model. Examples of companies that provide this kind of service are Datasift, Mention and Gnip.

Sentimental analysis

A very important metric on the brand’s health monitoring is the sentimental analysis. In a simple statement, sentimental analysis is exactly what the name says: is the analysis of the “sentiment” the author of a given text is feeling about the subject of a given text he wrote about, been classified as negative, neutral or positive. Of course, it is very clear how important this metric is for most of the analysis, since is the key to understand the quality of your brand’s image on the perspective of your public.

But how does this work? How is it possible to analyse someone’s sentiments? This is a field still on progress, but there’s already some techniques been applied for this task, such as keywords scoring (presence of words such as curses, for example), polarities scores to balance the percentage a sentence is positive, neutral and negative in order to analyse the overall sentiment of the text and so on. At the end of this post, there is a article from Columbia’s University about sentimental analysis of Twitter posts, that the reader can use as a starting point to deepen on the details of the techniques involved on the subject.

Big Data

As the reader may have already guessed, we are talking about a big volume of data, that grows very fast, is unstructured, has mixed veracity – since we can have both valuable and non-valuable information among our dataset – and has a enormous potential of value for our analysis, since are the opinions and tastes – or the “soul” – of our costumers. As we have see previously on my first post about Big Data, this data qualifies on the famous “Vs” that are always talked about when we heard about Big Data. Indeed, generally speaking, most of the tools used on this kind of solution can be classified as Big Data’s solutions, since they are processing amounts of data with this characteristics, heavily using distributed systems concepts. Just remember: It is not always that because it uses social media, that it is Big Data!

A practical exercise

Now, let’s see a simple practical exercise, just to see a little of the things we talked about working on practice. On this hands-on, we will make a simple Python script. This Python script will connect to Twitter, to the public feed to be more precise, filtering everything with the keyword “coca-cola”. Then, it will make a sentimental analysis on all the tweets provided by the feed, using a library called TextBlob that provides us with Natural Language Processing (NLP) capabilities and finally it will print all the results on the console. So, without further delay, let’s begin!

Installation

On this lab, we will use Python 3. I am using Ubuntu 15.04, so Python is already installed by default. If the reader is using a different OS, you can install Python 3 by following this link.

We will also use virtualenv. Virtualenv is a tool used to create independent Python’s environments on our development machine. This is useful to isolate the dependencies and versions of libraries between Python applications, eliminating the problems of installing the libraries on the global Python’s installation of the OS. To install Virtualenv, please refer to this link.

Set up

To start our set up, first, let’s create a virtual environment. To do this, we open a terminal and type:

virtualenv –python=python3.4 twitterhandson

This will create a folder called twitterhandson, where we can see that a complete Python environment was created, including executables such as pip and python itself. To use Virtualenv, enter the twitterhandson folder and input:

source bin/activate

After entering the command, we can see that our command prompt got a prefix with the name of our environment, as we can see on the screen bellow:

 That’s all we need to do in order to use Virtualenv. If we want to close, just type exit on the console.

Using a IDE

On this lab, I am using Pycharm, a powerfull Python’s IDE developed by Jetbrains. The IDE is not required for our lab, since any text editor will suffice, but I recommend the reader to experiment the IDE, I am sure you will like it!

Downloading module dependencies

On Python, we have modules. A module is a python file where we can have definitions of variables, functions and classes, that we can reuse later on more complex scripts. For our lab, we will use Pip to download the dependencies. Pip is a tool recommended by Python used to manage dependencies, something like what Maven do for us in the Java World. To use it, first, we create on our virtualenv root folder a file called requirements.txt and put the following inside:

httplib2
simplejson
six
tweepy
textblob

The dependencies above are necessary to use the NLP library and use the Twitter API. To make Pip download the dependencies, first we activate the virtual environment we created previously and then, on the same folder of our txt file, we input:

pip3 install -r requirements.txt

After running the command above, the modules should be downloaded and enabled on our virtualenv environment.

Using sentimental analysis on other languages

On this post, we are using TextBlob, which sadly has only english as supported language for sentimental analysis – he can translate the text to other languages using Google translator, but of course is not the same as a analyser specially designed to process the language. If the reader wants a alternative to process sentimental analysis on other languages as well, such as Portuguese for example, is there a REST API from a company called BIText – which provides the sentimental analysis solution for Salesforce’s Marketing products – that I have tested and provides very good results. The following link points for the company’s API page:

BIText

Creating the Access Token

Before we start our code, there is one last thing we need to do: We need to create a access token, in order to authenticate our calls on Twitter to obtain the data from the public feed. In order to do this, first, we need to create a Twitter account, on Twitter.com. With a account created, we create a access token, following this tutorial from Twitter.

Developing the script

Well, now that all the preparations were made, let’s finally code! First, we will create a file called config.py. On that file, we will create all the constants we will use on our script:

accesstoken='<access token>’
accesstokensecret='<access token secret>’
consumerkey='<consumer key>’
consumerkeysecret='<consumer key secret>’

And finally, we will create a file called twitter.py, where we will code our Python script, as the following:

from config import *
from textblob import TextBlob
from nltk import downloader
import tweepy


class MyStreamListener(tweepy.StreamListener):
    def on_status(self, status):
        print('A TWEET!')
        print(status.text)
        print('AND THE SENTIMENT PER SENTENCE IS:')
        blob = TextBlob(status.text)
        for sentence in blob.sentences:
            print(sentence.sentiment.polarity)


auth = tweepy.OAuthHandler(consumerkey, consumerkeysecret)
auth.set_access_token(accesstoken, accesstokensecret)

downloader.download('punkt')

myStreamListener = MyStreamListener()
myStream = tweepy.Stream(auth=auth, listener=myStreamListener)

stream = tweepy.Stream(auth, myStreamListener)
stream.filter(track=['coca cola'], languages=['en'])

On the first time we run the example, the reader may notice that the script will download some files. That is because we have to download the resources for the NLTK library, a dependency from TextBlob, which is the real NLP processor that TextBlob uses under the hood. Beginning our explanation of the script, we can see that we are creating a OAuth handler, which will be responsible for managing our authentication with Twitter. Then, we instantiate a listener, which we defined at the beginning of our script and pass him as one of the args for the creation of our stream and then we start the stream, filtering to return just tweets with the words “coca cola” and on the english language. According to Twitter documentation, it is advised to process the tweets asynchronously, because if we process them synchronous, we can lose a tweet while we are still processing the predecessor. That is why tweepy requires us to implement a listener, so he can collect the tweets for us and order them to be processed on our listener implementation.

On our listener, we simply print the tweet, use the TextBlob library to make the sentimental analysis and finally we print the results, which are calculated sentence by sentence. We can see the results from a run bellow:

A TWEET!
RT @GeorgeLudwigBiz: Coca-Cola sees a new opportunity in bottling billion-dollar #startups http://t.co/nZXpFRwQOe
AND THE SENTIMENT PER SENTENCE IS:
0.13636363636363635
A TWEET!
RT @momosdonuts: I told y’all I change things up often! Delicious, fluffy, powdered and caramel drizzled coca-cola cake. #momosdonuts http:…
AND THE SENTIMENT PER SENTENCE IS:
0.0
0.4
0.0
A TWEET!
vanilla coca-cola master race

tho i have yet to find a place where they sell imports of the british version
AND THE SENTIMENT PER SENTENCE IS:
0.0
A TWEET!
RT @larrywhoran: CLOUDS WAS USED IN THE COCA COLA COMMERCIAL AND NO CONTROL BEING PLAYED IN RADIOS AND THEYRE NOT EVEN SINGLES YAS SLAY
AND THE SENTIMENT PER SENTENCE IS:
0.0
A TWEET!
RT @bromleyfthood: so sei os covers e coca cola dsanvn I vote for @OTYOfficial for the @RedCarpetBiz Rising Star Award 2015 #RCBAwards
AND THE SENTIMENT PER SENTENCE IS:
0.0
A TWEET!
RT @LiPSMACKER_UK: Today, we’re totally craving Coca-Cola! http://t.co/V140SADKok
AND THE SENTIMENT PER SENTENCE IS:
0.0
0.0
A TWEET!
RT @woodstammie8: Early production of Coca Cola contained trace amounts of coca leaves, which, when processed, render cocaine.
AND THE SENTIMENT PER SENTENCE IS:
0.1
A TWEET!
RT @designtaxi: Coca-Cola creates braille cans for the blind http://t.co/cCSvJLv7O0 http://t.co/UA0PGoheO2
AND THE SENTIMENT PER SENTENCE IS:
-0.5
A TWEET!
Instrus, weed, Coca-Cola y snacks.
AND THE SENTIMENT PER SENTENCE IS:
0.0
A TWEET!
RT @larrywhoran: CLOUDS WAS USED IN THE COCA COLA COMMERCIAL AND NO CONTROL BEING PLAYED IN RADIOS AND THEYRE NOT EVEN SINGLES YAS SLAY
AND THE SENTIMENT PER SENTENCE IS:
0.0
A TWEET!
1 Korean Coca-Cola Bottle in GREAT CONDITION Coke Bottle Coke Coca Cola http://t.co/IHhxoJ7aMz
AND THE SENTIMENT PER SENTENCE IS:
0.8
A TWEET!
#Coca-Cola#I#♥#YOU#
Fanny#day#Good… https://t.co/5PU7L4QchC
AND THE SENTIMENT PER SENTENCE IS:
0.0
A TWEET!
Entry List for Coca-Cola 600 #NASCAR Sprint Cup Series race at Charlotte Motor Speedway is posted, 48 drivers entered http://t.co/UYXPdOP9te
AND THE SENTIMENT PER SENTENCE IS:
0.0
A TWEET!
@diannaeanderson + walk, get some Coca-Cola, and spend some time reading. Lord knows I need to de-stress.
AND THE SENTIMENT PER SENTENCE IS:
0.0
0.0
A TWEET!
Apply now to work for Coca-Cola #jobs http://t.co/ReFQUIuNeK http://t.co/KVTvyr1e6T
AND THE SENTIMENT PER SENTENCE IS:
0.0
A TWEET!
RT @jayski: Entry List for Coca-Cola 600 #NASCAR Sprint Cup Series race at Charlotte Motor Speedway is posted, 48 drivers entered http://t.…
AND THE SENTIMENT PER SENTENCE IS:
0.0
A TWEET!
RT @SeyiLawComedy: When you enter a fast food restaurant and see their bottle of Coca-Cola drink (35cl) is N800; You just exit like » http:…
AND THE SENTIMENT PER SENTENCE IS:
0.2
A TWEET!
Entry List for Coca-Cola 600 #NASCAR Sprint Cup Series race at @CLTMotorSpdwy is posted, 48 drivers entered http://t.co/c2wJAUzIeQ
AND THE SENTIMENT PER SENTENCE IS:
0.0

The reader may notice that the sentimental analysis of the tweets could be more or less inaccurate to what the sentiment of the author really was, using our “human analysis”. Indeed, as we have talked before, this field is still improving, so it will take some more time for us to rely 100% on this kind of analysis

Conclusion

As we can see, it was pretty simple to construct a program that connects to Twitter, runs a sentimental analysis and print the results. Despise some current issues with the accuracy of the sentimental analysis, as we talked about previously, this kind of analysis are already a really powerfull tool to explore, that companies can use to improve their perception of how the world around them realize their existences. Thank you for following me on another post, until next time.

Continue reading

Big Data – final part

Standard

Welcome, dear reader, to the last post in our series on Big Data. If the reader has not read the previous posts in this series, the links can be found at the end of this post, or in the menus, “Big Data” section. In this final post, we will discuss some interesting cases in the use of Big Data in order to demonstrate how it has been used by the market. If the reader wants to know more about any case in particular, the reference links to them can be found at the end of this post.

 HealthMap: preventing diseases

Driven by the need to monitor the progress of epidemics around the world, the HealthMap tool was created by researchers in Boston. It uses various data sources such as social media, local news, etc in order to predict the progress of the diseases across the globe. The tool was highlighted in the media recently as predicted the emergence of Ebola in Guinea nine days before the WHO announcement.

 Google: better efficience on the data sources

Possessing the world’s largest search engine, and other solutions such as cloud computing, Google has huge data centers to support its operation. Through a Big Data solution that collects various information such as power consumption, temperature, CPU power, memory, etc, was possible to establish a quickly number of measures that improved the performance of the data center, such as adjustments in the cooling system, thereby preventing temperature peaks that compromise the performance of the equipment, and increases energy consumption.

 Target: predicting consumer behavior

Target retail company, with branches in several countries such as USA and Australia, has implemented an interest case of Big Data. Using sales data and navigation of its customers, extracted through its channels such as E-Commerce, the retailer can trace their customers behavior, providing what products they would be more interested in purchasing. Gained prominence in the media predicting the products to offer for pregnant women, where through the purchases of a customer, the solution detects that it is a pregnant women and through promotional email offers for the products that will be interested in acquiring on the next week of pregnancy.

  Ford: vehicle real-time analysis

The famous car manufacturer has implemented a Big Data solution very innovative, which involves collecting data from customers’ own cars in real time. Through sensors, data of the engine and other parts of the cars are sent in real time to Ford’s data centers, which use the data for applications such as the correction of design engineering of future releases, preventive maintenance and offers greater flexibility in recalls detection.

 Conclusion

And so, we conclude our first journey in the world of Big Data. It is clear, however, that we will not stop here: I promise the reader to continue evolving our studies in Big Data. Please be sure to follow my blog, where I intend to start a series of hands-on, where we will see more of the key technologies associated with Big Data put it in practice. I thank all who have accompanied me in this series and I wish you all much success in your careers, whether in the world of big data or not. Thank you

Continue reading

Big Data – part 4

Standard

Welcome, dear reader, to another post in our series on Big Data. If the reader has not read the previous posts in this series, the links can be found at the end of this post, or in the menus, “Big Data” section. In this post, we will cover a technology that has gained quite popularity in the world of Big Data: The Apache Spark.

Origin

Created in Berkeley University by AMPLab, the goal of Spark is to provide a computer model, according to the official website, up to 100x faster than a conventional mapreduce Hadoop job. But how it hopes to achieve this performance improvement?

Architecture

Such gain is based on this one point in Hadoop mapreduce model. During the execution of a Hadoop job, we have 3 times when the data is “stored” in the processing:

  • At initial processing, before the map step;
  • In the midst of processing, when the data filtered by the map phase is being stored for later stages of sort and reduce;
  • At the end of the processing, when the final result is delivered;

In Hadoop, on these three aforementioned moments, we have an IO disk consumption, because the data is stored on disk, rather than kept in memory, including the intermediate step between the steps of map and reduce. In a production environment of Big Data, it is common to have iterative jobs, running several times on a given body of data, using the result of the previous run as input for the next run. It is precisely in this scenario that the Spark has its biggest gain: keeping the data in memory, the access / write of the data becomes much faster, thus ensuring the announced earnings. From this seemingly simple change, the Spark project, which allows constructing jobs following the BSP model (Bulk Synchronous Parallel), was born keeping as much as possible of the data in memory within a run, thus ensuring a fast and scalable computational model. In the picture below we can see the architecture of the Spark and its subprojects, which we will discuss below

Complementary modules

From the Spark initial project, 4 subprojects were born, that complement his use. All these modules are already part of the default installation of Spark and they are:

Spark SQL: Similar to what is the Hive for Hadoop, Spark SQL brings a language similar to SQL for data query on a Spark installation;

Spark Streaming: Spark streaming allows the build of streaming style applications, where the data can be read / written during the processing, instead of the traditional model, where results from a process can only be delivered at the end of a execution;

MLlib: Equivalent to Apache Mahout, allows the construction of machine learning processes. Machine learning is a field within computer science, where using of statistical and logical rules, programs can “learn” and draw your own conclusions from a mass of data provided as input, simulating a human reasoning;

GraphX: The Spark GraphX allows processing to be built in the Graph format, allowing the resolution of problems through algorithms like Pert, BFS and DFS.

Spark & Hadoop

The reader may be wondering at this point: may I use Spark or Hadoop in my Big Data project? Like everything in the world of technology, this is no simple answer. Several factors may influence this decision, not only technical, but also business, such as the absence, to date, of major players that provide distributions with commercial support, unlike Hadoop that already has commercial distributions of weight as Cloudera and Hortonworks. Due to his complementary nature – Spark integrates with most of the components that make up Hadoop – however, it is possible that Spark could go for a complementary technology over than a competing platform. An example of this is the distribution of Cloudera itself, which provides a Hadoop distribution that also has a Spark distribution. Thus, we have as an increasingly scenario, the combination of the two technologies, rather than using only one of the two. After all, why should we use only 1, if we can enjoy the best that each has to offer us?

Conclusion

And so we come to the conclusion of another chapter of our series. In the next and last post in our series, we will examine some cases of the use of Big Data in the world, in order that we see in practice all the benefits that the Big Data can offer us. Until next time.
Continue reading

Big Data – part 3

Standard

In this post we will proceed to our series on Big Data. If the reader has not read the previous posts in this series, the links can be found at the end of this post, or the menus, “Big Data” section.

In this post, we will discuss one of the most popular technologies of the moment in the development of Big Data solutions: Apache Hadoop.

Origin

Hadoop was created in 2005 by two developers, Doug Cutting and Mike Cafarella. The symbol of Hadoop, the famous yellow elephant, it is Mike’s son toy elephant, and the name “Hadoop” is the elephant’s name. In the video below we can see the co-creator in an interview, talking about the challenges of data mining:

Architecture

Speaking of the Hadoop architecture, we can separate into 2 main parts, consisting of two clusters:

  1. One part consists of a cluster that implements a distributed file system, known as HDFS (Hadoop Distributed File System);
  2. The second part consists of another cluster, which provides an environment for executing programs written following the MapReduce model. If the reader does not know what is mapreduce, we address this point in Part 2 of our series;

Lets examine, in general, each of these clusters:

HDFS

The HDFS, Hadoop file storage system consists of a system that allows files to be stored across multiple nodes (servers). When we insert a file in the cluster, either through the command line interface and / or its REST interface, or when we have mapreduce processes generating processing of output files, the HDFS makes a “break” of the file into several smaller files – by default, parts of 64MB – and distributes the files across the nodes, managing details on run time as the number of copies that each part must have, remaking this balancing in case of a cluster node falls. All this break is transparent to the developer because the cluster will make the mounting in every query made through the interfaces.

A HDFS cluster consists of two components:

  1. NameNodes: Central cluster component, responsible for managing the assembly metadata – used to reconstruct the original files – and make the management of the files in the cluster;
  2. DataNodes: “Physical” component of the cluster, responsible for making the read / write of the files on the disk. Each node has its DataNode, which performs the read / write on the server disk that is running;

PS: Na versão 2.0 do Hadoop, um novo componente foi incluso no HDFS, chamado YARN (Yet Another Resource NameNode), cujo objetivo principal é fornecer uma camada a mais de interface entre os usuários do HDFS e o mesmo. Graças a essa melhoria, podemos ter no cluster também diversos NameNodes para efetuar o gerenciamento dos arquivos, evitando assim o problema da possível perda de um cluster HDFS no caso de problemas irrecuperáveis com os NameNodes, como no caso do Hadoop 1.0, onde tinhamos, tipicamente, apenas dois processos de NameNode, sendo um deles para mecanismo de failover.

Mapreduce cluster

The mapreduce cluster  consists of a cluster which performs the execution of mapreduce processes. Typically, the input / output of a mapreduce job in Hadoop is with HDFS using the NameNode (YARN in version 2.0) to interface the cluster with the HDFS. The following are the components of a  MapReduce cluster:

  1. JobTracker: Component that interface the cluster with the developers, makes the management of process execution, identifying with the NameNode from the HDFS cluster where each part of the input data is to be processed, indicating for TaskTrackers which part of the data to process, and manages the beginning and end of each stage of processing;
  2. TaskTracker:Component that receives from the JobTracker the instructions for executing jobs, which parts of the mass of data it is responsible for processing, and report to the JobTracker when processing is complete;
  3. Task: Smaller cluster unit, the Task is responsible for making the processing itself. Each task can be performed in a JVM instance initiated during process execution, or it can be instantiated in a JVM already started with other Tasks running, according to the specified memory consumption settings in the cluster;

Hadoop complementary software

Several software was created to complement the use of Hadoop, or even built from the same. A brief description of some of them:

  • Mahout: Allows you to use machine learning techniques for data analysis in hadoop;
  • Sqoop: Allows integrate HDFS with relational databases;
  • Hive: Allows consultations in HDFS more easy way, through SQL commands;
  • Hama: Allow the development of jobs in Hadoop on other models besides the mapreduce, as the BSP;
  • HBase: NoSQL database, built under the HDFS;

In future posts, we will discuss this software in more detail.

Conclusion

And so, we concluded one more post of our series. With the growth of projects and solutions in Big Data worldwide, the hadoop has grown a lot as a market-leading technology, already having market implementations of large players like Cloudera and Hortonworks. In the next post, we will address other well known technology in the world of Big Data: the Spark. Until next time.

Continue reading

Big Data – part 2

Standard

This is the second part of a series of posts on Big Data.On this post, let’s talk about the two most popular distributed  processing models of Big Data, the mapreduce, and the BSP (Bulk Synchronous Parallel). A process model is a kind of algorithm upon which to develop software.

Mapreduce model

Modelo map reduce

In the figure above, we can see the mapreduce model. This model is widely used in the market today, especially in companies that use Hadoop as her main Big Data technology. The model consists of two well-defined steps, called map and reduce:

  • In the step known as Map, hundreds – or even thousands – of parallel processes, called “threads”, perform a type of task called mapping, where a large mass of data is divided into pieces, and each performs a filtering process within a respective piece, creating a mass of values in the key-value format. At the end of this phase, there is a group phase, where the values for the same key are grouped to form data in the format key: {value1, value2, value3 …. valueN};
  • In the step known as reduce, the data generated by the map phase is again divided into pieces and passed to hundreds or even thousands of processes that perform processing on the received data bits and generate as a key-value output, which is the final output of the processing that is finally grouped into a mass of results;

In a future post, we’ll take a hands-on hadoop, where we can see an example of this processing model in practice with the WordCount.

BSP Model (Bulk Synchronous Parallel)

bsp

Although widespread, the mapreduce model is not without its drawbacks. When we talk about the model being applied in the context of Hadoop, for example, all of the cluster steps and mounting of the final mass with the results is done through files on the file system of Hadoop, HDFS, which generates an overhead in performance when it has to perform the same processing in a iterative manner.Another problem is that for graph algorithms such as DFS, BFS or Pert, MapReduce model is not satisfactory. For these scenarios, there is the BSP.

In the BSP algorithm, we have the concept of supersteps. A superstep consists of a unit of generic programming, which through a global communication component, makes thousands of parallel processing on a mass of data and sends it to a “meeting” called synchronization barrier. At this point, the data are grouped, and passed on to the next superstep chain. In this model, it is simpler to construct iterative workloads, since the same logic can be re-executed in a flow of supersteps. Another advantage pointed out by proponents of this model is that it has a simpler learning curve for developers coming from the procedural world.

Speaking in terms of platforms, Hadoop has the Apache Hama as implementation of this model. The main competitor of Hadoop, Spark, come with this feature natively.

Conclusion

And so we conclude another part of our series on Big Data. To date, these are the main models used by the Big Data platforms. As a technology booming, it is natural that in the future we could have more models emerging and gaining their adoption shares. In the next parts of our series, we’ll talk about the two most known implementations of Big Data to date: Hadoop and Spark. U.

Continue reading

Big Data – part 1

Standard

This is a series of posts that will be published, in order to elucidate the concept of Big Data.

In this first part, we will start a discussion on what is Big Data. In future posts, we’ll talk about new processing models that try to address the problem, and new technologies that are emerging to put into practice these concepts.

My posts are based on the idea of collaboration. Please all who wish to contribute to the discussion, feel free to do so, bringing more knowledge and experience for all.

Let’s start our series talking about what is, after all, Big Data.

 The explosion of data

Never in the world has the production of data been so big. According to infographic produced by IBM, 100 terabytes of data are produced every day only on Facebook, 294 billion emails are sent daily and 230 billion tweets are made every day! (Source)

This huge amount of data produces a phenomenon known in the world of big data as the 5 Vs:

Volume: Huge amounts of data being produced;

Velocity: Amounts of data being produced at a very high speed;

Variety: Amounts of data being produced in different structures that nonetheless may have intrinsic relations. The content sent by e-mail a user has a close relationship with the tweets that it is (are data produced by the same user, which may refer to the same subject), but they have a completely different structure;

Veracity: In a world where large amounts of data are produced at high speed, and in different formats, it is more difficult to get data “cleaned up”, without incompleteness problems or even duplicity. The email you sent with the cake recipe of your grandmother is the same one when you published it on Facebook, just in a different formats;

Value: All these data have a high value for the business, as they bring information about the behavior, beliefs and preferences of its customers;

To resolve this issue, were developed processing models, using a technique called distributed processing. In the next post, we’ll talk more about them.

For those who have more interest in knowing about the “Vs”, this presentation is a good reference:

Continue reading