Hi, dear readers! Welcome to my blog. A long time ago, I wrote a post about the actor model and how to use Akka to implement solutions using actors. If the reader doesn’t read the post, it can be found here. Now, more than 4 years later – how fast time goes! – it is time to revisit this world, with a much better understanding and maturity. At the time, I used good old Java to do the task.
There’s nothing wrong with using Java, but if you really want to delve on Akka, then Scala is the language of choice, especially if we want to use Akka, a project specially tailored to develop data flows that could do tasks such as system integrations.
With non-blocking IO and parallelism embedded at his core – and encouraged to be used on our custom code by following their good practices! – Akka streams allow us to develop really fast applications that can easily scale. From my personal experience, it is a specially good option for integrating with Apache Kafka.
So, without further delay, let’s begin our journey!
Actor Model
The actor model was already explained in my previous post so we won’t waste much time with this explanation. To sum it up, we have a system where actors work with each other asynchronously, creating a system where tasks are broken down on multiple steps by different actors, each one of them communicating by a personal queue (mailbox) that enqueues messages to be processed by the actors. This way, we have a scalable solution, where tasks are done in parallel.
Akka quick recap
Actors
Actors are the core components of an actor system. An actor consists of a program unit that implements logic based on messages it receives from his mailbox.
When developing Akka applications on Scala, an actor must implement a receive method, where will create logic for different types of messages it can receive. Each time a message arrives at the mailbox, the dispatcher delivers the message to the actor. It is important to notice it, however, that it is the actor which asks for the next message, as it completes processing the current message – by default, each actor process just one message a time -, this way avoiding an actor to be overloaded. This technique is called back-pressure, which we will talk more about it in the next sections.
ActorSystem
The actor system comprehends the whole actor solution. It is composed of actors, dispatchers, and mailboxes.
Applications can have multiple actor systems inside. Also, it is possible to define actor systems to be linked together remotely, forming a cluster.
Execution Context (Dispatchers)
Execution contexts, also known as dispatchers, are responsible for serving actors with messages by delivering the messages to the mailboxes.
Dispatchers are also responsible for allocating the actors themselves, including details such as parallel actor execution, using strategies such as thread pools, for example. A dispatcher can be defined globally for the whole system or defined at actor level.
An important note regarding performance with dispatchers is that they run the actors inside thinner layers that are memory-optimized, so memory consumption inside Akka solutions is lower than in traditional Java applications.
One interesting thing to notice on actor instantiation is how Akka treats actor references. When asking for an actor to be created inside a system, Akka will create an actor reference, which can be used to send messages to it.
These messages are sent using remote calls, even when the actor system is been used all locally. This guarantees that when using actor systems remotely, such as in a cluster, for example, there will be no difference in the code.
Mailboxes are, like the name suggests, repositories to messages that it will be processed by actors. Mailboxes can have different strategies to treat messages, such as unbounded lists, single and multi-consumer, priority queues and more.
Actor Supervisors & Lifecycle
When creating actors, we can create them at the system level or create them inside another actor. When creating inside an actor, we call the parent actor a Supervisor and the actors created inside are called Child Actors (when creating an actor at the system level, also known as Top-level Actors, they also are child actors, in this case from a reserved actor from Akka itself).
Every actor has a lifecycle: it can be started, on which case is running, stopped when an unrecoverable failure occurs and restarted or resumed, depending on the circumstances of the failure.
Supervisors are actors responsible for deciding for their child actors what to do when one of them faces a failure. It is possible to simply stop the actor, restart him, or resume (the main difference between restart and resume is that resources are freed on a restart, while on a resume the actor simply resumes his execution).
These decisions are called Supervisor Policies. These policies can also be set to behavior as one-for-one or all-for-one, meaning that when an error occurs on one child actor, the policy will be applied to all actors bellow (for example, all actors would restart) or just to the failed actor.
And that concludes our quick recap of Akka. Now, let’s begin our talk about Akka Stream.
Stream concepts
A stream is composed of tasks that must be done – continuously or not – in order to do a process. Each stream must have a Source, which is the beginning, a Flow composed of multiple tasks that can run at parallel depending on the needs and a Sink, which is the stream’s end.
Actor materialization
Akka Streams runs on top of Akka. That means when a stream is started, internally Akka Streams creates an actor system with actors responsible for running the tasks of the stream.
The responsibility for doing this task is of the Actor Materializer, that creates (materializes) the resources need to run the stream. One interesting thing is that it is possible to explicitly define materializing points on our flow.
These points are used by Akka streams to define points where it will group the tasks from the flow to run on separated actors, so it is a good technique to keep it in mind when doing stream tunning.
Sources
Sources are flow’s beginnings. A source is used for defining an entrypoint for data, be a finite datasource, such as a file, to an infinite one, such as a Kafka topic, for example. It is possible to zip multiple source definitions on a single combined source for processing, but still, a flow can have only one source.
Flows
Flows are the middle of the stream. One flow can have an infinite number of tasks (steps), that range from data transformation to enrichment by calling external resources.
Sinks
Sinks are flow’s endings. Analogous to sources, sinks can have multiple types of destinations, such as files, Kafka topics, REST endpoints, etc. Likewise the source, flows can also have only one sink.
Graphs
When modeling an Akka stream, as seen previously, we define a source, a sink and several flows in between. All of this generates a graph, where each node represents a task on the stream.
When instantiating a stream, a runnable graph is created, which represents a blueprint for executions. After executing the stream with the run() method for example (there’s also a runWith(Sink) method that accepts a sink as a parameter) the runnable graph is materialized and executed.
During our lab, we will see Graph Stages. Graph stages are like “boxes” that group tasks together, making them look like a single node in the final graph.
Back-pressure
One very important concept when learning about Akka streams is back-pressure. Typically, on a producer-consumer architecture, the producer will keep sending data to the consumer, without really knowing if the consumer is capable of keeping it up with the load or not. This can create a problem where a producer overloads a consumer, generating all kinds of errors and slowness.
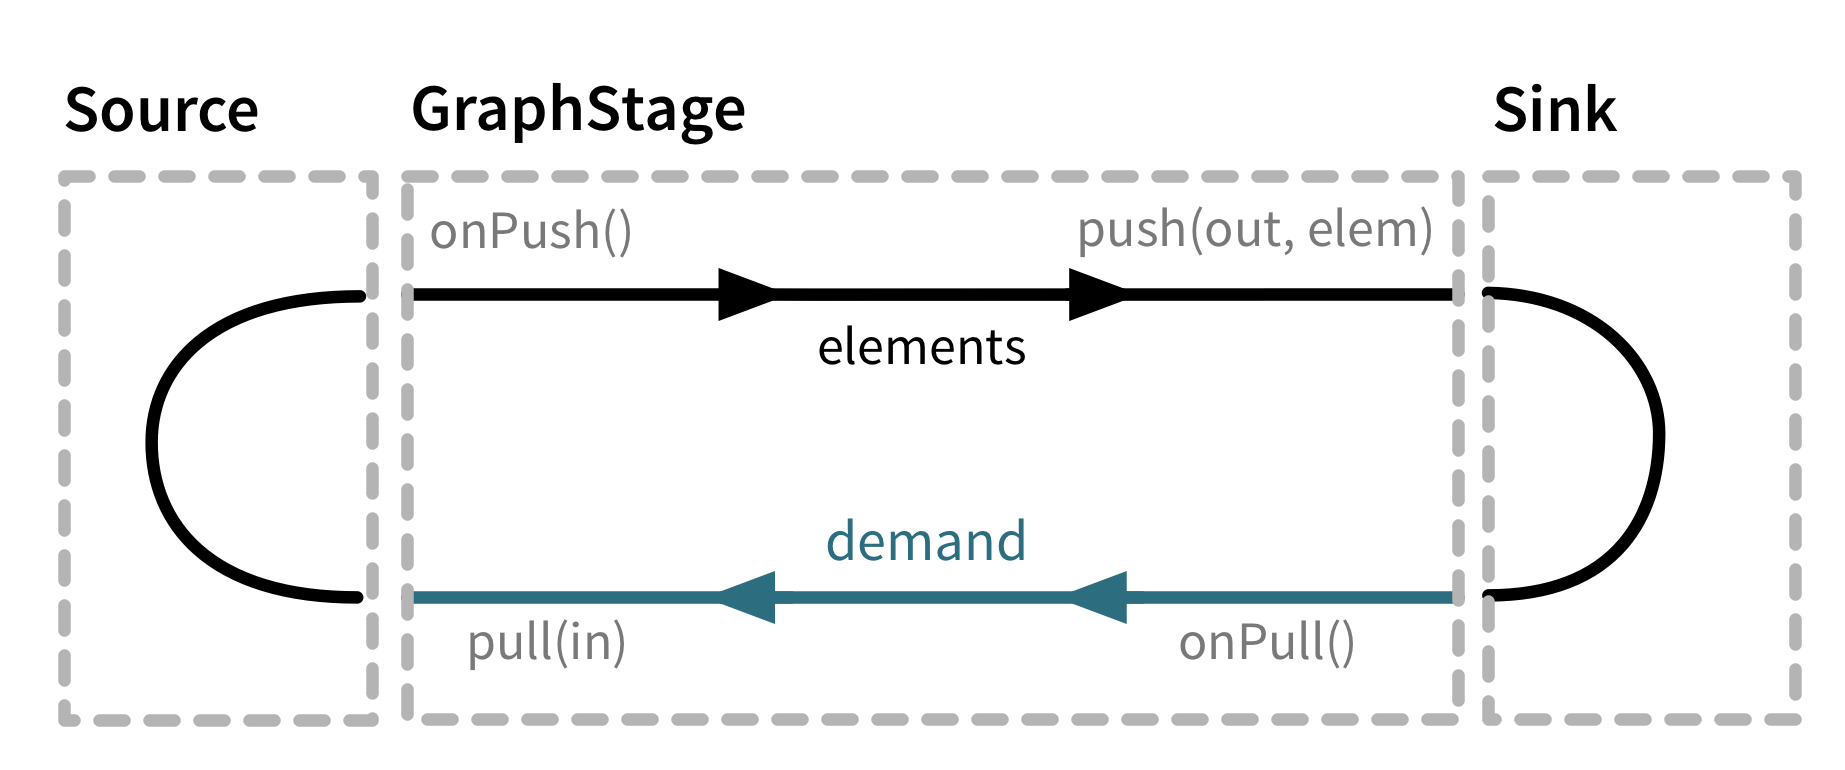
With back-pressure, this approach is reversed. Now, it is the consumer that dictates when to receive a new message, by pulling new data at his rhythm. while no new message is asked, the producer keeps waiting for a signal and only then it starts pushing messages again.
The image below illustrates the concept in action:
Stream error handling
Of course, just like with an actor system, streams also can fail. Just like with actors, error handling is also done with supervisors, that defines policies for a stream to resume, stop or restart depending on the error.
Streams also support a recovery configuration, that allows us, for example, to chain another stream execution in case of error after several retries.
Alpakka project
The Alpakka project is an integration library composed of several components that allow us to quickly deploy integrations between several technologies, such as files, REST endpoints and even AWS technologies such as Amazon Kinesis. During the course of our lab, we will use resources from this project, so stay tuned for more!
The project documentation can be found in:
https://developer.lightbend.com/docs/alpakka/current/
Lab
Pre-requisites
So, without further delay, let’s begin! This lab requires that the reader already have some knowledge of Scala and Akka. On my blog, it is possible to read my previous post on Akka, alongside my series about the Scala language.
Creating the project & infrastructure code
To create the project, let’s begin by just creating the sbt file that will hold our project’s dependencies. We will start by creating a folder that will hold our project (all sources for the lab can be found here) and type the following on a file called build.sbt:
name := "Akka-stream-lab"
version := "1.0"
scalaVersion := "2.12.5"

enablePlugins(JavaAppPackaging)

mainClass in Compile := Some("Main")

lazy val Versions = new {
  val akkaVersion = "2.5.11"
}

lazy val akkaDependencies = Seq(
  "com.lightbend.akka" %% "akka-stream-alpakka-csv" % "0.8",
  "com.typesafe.akka" %% "akka-stream-kafka" % "0.22",
  "com.typesafe.akka" %% "akka-actor" % Versions.akkaVersion,
  "com.typesafe.akka" %% "akka-stream" % Versions.akkaVersion,
  "com.typesafe.akka" %% "akka-slf4j" % Versions.akkaVersion,
  "com.typesafe.akka" %% "akka-testkit" % Versions.akkaVersion % Test,
  "com.typesafe.akka" %% "akka-stream-testkit" % Versions.akkaVersion % Test,
  "com.typesafe.akka" %% "akka-testkit" % Versions.akkaVersion % Test
)

lazy val testDependencies = Seq(
  "org.scalacheck" %% "scalacheck" % "1.13.4" % Test,
  "org.scalamock" %% "scalamock" % "4.1.0" % Test,
  "org.mockito" % "mockito-core" % "2.19.0" % Test,
  "org.scalatest" %% "scalatest" % "3.0.5" % Test
)

lazy val loggingDependencies = Seq(
  "ch.qos.logback" % "logback-classic" % "1.2.3",
  "com.typesafe.scala-logging" %% "scala-logging" % "3.9.0",
  "org.slf4j" % "slf4j-api" % "1.7.25"
)

lazy val otherDependencies = Seq(
  "io.spray" %% "spray-json" % "1.3.5"
)

libraryDependencies ++= (
  akkaDependencies++
  loggingDependencies++
  testDependencies++
  otherDependencies
  )
As can be seen above, not only we defined a sbt project, but also included dependencies for Akka and logging, alongside Akka Streams itself. We also added a packaging plugin to simplify our use when running the project from command-line.
In order to use the plugin, we need to add it to sbt project’s definition. To do that, we create a project folder and inside create an plugins.sbt file, with the following:
logLevel := Level.Warn

addSbtPlugin("com.typesafe.sbt" % "sbt-native-packager" % "1.3.2")
Finally, we create our main Scala object that will be the App launcher for our project. We create a Scala source folder and add a Main.scala file, containing the following:
import akka.actor.ActorSystem

object Main extends App {
implicit val system: ActorSystem = ActorSystem("akka-streams-lab")
}
Our first version is very simple: It simply creates a new actor system. Of course, during our lab, it will receive more code to evolve to our final solution.
Concluding the setup, this would be the first structure of our project when seen (some other files, such as sbt’s build.properties, are created automatically when running the project using sbt):

This image is taken from Intellij, which I recommend as the IDE for the lab.
Without spoiling too much, as we can see in our next section, we will need some infrastructure code that will set it up a Kafka cluster for our use in the lab. For this, we will use Docker Compose.
So, let’s begin by creating a docker-compose.yml file, that will create our Kafka cluster. The file will be as follows:
version: '2'
services:
  zookeeper:
    image: wurstmeister/zookeeper:3.4.6
    ports:
      - 2181:2181
  kafka:
    image: wurstmeister/kafka:1.1.0
    ports:
      - 9092:9092
    environment:
      KAFKA_ADVERTISED_HOST_NAME: localhost
      KAFKA_CREATE_TOPICS: "accounts:1:1"
      KAFKA_ZOOKEEPER_CONNECT: zookeeper:2181
In this simple docker-compose file, we create an embedded cluster with a broker node and a Zookeeper node and also create a accounts topic at startup. To test it out our code, with docker up and running, we can start a cluster by running:
docker-compose up -d
Finally, let’s create a logback config file for our logging. To do this, let’s create a file called logback.xml inside resources folder and enter the following:
%d{HH:mm:ss.SSS} [%thread] %-5level %logger{36} – %msg%n
That’s it! now that we have our infrastructure code ready, let’s begin the actual coding.
Lab’s use case
In our lab, we will create 2 streams. One of them will read data from a file and publish to a Kafka topic. The other one will read from this same topic and save the message on other files, this way demonstrating the flow of data from a point A to a point B.
Creating the first stream
Let’s begin by creating the first stream, which is a simple stream that will read data (accounts in our case) from a file and send to Kafka. At first, let’s code the stream in the main code itself and evolve as we develop.
First, we create a file called input1.csv and add the following:
“COD”,”NAME”,”DOCUMENT”,”AGE”,”CIVIL_STATUS”,”PHONE”,”BIRTHDAY”,”HOME_COUNTRY”,”HOME_STATE”,”HOME_CITY”,”HOME_STREET”,”HOME_STREETNUM”,”HOME_NEIGHBORHOOD”
1,”alexandre eleuterio santos lourenco 1″,”43456754356″,36,”Single”,”+5511234433443″,”21/06/1982″,”Brazil”,”São Paulo”,”São Paulo”,”false st”,3134,”neigh 1″
2,”alexandre eleuterio santos lourenco 2″,”43456754376″,37,”Single”,”+5511234433444″,”21/06/1983″,”Brazil”,”São Paulo”,”São Paulo”,”false st”,3135,”neigh 1″
That will be the csv input file for our first stream. Next, we create a case class Account to encapsulate the data from the file:
package com.alexandreesl.model

case class Account(cod: Long, name: String, document: String,
age: Int, civilStatus: String,
                   phone: String, birthday: String,
country: String, state: String,
                   city: String, street: String,
streetNum: Long, neighBorhood: String)
We also create an object to allow JSON marshaling/unmarshalling when sending/receiving messages in Kafka:
package com.alexandreesl.json

import com.alexandreesl.model.Account
import spray.json.DefaultJsonProtocol

object JsonParsing extends DefaultJsonProtocol {

  implicit val accountFormat = jsonFormat13(Account)

}
Finally, we code the stream that reads from the file and publishes to Kafka (don’t you worry, we will refactor later):
import java.nio.file.Paths

import akka.actor.ActorSystem
import akka.kafka.ProducerSettings
import akka.kafka.scaladsl.Producer
import akka.stream.scaladsl.{FileIO, Flow, Framing}
import akka.stream.{ActorMaterializer, ActorMaterializerSettings}
import akka.util.ByteString
import com.alexandreesl.model.Account
import com.typesafe.scalalogging.Logger
import org.apache.kafka.common.serialization.StringSerializer
import org.slf4j.LoggerFactory
import spray.json._
import com.alexandreesl.json.JsonParsing._
import org.apache.kafka.clients.producer.ProducerRecord
object Main extends App {

implicit val system: ActorSystem = ActorSystem("akka-streams-lab")
implicit val materializer: ActorMaterializer = ActorMaterializer(ActorMaterializerSettings(system))
implicit val ec = system.dispatcher
private val logger = Logger(LoggerFactory.getLogger("Main"))
val config = system.settings.config.getConfig("akka.kafka.producer")
val producerSettings =
ProducerSettings(config, new StringSerializer, new StringSerializer)
.withBootstrapServers("localhost:9092")

logger.info("Starting streams...")

private def convertToClass(csv: Array[String]): Account = {
Account(csv(0).toLong,
csv(1), csv(2),
csv(3).toInt, csv(4),
csv(5), csv(6),
csv(7), csv(8),
csv(9), csv(10),
csv(11).toLong, csv(12))
}

private val flow = Flow[String].filter(s => !s.contains("COD"))
.map(line => {
convertToClass(line.split(","))
})

FileIO.fromPath(Paths.get("input1.csv"))
.via(Framing.delimiter(ByteString("\n"), 4096)
.map(_.utf8String))
.via(flow)
.map(value => new ProducerRecord[String, String]("accounts", value.toJson.compactPrint))
.runWith(Producer.plainSink(producerSettings))

logger.info("Stream system is initialized!")

}
As we can see, the code is pretty straight-forward. We just added a stream that reads from a csv file and dispatches the lines to Kafka. To see the messages on Kafka, first, we start the application – don’t forget to run docker compose up first! -, and them we can use a shell inside the broker’s container, as follows:
docker exec -t -i akka-stream-lab_kafka_1 /opt/kafka/bin/kafka-console-consumer.sh –bootstrap-server :9092 –topic accounts –from-beginning
This will produce an output as follows:
{“age”:36,”birthday”:”\”21/06/1982\””,”city”:”\”São Paulo\””,”civilStatus”:”\”Single\””,”cod”:1,”country”:”\”Brazil\””,”document”:”\”43456754356\””,”name”:”\”alexandre eleuterio santos lourenco 1\””,”neighBorhood”:”\”neigh 1\””,”phone”:”\”+5511234433443\””,”state”:”\”São Paulo\””,”street”:”\”false st\””,”streetNum”:3134}
{“age”:37,”birthday”:”\”21/06/1983\””,”city”:”\”São Paulo\””,”civilStatus”:”\”Single\””,”cod”:2,”country”:”\”Brazil\””,”document”:”\”43456754376\””,”name”:”\”alexandre eleuterio santos lourenco 2\””,”neighBorhood”:”\”neigh 1\””,”phone”:”\”+5511234433444\””,”state”:”\”São Paulo\””,”street”:”\”false st\””,”streetNum”:3135}
Now that we have coded our first stream, let’s create our second stream. Don’t you worry about the messing code right now, we will refactor later when implementing error handling using actors.
Creating the second Stream
Now, let’s create our second stream. This stream will read from Kafka and generate two files, one with personal data and another with address data.
For this, we will use a graph stage, that will make the file write in parallel. We will disable autocommit for Kafka consumption and commit only at the end.
Before creating the stage, let’s do our first refactoring, by moving the Account case class to a GraphMessages object, which will hold all case classes we will use on our coding:
package com.alexandreesl.graph

import akka.kafka.ConsumerMessage

object GraphMessages {

  case class Account(cod: Long, name: String, document: String,
                     age: Int, civilStatus: String,
                     phone: String, birthday: String,
                     country: String, state: String,
                     city: String, street: String,
                     streetNum: Long, neighBorhood: String)

  case class InputMessage(acc: Account,
                          offset: ConsumerMessage.CommittableOffset)

  case class AccountPersonalData(cod: Long, name: String,
                                 document: String, age: Int,
                                 civilStatus: String,
                                 phone: String, birthday: String)

  case class AccountAddressData(cod: Long, country: String,
                                state: String, city: String,
                                street: String, streetNum: Long,
                                neighBorhood: String)

}
We also update our Json protocol accordingly, since we will use JSON marshaling for the other classes as well:
package com.alexandreesl.json

import com.alexandreesl.graph.GraphMessages.{Account, AccountAddressData, AccountPersonalData}
import spray.json.DefaultJsonProtocol

object JsonParsing extends DefaultJsonProtocol {

  implicit val accountFormat = jsonFormat13(Account)
  implicit val accountPersonalFormat = jsonFormat7(AccountPersonalData)
  implicit val accountAddressFormat = jsonFormat7(AccountAddressData)

}
Finally, let’s create our graph stage. Notice the ~> symbol? That symbol is used inside the graph stage builder to create the stage flow. This allows us to code flows in a visual manner, making a lot simpler to design stream flows.
package com.alexandreesl.graph

import java.nio.file.{Paths, StandardOpenOption}

import akka.actor.ActorSystem
import akka.kafka.ConsumerMessage
import akka.stream.{ActorMaterializer, FlowShape}
import akka.stream.scaladsl.{Broadcast, FileIO, Flow, GraphDSL, Source, Zip}
import akka.util.ByteString
import com.alexandreesl.graph.GraphMessages.{Account, AccountAddressData, AccountPersonalData, InputMessage}
import spray.json._
import com.alexandreesl.json.JsonParsing._

object AccountWriterGraphStage {

  val personal = Paths.get("personal.csv")
  val address = Paths.get("address.csv")

  def graph(implicit system: ActorSystem, materializer: ActorMaterializer) =
Flow.fromGraph(GraphDSL.create() { implicit builder =>

    import GraphDSL.Implicits._

    val flowPersonal = Flow[InputMessage].map(msg => {
      Source.single(AccountPersonalData(msg.acc.cod,
        msg.acc.name, msg.acc.document, msg.acc.age,
msg.acc.civilStatus, msg.acc.phone,
msg.acc.birthday).toJson.compactPrint + "\n")
        .map(t => ByteString(t))
        .runWith(FileIO.toPath(personal,
Set(StandardOpenOption.CREATE, StandardOpenOption.APPEND)))
      msg.acc
    })

    val flowAddress = Flow[InputMessage].map(msg => {
      Source.single(AccountAddressData(msg.acc.cod,
        msg.acc.country, msg.acc.state,
msg.acc.city, msg.acc.street, msg.acc.streetNum,
msg.acc.neighBorhood).toJson.compactPrint + "\n")
        .map(t => ByteString(t))
        .runWith(FileIO.toPath(address,
Set(StandardOpenOption.CREATE, StandardOpenOption.APPEND)))
      msg.offset
    })

    val bcastJson = builder.add(Broadcast[InputMessage](2))
    val zip = builder.add(Zip[Account, ConsumerMessage.CommittableOffset])

    bcastJson ~> flowPersonal ~> zip.in0
    bcastJson ~> flowAddress ~> zip.in1

    FlowShape(bcastJson.in, zip.out)

  })

}
On our stage, we created two flows that executed in parallel a broadcast, each one passing through one value from the original input message. In the end, we use zip to generate a tuple from the two objects that will be passed to the next stage. Finally, let’s create our stream, which will be using the graph stage as part of the stream. I promise this will be the last time we will see that big messy main object: next section we will start refactoring.
import java.nio.file.Paths

import akka.actor.ActorSystem
import akka.kafka.{ConsumerSettings, ProducerSettings, Subscriptions}
import akka.kafka.scaladsl.{Consumer, Producer}
import akka.stream.scaladsl.{FileIO, Flow, Framing, Sink}
import akka.stream.{ActorMaterializer, ActorMaterializerSettings}
import akka.util.ByteString
import com.alexandreesl.graph.AccountWriterGraphStage
import com.alexandreesl.graph.GraphMessages.{Account, InputMessage}
import com.typesafe.scalalogging.Logger
import org.apache.kafka.common.serialization.{StringDeserializer, StringSerializer}
import org.slf4j.LoggerFactory
import spray.json._
import com.alexandreesl.json.JsonParsing._
import org.apache.kafka.clients.consumer.ConsumerConfig
import org.apache.kafka.clients.producer.ProducerRecord

import scala.concurrent.Future

object Main extends App {

  implicit val system: ActorSystem = ActorSystem("akka-streams-lab")
  implicit val materializer: ActorMaterializer = ActorMaterializer(ActorMaterializerSettings(system))
  implicit val ec = system.dispatcher
  private val logger = Logger(LoggerFactory.getLogger("Main"))
  val configProducer = system.settings.config.getConfig("akka.kafka.producer")
  val producerSettings =
    ProducerSettings(configProducer, new StringSerializer, new StringSerializer)
      .withBootstrapServers("localhost:9092")
  val configConsumer = system.settings.config.getConfig("akka.kafka.consumer")
  val consumerSettings =
    ConsumerSettings(configConsumer, new StringDeserializer, new StringDeserializer)
      .withBootstrapServers("localhost:9092")
      .withGroupId("group1")
      .withProperty(ConsumerConfig.AUTO_OFFSET_RESET_CONFIG, "earliest")

  logger.info("Starting streams...")

  private def convertToClass(csv: Array[String]): Account = {
    Account(csv(0).toLong,
      csv(1), csv(2),
      csv(3).toInt, csv(4),
      csv(5), csv(6),
      csv(7), csv(8),
      csv(9), csv(10),
      csv(11).toLong, csv(12))
  }

  private val flow = Flow[String].filter(s => !s.contains("COD"))
    .map(line => {
      convertToClass(line.split(","))
    })

  FileIO.fromPath(Paths.get("input1.csv"))
    .via(Framing.delimiter(ByteString("\n"), 4096)
      .map(_.utf8String))
    .via(flow)
    .map(value => new ProducerRecord[String, String]("accounts", value.toJson.compactPrint))
    .runWith(Producer.plainSink(producerSettings))

  Consumer
    .committableSource(consumerSettings, Subscriptions.topics("accounts"))
    .mapAsync(10)(msg =>
      Future.successful(InputMessage(msg.record.value.parseJson.convertTo[Account], msg.committableOffset))
    ).via(AccountWriterGraphStage.graph)
    .mapAsync(10) { tuple =>
      val acc = tuple._1
      logger.info(s"persisted Account: $acc")
      tuple._2.commitScaladsl()
    }.runWith(Sink.ignore)

  logger.info("Stream system is initialized!")

}
That’s it! since we started both streams in the main application, it is possible to test the stream simply by running the application, which will make the first stream to enqueue 2 messages, that it will be dequeued by the other stream. If we see the logs, we will see the following:
[INFO] [12/27/2018 23:59:52.395] [akka-streams-lab-akka.actor.default-dispatcher-3] [SingleSourceLogic(akka://akka-streams-lab)] Assigned partitions: Set(accounts-0). All partitions: Set(accounts-0)
23:59:52.436 [akka-streams-lab-akka.actor.default-dispatcher-2] INFO Main – persisted Account: Account(1,”alexandre eleuterio santos lourenco 1″,”43456754356″,36,”Single”,”+5511234433443″,”21/06/1982″,”Brazil”,”São Paulo”,”São Paulo”,”false st”,3134,”neigh 1″)
23:59:52.449 [akka-streams-lab-akka.actor.default-dispatcher-2] INFO Main – persisted Account: Account(2,”alexandre eleuterio santos lourenco 2″,”43456754376″,37,”Single”,”+5511234433444″,”21/06/1983″,”Brazil”,”São Paulo”,”São Paulo”,”false st”,3135,”neigh 1″)
And if we inspect the files, we will see that it wrote the data accordingly, as we can see below:
personal.csv:
{“age”:36,”birthday”:”\”21/06/1982\””,”civilStatus”:”\”Single\””,”cod”:1,”document”:”\”43456754356\””,”name”:”\”alexandre eleuterio santos lourenco 1\””,”phone”:”\”+5511234433443\””}
{“age”:37,”birthday”:”\”21/06/1983\””,”civilStatus”:”\”Single\””,”cod”:2,”document”:”\”43456754376\””,”name”:”\”alexandre eleuterio santos lourenco 2\””,”phone”:”\”+5511234433444\””}
address.csv:
{“city”:”\”São Paulo\””,”cod”:1,”country”:”\”Brazil\””,”neighBorhood”:”\”neigh 1\””,”state”:”\”São Paulo\””,”street”:”\”false st\””,”streetNum”:3134}
{“city”:”\”São Paulo\””,”cod”:2,”country”:”\”Brazil\””,”neighBorhood”:”\”neigh 1\””,”state”:”\”São Paulo\””,”street”:”\”false st\””,”streetNum”:3135}
Now, let’s refactor this code to be more maintainable and introduce error handling.
Implementing error handling
In order to easier error handling, we will move our streams to actors. Them we will create a supervisor, defining what to do when an error occurs.
Let’s begin by creating the first actor, called KafkaImporterActor and move the stream:
package com.alexandreesl.actor

import java.nio.file.Paths

import akka.actor.{Actor, ActorLogging, ActorSystem, Props}
import akka.kafka.ProducerSettings
import akka.kafka.scaladsl.Producer
import akka.stream.ActorMaterializer
import akka.stream.scaladsl.{FileIO, Flow, Framing}
import akka.util.ByteString
import com.alexandreesl.actor.KafkaImporterActor.Start
import com.alexandreesl.graph.GraphMessages.Account
import com.alexandreesl.json.JsonParsing._
import org.apache.kafka.clients.producer.ProducerRecord
import org.apache.kafka.common.serialization.StringSerializer
import spray.json._

import scala.concurrent.ExecutionContextExecutor

class KafkaImporterActor extends Actor with ActorLogging {

implicit val actorSystem: ActorSystem = context.system
implicit val materializer: ActorMaterializer = ActorMaterializer()
implicit val dispatcher: ExecutionContextExecutor = context.system.dispatcher

private def convertToClass(csv: Array[String]): Account = {
Account(csv(0).toLong,
csv(1), csv(2),
csv(3).toInt, csv(4),
csv(5), csv(6),
csv(7), csv(8),
csv(9), csv(10),
csv(11).toLong, csv(12))
}

private val flow = Flow[String].filter(s => !s.contains("COD"))
.map(line => {
convertToClass(line.split(","))
})
private val configProducer = actorSystem.settings.config.getConfig("akka.kafka.producer")
private val producerSettings =
ProducerSettings(configProducer, new StringSerializer, new StringSerializer)
.withBootstrapServers("localhost:9092")

override def preStart(): Unit = {
self ! Start
}

override def receive: Receive = {
case Start =>
FileIO.fromPath(Paths.get("input1.csv"))
.via(Framing.delimiter(ByteString("\n"), 4096)
.map(_.utf8String))
.via(flow)
.map(value => new ProducerRecord[String, String]("accounts", value.toJson.compactPrint))
.runWith(Producer.plainSink(producerSettings))

}

}

object KafkaImporterActor {

val name = "Kafka-Importer-actor"

def props = Props(new KafkaImporterActor)

case object Start

}
On this actor, we just moved our configurations and created a receive method. On that method, we created a message case that it is fired at actor startup, making the actor starting up the stream as soon it is instantiated.
Now, let’s do the same to the other stream:
package com.alexandreesl.actor

import akka.actor.{Actor, ActorLogging, ActorSystem, Props}
import akka.kafka.{ConsumerSettings, Subscriptions}
import akka.kafka.scaladsl.Consumer
import akka.stream.ActorMaterializer
import akka.stream.scaladsl.Sink
import com.alexandreesl.actor.KafkaExporterActor.Start
import com.alexandreesl.graph.AccountWriterGraphStage
import com.alexandreesl.graph.GraphMessages.{Account, InputMessage}
import org.apache.kafka.clients.consumer.ConsumerConfig
import org.apache.kafka.common.serialization.StringDeserializer
import spray.json._
import com.alexandreesl.json.JsonParsing._

import scala.concurrent.{ExecutionContextExecutor, Future}

class KafkaExporterActor extends Actor with ActorLogging {

implicit val actorSystem: ActorSystem = context.system
implicit val materializer: ActorMaterializer = ActorMaterializer()
implicit val dispatcher: ExecutionContextExecutor = context.system.dispatcher
private val configConsumer = actorSystem.settings.config.getConfig("akka.kafka.consumer")
private val consumerSettings =
ConsumerSettings(configConsumer, new StringDeserializer, new StringDeserializer)
.withBootstrapServers("localhost:9092")
.withGroupId("group1")
.withProperty(ConsumerConfig.AUTO_OFFSET_RESET_CONFIG, "earliest")

override def preStart(): Unit = {
self ! Start
}

override def receive: Receive = {
case Start =>
Consumer
.committableSource(consumerSettings, Subscriptions.topics("accounts"))
.mapAsync(10)(msg =>
Future.successful(InputMessage(msg.record.value.parseJson.convertTo[Account], msg.committableOffset))
).via(AccountWriterGraphStage.graph)
.mapAsync(10) { tuple =>
val acc = tuple._1
log.info(s"persisted Account: $acc")
tuple._2.commitScaladsl()
}.runWith(Sink.ignore)

}

}

object KafkaExporterActor {

val name = "Kafka-Exporter-actor"

def props = Props(new KafkaExporterActor)

case object Start

}
Finally, as we moved the code to actors, we now can simplify the main object to be just this:
import akka.actor.ActorSystem
import com.alexandreesl.actor.{KafkaExporterActor, KafkaImporterActor}
import com.typesafe.scalalogging.Logger
import org.slf4j.LoggerFactory

object Main extends App {

implicit val system: ActorSystem = ActorSystem("akka-streams-lab")
private val logger = Logger(LoggerFactory.getLogger("Main"))

logger.info("Starting streams...")

system.actorOf(KafkaImporterActor.props, KafkaImporterActor.name)
system.actorOf(KafkaExporterActor.props, KafkaExporterActor.name)

logger.info("Stream system is initialized!")

}
If we run the application again, we will see that it runs just like before, proving our refactoring was a success.
Now that our code is better organized, let’s introduce a supervisor to guarantee error handling. We will define a supervisor strategy in our actors and backoff policies to make the actors restart gradually slower as errors repeat, for example, to wait for Kafka to recover from a shutdown.
To do this, we change our main object code like this:
import akka.actor.{ActorSystem, OneForOneStrategy, Props, SupervisorStrategy}
import akka.pattern.{Backoff, BackoffSupervisor}
import com.alexandreesl.actor.{KafkaExporterActor, KafkaImporterActor}
import com.typesafe.scalalogging.Logger
import org.slf4j.LoggerFactory

import scala.concurrent.duration._

object Main extends App {

implicit val system: ActorSystem = ActorSystem("akka-streams-lab")
private val logger = Logger(LoggerFactory.getLogger("Main"))

logger.info("Starting streams...")

private val supervisorStrategy = OneForOneStrategy() {
case ex: Exception =>
logger.info(s"exception: $ex")
SupervisorStrategy.Restart

}
private val importerProps: Props = BackoffSupervisor.props(
Backoff.onStop(
childProps = KafkaImporterActor.props,
childName = KafkaImporterActor.name,
minBackoff = 3.seconds,
maxBackoff = 30.seconds,
randomFactor = 0.2
).withSupervisorStrategy(supervisorStrategy)
)
private val exporterProps: Props = BackoffSupervisor.props(
Backoff.onStop(
childProps = KafkaExporterActor.props,
childName = KafkaExporterActor.name,
minBackoff = 3.seconds,
maxBackoff = 30.seconds,
randomFactor = 0.2
).withSupervisorStrategy(supervisorStrategy)
)

system.actorOf(importerProps, "Kafka-importer")
system.actorOf(exporterProps, "Kafka-exporter")

logger.info("Stream system is initialized!")

}
On our code, we now defined backoff policies that start restarting after 3 seconds, all up to 30 seconds, randomly scaling up the time between retries after each retry. As supervisor policy, we defined a OneForOne strategy, meaning that if one of the actors restart, only the faulty actor will be affected by the policy.
Finally, we define a simple policy where any errors that occur will be logged and the actor will be restarted. Since errors in the stream will also escalate to the encapsulating actor, this means that errors in the stream will also make the actor fail, causing a restart.
To make this escalation to work, we need to change our actors to make the errors inside the streams to propagate. To do this, we change the actors as follows, adding code to check the status from the stream’s futures:
KafkaImporterActor
package com.alexandreesl.actor

import java.nio.file.Paths

import akka.actor.{Actor, ActorLogging, ActorSystem, PoisonPill, Props}
import akka.kafka.ProducerSettings
import akka.kafka.scaladsl.Producer
import akka.stream.ActorMaterializer
import akka.stream.scaladsl.{FileIO, Flow, Framing}
import akka.util.ByteString
import com.alexandreesl.actor.KafkaImporterActor.Start
import com.alexandreesl.graph.GraphMessages.Account
import com.alexandreesl.json.JsonParsing._
import org.apache.kafka.clients.producer.ProducerRecord
import org.apache.kafka.common.serialization.StringSerializer
import spray.json._

import scala.concurrent.ExecutionContextExecutor
import scala.util.{Failure, Success}

class KafkaImporterActor extends Actor with ActorLogging {

implicit val actorSystem: ActorSystem = context.system
implicit val materializer: ActorMaterializer = ActorMaterializer()
implicit val dispatcher: ExecutionContextExecutor = context.system.dispatcher

private def convertToClass(csv: Array[String]): Account = {
Account(csv(0).toLong,
csv(1), csv(2),
csv(3).toInt, csv(4),
csv(5), csv(6),
csv(7), csv(8),
csv(9), csv(10),
csv(11).toLong, csv(12))
}

private val flow = Flow[String].filter(s => !s.contains("COD"))
.map(line => {
convertToClass(line.split(","))
})
private val configProducer = actorSystem.settings.config.getConfig("akka.kafka.producer")
private val producerSettings =
ProducerSettings(configProducer, new StringSerializer, new StringSerializer)
.withBootstrapServers("localhost:9092")

override def preStart(): Unit = {
self ! Start
}

override def receive: Receive = {
case Start =>
val done = FileIO.fromPath(Paths.get("input1.csv"))
.via(Framing.delimiter(ByteString("\n"), 4096)
.map(_.utf8String))
.via(flow)
.map(value => new ProducerRecord[String, String]("accounts", value.toJson.compactPrint))
.runWith(Producer.plainSink(producerSettings))
done onComplete {
case Success(_) =>
log.info("I completed successfully, I am so happy :)")
case Failure(ex) =>
log.error(ex, "I received a error! Goodbye cruel world!")
self ! PoisonPill
}

}

}

object KafkaImporterActor {

val name = "Kafka-Importer-actor"

def props = Props(new KafkaImporterActor)

case object Start

}
KafkaExporterActor
package com.alexandreesl.actor

import akka.actor.{Actor, ActorLogging, ActorSystem, PoisonPill, Props}
import akka.kafka.{ConsumerSettings, Subscriptions}
import akka.kafka.scaladsl.Consumer
import akka.stream.ActorMaterializer
import akka.stream.scaladsl.Sink
import com.alexandreesl.actor.KafkaExporterActor.Start
import com.alexandreesl.graph.AccountWriterGraphStage
import com.alexandreesl.graph.GraphMessages.{Account, InputMessage}
import org.apache.kafka.clients.consumer.ConsumerConfig
import org.apache.kafka.common.serialization.StringDeserializer
import spray.json._
import com.alexandreesl.json.JsonParsing._

import scala.concurrent.{ExecutionContextExecutor, Future}
import scala.util.{Failure, Success}

class KafkaExporterActor extends Actor with ActorLogging {

implicit val actorSystem: ActorSystem = context.system
implicit val materializer: ActorMaterializer = ActorMaterializer()
implicit val dispatcher: ExecutionContextExecutor = context.system.dispatcher
private val configConsumer = actorSystem.settings.config.getConfig("akka.kafka.consumer")
private val consumerSettings =
ConsumerSettings(configConsumer, new StringDeserializer, new StringDeserializer)
.withBootstrapServers("localhost:9092")
.withGroupId("group1")
.withProperty(ConsumerConfig.AUTO_OFFSET_RESET_CONFIG, "earliest")

override def preStart(): Unit = {
self ! Start
}

override def receive: Receive = {
case Start =>
val done = Consumer
.committableSource(consumerSettings, Subscriptions.topics("accounts"))
.mapAsync(10)(msg =>
Future.successful(InputMessage(msg.record.value.parseJson.convertTo[Account], msg.committableOffset))
).via(AccountWriterGraphStage.graph)
.mapAsync(10) { tuple =>
val acc = tuple._1
log.info(s"persisted Account: $acc")
tuple._2.commitScaladsl()
}.runWith(Sink.ignore)
done onComplete {
case Success(_) =>
log.info("I completed successfully, I am so happy :)")
case Failure(ex) =>
log.error(ex, "I received a error! Goodbye cruel world!")
self ! PoisonPill
}

}

}

object KafkaExporterActor {

val name = "Kafka-Exporter-actor"

def props = Props(new KafkaExporterActor)

case object Start

}
Finally, let’s test it out. We begin by shutting down Kafka without stopping our application, by running:
docker-compose down
If we look at the logs, we will see the streams will start complaining about not connecting to Kafka. After some time, we will get an actor terminated error, caused by the poison pill we make it swallow:
[INFO] [12/28/2018 22:23:54.236] [akka-streams-lab-akka.actor.default-dispatcher-4] [akka://akka-streams-lab/system/kafka-consumer-1] Message [akka.kafka.KafkaConsumerActor$Stop$] without sender to Actor[akka://akka-streams-lab/system/kafka-consumer-1#1868012916] was not delivered. [2] dead letters encountered. If this is not an expected behavior, then [Actor[akka://akka-streams-lab/system/kafka-consumer-1#1868012916]] may have terminated unexpectedly, This logging can be turned off or adjusted with configuration settings ‘akka.log-dead-letters’ and ‘akka.log-dead-letters-during-shutdown’.
[ERROR] [12/28/2018 22:23:54.236] [akka-streams-lab-akka.actor.default-dispatcher-5] [akka://akka-streams-lab/user/Kafka-exporter/Kafka-Exporter-actor] I received a error! Goodbye cruel world!
akka.kafka.ConsumerFailed: Consumer actor terminated
at akka.kafka.internal.SingleSourceLogic.$anonfun$preStart$1(SingleSourceLogic.scala:66)
at akka.kafka.internal.SingleSourceLogic.$anonfun$preStart$1$adapted(SingleSourceLogic.scala:53)
at akka.stream.stage.GraphStageLogic$StageActor.internalReceive(GraphStage.scala:230)
at akka.stream.stage.GraphStageLogic$StageActor.$anonfun$callback$1(GraphStage.scala:198)
at akka.stream.stage.GraphStageLogic$StageActor.$anonfun$callback$1$adapted(GraphStage.scala:198)
at akka.stream.impl.fusing.GraphInterpreter.runAsyncInput(GraphInterpreter.scala:454)
at
If we just keep watching, we will see this cycle endless repeating, as streams are restarted, they fail to connect to Kafka and the poison pill is swallowed again.
To make the application come back again, let’s restart our Kafka cluster with:
docker-compose up -d
We will see that after Kafka returns, the streams will resume to normal.
And that concludes our error handling code. Of course, that it is not all we can do in this field. Another interesting error handling technique that can be used in some cases is recovering, where we can define another stream to be executed in case of a failure, as a circuit breaker. This can be seen in more detail here.
Finally, let’s test our Package plugin, by running the code in the terminal. Let’s open a terminal and run the following:
sbt stage
This will prepare our application, including a shell script to run the application. We can run it by typing:
./target/universal/stage/bin/akka-stream-lab
After entering, we will see that our application will run just like in Intellij:

Automated testing the stream
Finally, to wrap it up, we will see how to test our streams. Automated tests are important to code’s sturdiness, also allowing CI pipelines to be implemented efficiently.
Streams can be tested by using probes to run the streams and check the results. Let’s start by creating a test for the converter flow that generates accounts from csv lines – the rest of the code would just be testing third-party libraries so we will focus on our own code only – and next, we will test our graph stage.
On our tests, we will use several traits to add support to several features we will/can use. It is good practice to join all traits inside a single one so our test classes won’t have a big single line of trait declarations.
So let’s begin by creating our trait:
package com.alexandreesl.test

import org.scalatest.{BeforeAndAfter, BeforeAndAfterAll, Matchers, WordSpecLike}

trait TestEnvironment extends WordSpecLike with Matchers

with BeforeAndAfter with BeforeAndAfterAll
Before coding the test, we will move the flow on KafkaImporterActor to the object companion, this way allowing us to reference in the test:
package com.alexandreesl.actor

import java.nio.file.Paths

import akka.actor.{Actor, ActorLogging, ActorSystem, PoisonPill, Props}
import akka.kafka.ProducerSettings
import akka.kafka.scaladsl.Producer
import akka.stream.ActorMaterializer
import akka.stream.scaladsl.{FileIO, Flow, Framing}
import akka.util.ByteString
import com.alexandreesl.actor.KafkaImporterActor.Start
import com.alexandreesl.graph.GraphMessages.Account
import com.alexandreesl.json.JsonParsing._
import org.apache.kafka.clients.producer.ProducerRecord
import org.apache.kafka.common.serialization.StringSerializer
import spray.json._

import scala.concurrent.ExecutionContextExecutor
import scala.util.{Failure, Success}

class KafkaImporterActor extends Actor with ActorLogging {

implicit val actorSystem: ActorSystem = context.system
implicit val materializer: ActorMaterializer = ActorMaterializer()
implicit val dispatcher: ExecutionContextExecutor = context.system.dispatcher

private val configProducer = actorSystem.settings.config.getConfig("akka.kafka.producer")
private val producerSettings =
ProducerSettings(configProducer, new StringSerializer, new StringSerializer)
.withBootstrapServers("localhost:9092")

override def preStart(): Unit = {
self ! Start
}

override def receive: Receive = {
case Start =>
val done = FileIO.fromPath(Paths.get("input1.csv"))
.via(Framing.delimiter(ByteString("\n"), 4096)
.map(_.utf8String))
.via(KafkaImporterActor.flow)
.map(value => new ProducerRecord[String, String]("accounts", value.toJson.compactPrint))
.runWith(Producer.plainSink(producerSettings))
done onComplete {
case Success(_) =>
log.info("I completed successfully, I am so happy :)")
case Failure(ex) =>
log.error(ex, "I received a error! Goodbye cruel world!")
self ! PoisonPill
}

}

}

object KafkaImporterActor {

private def convertToClass(csv: Array[String]): Account = {
Account(csv(0).toLong,
csv(1), csv(2),
csv(3).toInt, csv(4),
csv(5), csv(6),
csv(7), csv(8),
csv(9), csv(10),
csv(11).toLong, csv(12))
}

val flow = Flow[String].filter(s => !s.contains("COD"))
.map(line => {
convertToClass(line.split(","))
})

val name = "Kafka-Importer-actor"

def props = Props(new KafkaImporterActor)

case object Start

}
Next, we will implement an different equals method on Account class so it will work properly in test assertations:
package com.alexandreesl.graph

import akka.kafka.ConsumerMessage

object GraphMessages {

case class Account(cod: Long, name: String, document: String, age: Int, civilStatus: String,
phone: String, birthday: String, country: String, state: String,
city: String, street: String, streetNum: Long, neighBorhood: String) {
override def equals(that: Any): Boolean =
that match {
case that: Account => that.canEqual(this) && that.cod == this.cod
case _ => false
}
}

case class InputMessage(acc: Account, offset: ConsumerMessage.CommittableOffset)

case class AccountPersonalData(cod: Long, name: String, document: String, age: Int, civilStatus: String,
phone: String, birthday: String)

case class AccountAddressData(cod: Long, country: String, state: String,
city: String, street: String, streetNum: Long, neighBorhood: String)

}
Finally, let’s code the test:
package com.alexandreesl.test.importer

import akka.actor.ActorSystem
import akka.stream.ActorMaterializer
import akka.stream.scaladsl.{Sink, Source}
import akka.testkit.{TestKit, TestProbe}
import com.alexandreesl.actor.KafkaImporterActor
import com.alexandreesl.graph.GraphMessages.Account
import com.alexandreesl.test.TestEnvironment

import scala.concurrent.duration._

class KafkaImporterActorSpec extends TestKit(ActorSystem("MyTestSystem")) with TestEnvironment {
implicit val materializer = ActorMaterializer()
implicit val ec = system.dispatcher

override def afterAll() = TestKit.shutdownActorSystem(system)

"A csv line in a file " when {
val csv = "1,\"alexandre eleuterio santos lourenco 1\",\"43456754356\",36,\"Single\",\"+5511234433443\",\"21/06/1982\",\"Brazil\",\"São Paulo\",\"São Paulo\",\"false st\",3134,\"neigh 1\""

" should convert to Account case class " in {

val probe = TestProbe()

Source.single(csv)
.via(KafkaImporterActor.flow)
.to(Sink.actorRef(probe.ref, "completed"))
.run()

probe.expectMsg(2.seconds, Account(1, "alexandre eleuterio santos lourenco 1",
"43456754356", 36, "Single", "+5511234433443", "21/06/1982",
"Brazil", "São Paulo", "São Paulo", "false st", 3134, "neigh 1"))
probe.expectMsg(2.seconds, "completed")

}

}

}
On this code, we create a probe that waits for a message containing the Account converted from the flow and a “completed” message, that the sink will emit at the end. The 2 seconds timeout is to control how much time the probe will wait for a message to come.
Now, let’s code our second test. Before writing the test itself, let’s make a little refactoring on KafkaExporterActor, by exposing a part of the stream to the spec. This way we will test all our custom code:
package com.alexandreesl.actor

import akka.actor.{Actor, ActorLogging, ActorSystem, PoisonPill, Props}
import akka.kafka.{ConsumerSettings, Subscriptions}
import akka.kafka.scaladsl.Consumer
import akka.stream.ActorMaterializer
import akka.stream.scaladsl.{Flow, Sink}
import com.alexandreesl.actor.KafkaExporterActor.Start
import com.alexandreesl.graph.AccountWriterGraphStage
import com.alexandreesl.graph.GraphMessages.{Account, InputMessage}
import org.apache.kafka.clients.consumer.ConsumerConfig
import org.apache.kafka.common.serialization.StringDeserializer
import spray.json._
import com.alexandreesl.json.JsonParsing._
import com.typesafe.scalalogging.Logger
import org.slf4j.LoggerFactory

import scala.concurrent.{ExecutionContextExecutor, Future}
import scala.util.{Failure, Success}

class KafkaExporterActor extends Actor with ActorLogging {

implicit val actorSystem: ActorSystem = context.system
implicit val materializer: ActorMaterializer = ActorMaterializer()
implicit val dispatcher: ExecutionContextExecutor = context.system.dispatcher
private val configConsumer = actorSystem.settings.config.getConfig("akka.kafka.consumer")
private val consumerSettings =
ConsumerSettings(configConsumer, new StringDeserializer, new StringDeserializer)
.withBootstrapServers("localhost:9092")
.withGroupId("group1")
.withProperty(ConsumerConfig.AUTO_OFFSET_RESET_CONFIG, "earliest")

override def preStart(): Unit = {
self ! Start
}

override def receive: Receive = {
case Start =>
val done = Consumer
.committableSource(consumerSettings, Subscriptions.topics("accounts"))
.mapAsync(10)(msg =>
Future.successful(InputMessage(msg.record.value.parseJson.convertTo[Account], msg.committableOffset))
)
.via(KafkaExporterActor.flow)
.runWith(Sink.ignore)
done onComplete {
case Success(_) =>
log.info("I completed successfully, I am so happy :)")
case Failure(ex) =>
log.error(ex, "I received a error! Goodbye cruel world!")
self ! PoisonPill
}

}

}

object KafkaExporterActor {

private val logger = Logger(LoggerFactory.getLogger("KafkaExporterActor"))

def flow()(implicit actorSystem: ActorSystem,
materializer: ActorMaterializer) =
Flow[InputMessage].via(AccountWriterGraphStage.graph)
.mapAsync(10) { tuple =>
val acc = tuple._1
logger.info(s"persisted Account: $acc")
tuple._2.commitScaladsl()
}

val name = "Kafka-Exporter-actor"

def props = Props(new KafkaExporterActor)

case object Start

}
Finally, let’s code our test:
package com.alexandreesl.test.exporter

import akka.Done
import akka.actor.ActorSystem
import akka.kafka.ConsumerMessage.CommittableOffset
import akka.stream.ActorMaterializer
import akka.stream.scaladsl.{Sink, Source}
import akka.testkit.{TestKit, TestProbe}
import com.alexandreesl.actor.KafkaExporterActor
import com.alexandreesl.graph.GraphMessages.{Account, InputMessage}
import com.alexandreesl.test.TestEnvironment
import org.mockito.Mockito.{times, verify, when}
import org.scalatest.mockito.MockitoSugar.mock

import scala.concurrent.Future
import scala.concurrent.duration._

class KafkaExporterActorSpec extends TestKit(ActorSystem("MyTestSystem")) with TestEnvironment {
implicit val materializer = ActorMaterializer()
implicit val ec = system.dispatcher

override def afterAll() = TestKit.shutdownActorSystem(system)

"A Account object " when {

val offset = mock[CommittableOffset]
when(offset commitScaladsl) thenReturn Future.successful(Done)
val account = Account(1, "alexandre eleuterio santos lourenco 1",
"43456754356", 36, "Single", "+5511234433443", "21/06/1982",
"Brazil", "São Paulo", "São Paulo", "false st", 3134, "neigh 1")
val inputMessage = InputMessage(account, offset)

" should pass through the graph stage " in {

val probe = TestProbe()
Source.single(inputMessage)
.via(KafkaExporterActor.flow)
.to(Sink.actorRef(probe.ref, "completed"))
.run()

probe.expectMsg(2.seconds, Done)
probe.expectMsg(2.seconds, "completed")
verify(offset, times(1)) commitScaladsl

}

}

}
On this code, again we wait for the probe to receive messages. In this case, we first receive the Done object from Kafka commit – in this case, we create a mock object in order to allow us to run tests without Kafka – and next receive our good old “completed” message. Finally, we test if our mock was called, to assure that the flow is committing messages back to Kafka after processing.
Of course, this was just a tiny taste of what can be done with Akka’s Testkit. The probe we used just for sinks can also be used for sources as well and just like we test streams, it is also possible to test actors communicating with each other in an actor solution, for example.
In the references section, it is possible to get links to all documentation supplied to this and other subjects observed on this article.
Going beyond
Of course, this brief article can’t possibly talk about every detail of Akka and Akka Streams. From subjects not talked here we can spotlight a few:
- Akka FSM (Finite State Machine): It allows us to implement state machines on actors solutions;
- Akka HTTP: Allows us to call and expose HTTP endpoints;
- Akka persistence: Allows us to implement a persistence layer on messages flowing through Akka, in order to implement better recoverability in case of failures;
- Akka Event Bus: A built-in publisher-subscriber event bus inside Akka, Allows us to implement broadcasting of messages inside actor solutions.
In the references section, it is possible to find links for this and more!
Thanks
Special thanks to Iago David Santos (LinkedIn), which revised this article and pointed some things. Thanks, Iago!
Conclusion
And that concludes our article. With a great toolkit and sturdiness, Akka Streams is a great tool to be considered when coding integrations, APIs and more. Thank you for following me again on this article, until next time!
Continue reading


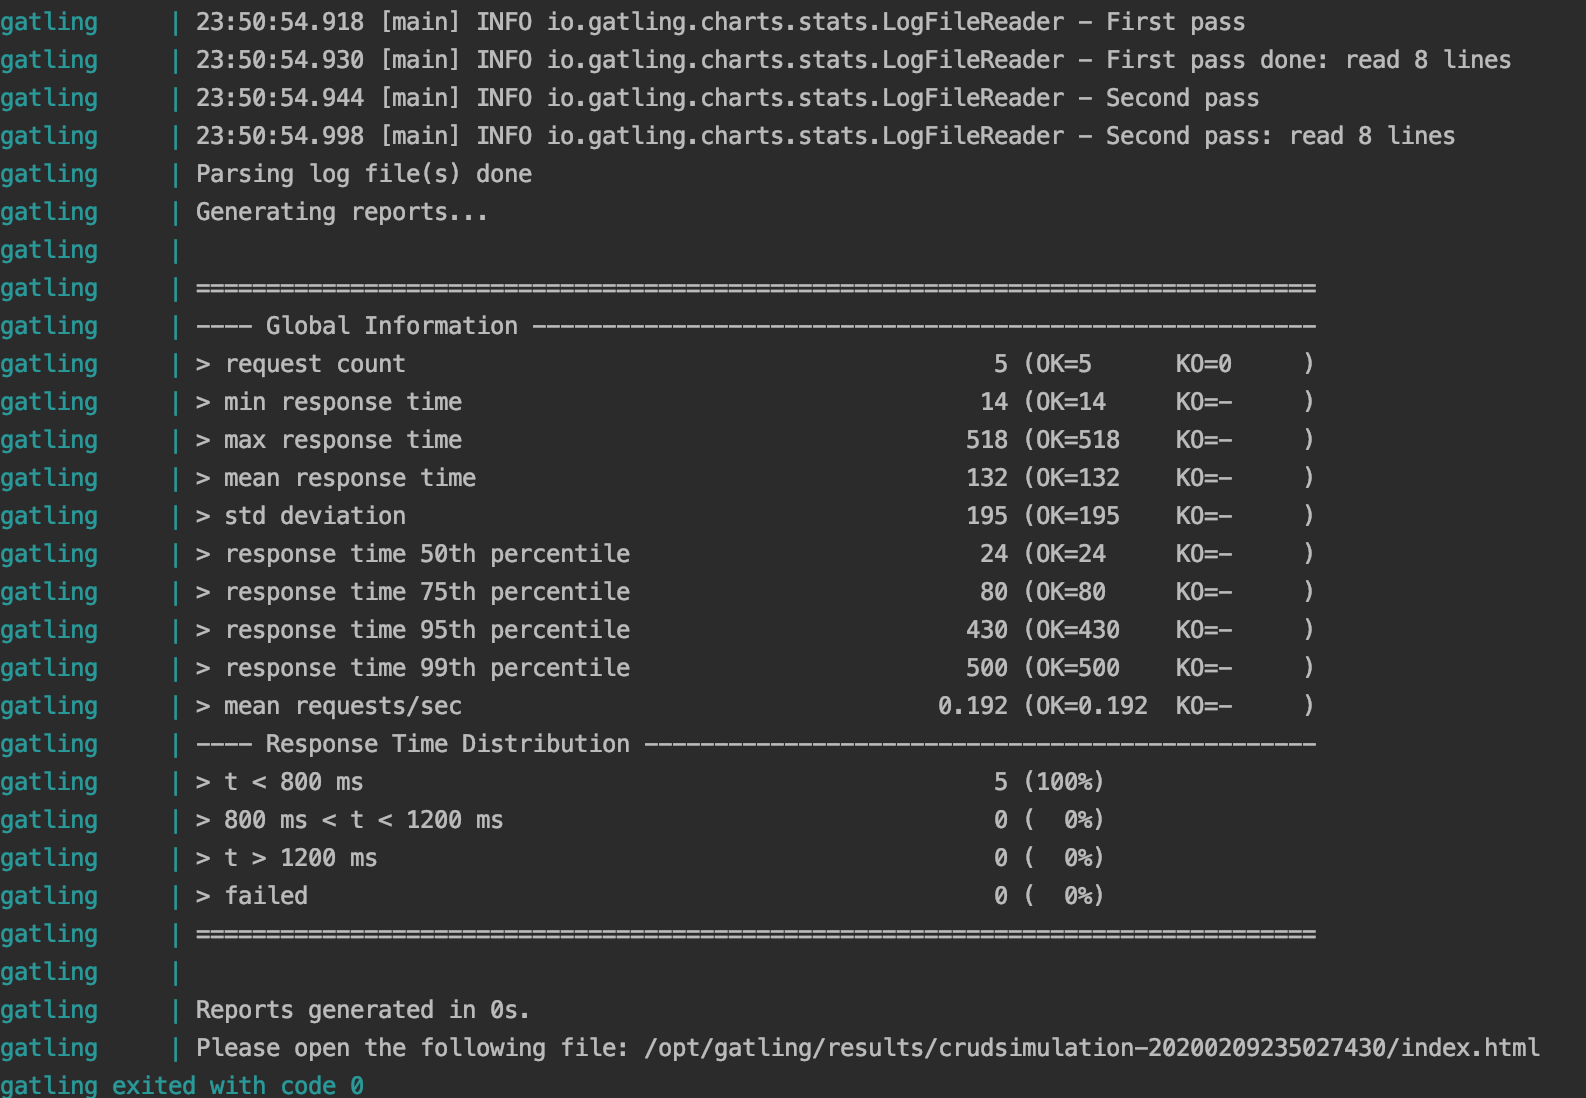

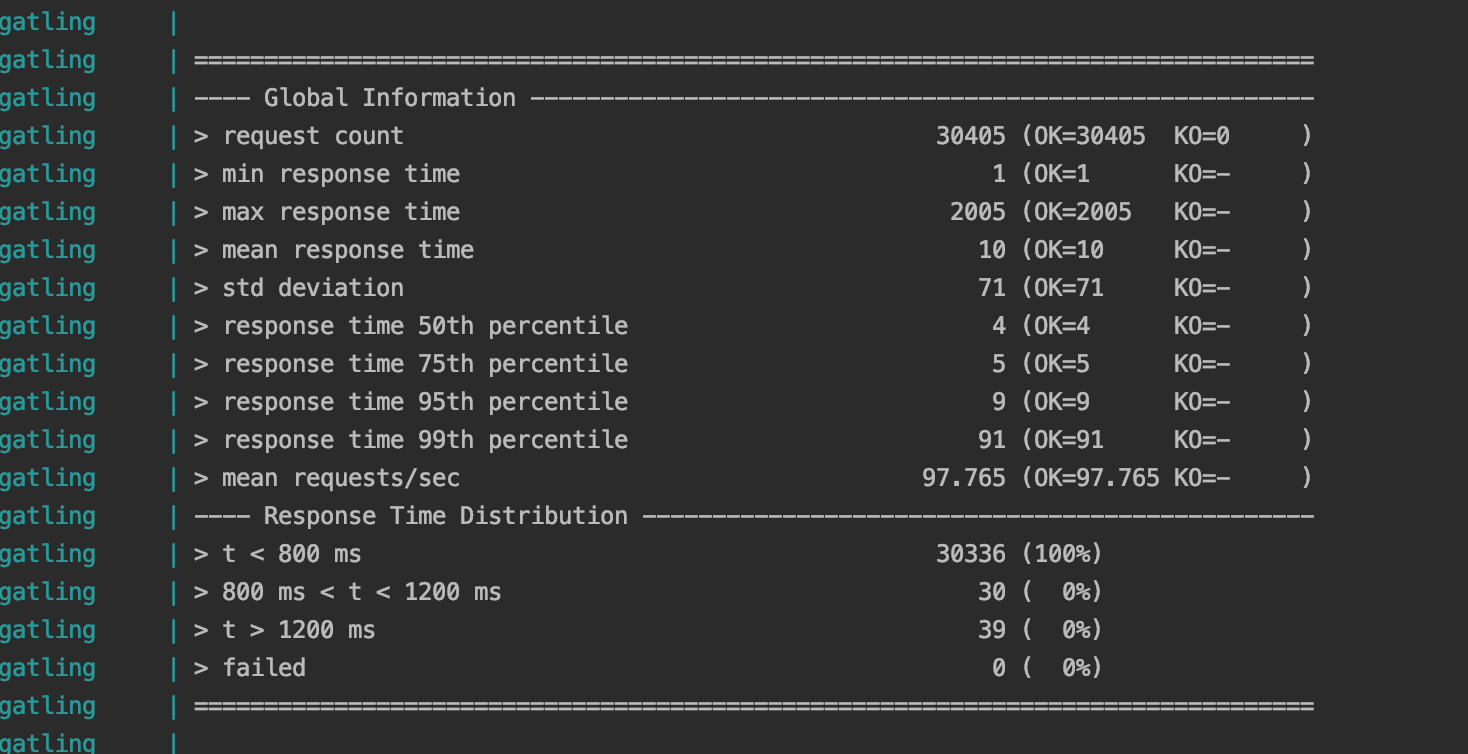
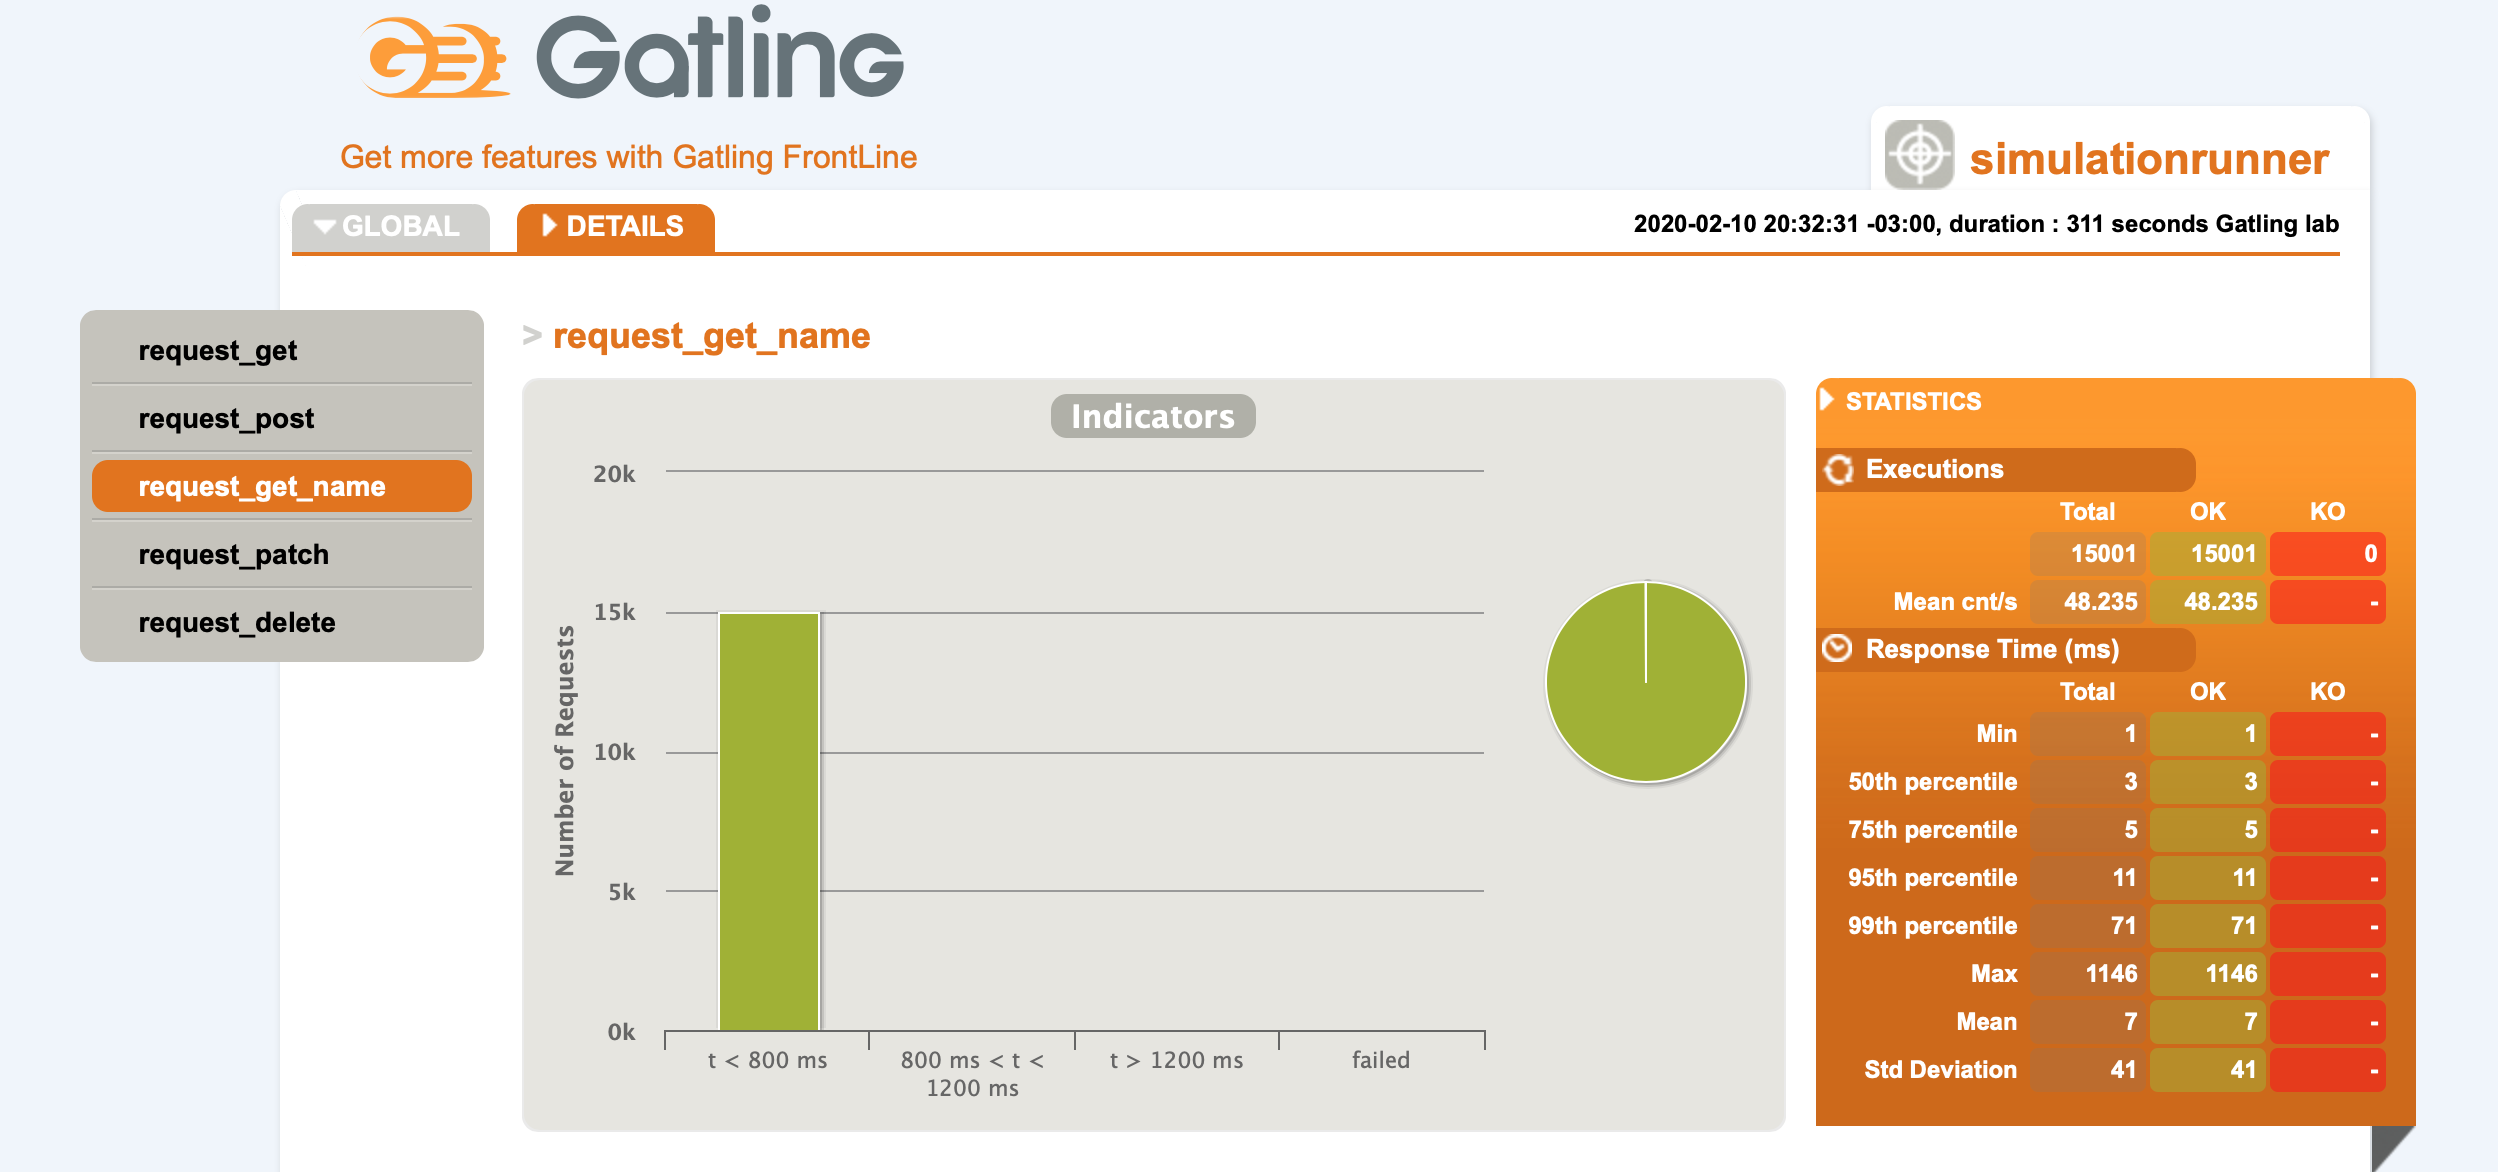

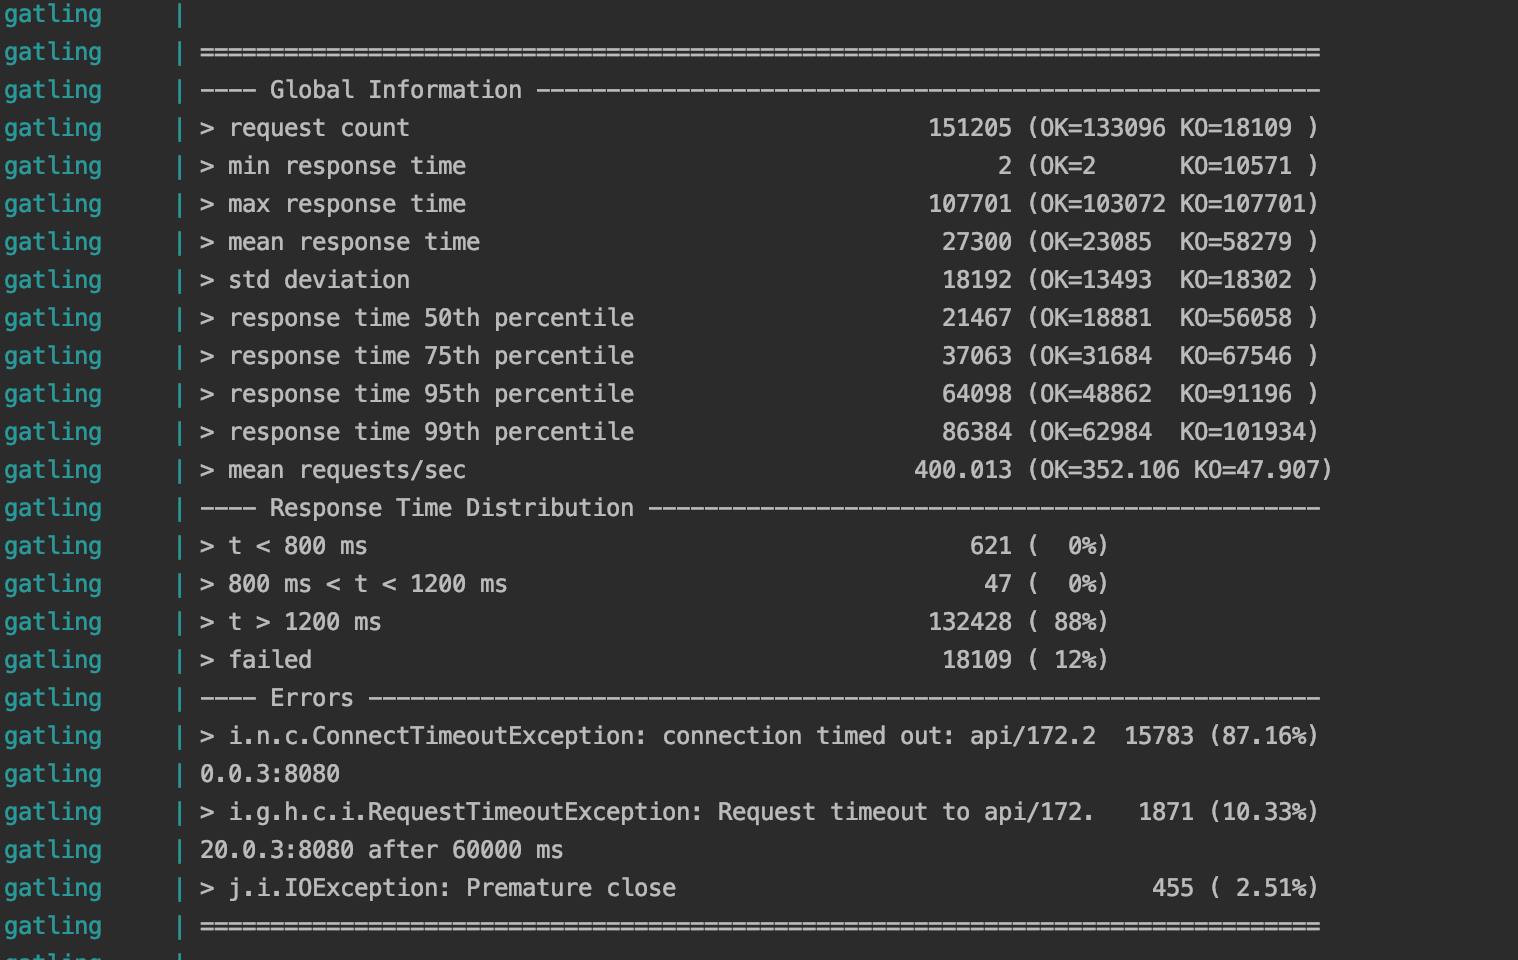 Now we got some errors! The cause, as we can see from the report, are timeouts from server threads been exhausted due to the massive amount of requests. In a real scenario, we should think of options such as horizontal balancing, reactive streams and such. But since our focus is not on API performance in the post, we will not continue for now. The main point for this little test is to show how Gatling can help us in testing the capacity of our applications.