AWS Lambda: building a serverless back-end on Amazon

Standard

Hello, dear readers! welcome to my blog. On this post, we will learn about AWS Lambda, a serverless architectural solution that enables us to quickly deploy serverless back-end infrastructures. But why using this service, instead of good old EC2s?Let’s find it out!

Motivation behind AWS Lambda

Alongside the benefits of developing a back-end using the serverless paradigm – which can be learned on more detail on this other post of mine – another good point on using AWS is pricing.

When deploying your application with a EC2, be a on-demand, spot or reserved one, we are charged by hour. This is true even if our application is not called at all during that hour, resulting on wasted resources and money.

With AWS lambda, Amazon charge us by processing time, as such, it only charges us the time spent on lambdas execution. This results on a much cleaner architecture, where less resources and money are spent. This post details the case on more detail.

AWS Lambda development is based on functions. When developing a lambda, we develop a function that can run as a REST endpoint – served by Amazon API Gateway – or a event processing function, running on events such as a file been uploaded to a S3 bucket.

Limitations

However, not all is simple on this service. When developing with AWS Lambda, two things must be kept in mind: cold starts and resource restrictions.

Cold starts consist of the first time a lambda is called, or after some time is passed and the server – behind the scenes, obviously there are servers that runs the functions, but this is hidden from the user – used to run the lambda is already down due to inactivity. Amazon has algorithms that make the server be up and serving as long as there is a consistent frequency of client calls, but off course, from time to time, there will be idle times.

When a cold start is made, this causes the requests to have a more slow response, since it will wait for a server to be up and running to run the function. This can be worsen if clients have low timeout configurations, resulting on requests failing. This should be taking on account when developing lambdas that act as APIs.

Another important aspect to take note are resource restrictions. Been designed to be used for small functions (“microservices”), lambdas have several limitations, such as amount of memory, disk and cpu. This limits can be increased, but only by a small amount. This link on AWS docs details more about the limits.

One important limit is the running time of the lambda itself. A AWS Lambda can run at most 5 minutes. This is a important limit to understand the nature of what lambdas must be in nature: simple functions, that must not run by long periods of time.

If any of this limits are reached, the lambda will fail his execution.

Lab

For this lab, we will use a framework called Serverless. Serverless is a framework that automates for us some tasks that are a little boring to do if developing with AWS Lambda by hand, such as creating a zip file with all our sources to be uploaded to S3 and creating/configuring all AWS resources. Serverless uses CloudFormation under the hood, managing resource creation and updates for us. For programming language, we will use Python 3.6.

To install Serverless, please follow this guide.

With Serverless installed, let’s begin our lab! First, let’s create a project, by running:

serverless create --template aws-python3 --path MyAmazingAWSLambdaService 

This command will create a new Serverless project, using a initial template for our first Python lambda. Let’s open the project – I will be using PyCharm, but any IDE or editor of choice will suffice – and see what the framework created for us.

Project structure

Serverless created a simple project structure, consisting of a serverless YAML file and a Python script. It is on the YAML that we declare our functions, the cloud provider, IAM permissions, resources to be created etc.

The file created by the command is as follows:

# Welcome to Serverless!
#
# This file is the main config file for your service.
# It's very minimal at this point and uses default values.
# You can always add more config options for more control.
# We've included some commented out config examples here.
# Just uncomment any of them to get that config option.
#
# For full config options, check the docs:
#    docs.serverless.com
#
# Happy Coding!

service: MyAmazingAWSLambdaService

# You can pin your service to only deploy with a specific Serverless version
# Check out our docs for more details
# frameworkVersion: "=X.X.X"

provider:
  name: aws
  runtime: python3.6

# you can overwrite defaults here
#  stage: dev
#  region: us-east-1

# you can add statements to the Lambda function's IAM Role here
#  iamRoleStatements:
#    - Effect: "Allow"
#      Action:
#        - "s3:ListBucket"
#      Resource: { "Fn::Join" : ["", ["arn:aws:s3:::", { "Ref" : "ServerlessDeploymentBucket" } ] ]  }
#    - Effect: "Allow"
#      Action:
#        - "s3:PutObject"
#      Resource:
#        Fn::Join:
#          - ""
#          - - "arn:aws:s3:::"
#            - "Ref" : "ServerlessDeploymentBucket"
#            - "/*"

# you can define service wide environment variables here
#  environment:
#    variable1: value1

# you can add packaging information here
#package:
#  include:
#    - include-me.py
#    - include-me-dir/**
#  exclude:
#    - exclude-me.py
#    - exclude-me-dir/**

functions:
  hello:
    handler: handler.hello

#    The following are a few example events you can configure
#    NOTE: Please make sure to change your handler code to work with those events
#    Check the event documentation for details
#    events:
#      - http:
#          path: users/create
#          method: get
#      - s3: ${env:BUCKET}
#      - schedule: rate(10 minutes)
#      - sns: greeter-topic
#      - stream: arn:aws:dynamodb:region:XXXXXX:table/foo/stream/1970-01-01T00:00:00.000
#      - alexaSkill
#      - alexaSmartHome: amzn1.ask.skill.xx-xx-xx-xx
#      - iot:
#          sql: "SELECT * FROM 'some_topic'"
#      - cloudwatchEvent:
#          event:
#            source:
#              - "aws.ec2"
#            detail-type:
#              - "EC2 Instance State-change Notification"
#            detail:
#              state:
#                - pending
#      - cloudwatchLog: '/aws/lambda/hello'
#      - cognitoUserPool:
#          pool: MyUserPool
#          trigger: PreSignUp

#    Define function environment variables here
#    environment:
#      variable2: value2

# you can add CloudFormation resource templates here
#resources:
#  Resources:
#    NewResource:
#      Type: AWS::S3::Bucket
#      Properties:
#        BucketName: my-new-bucket
#  Outputs:
#     NewOutput:
#       Description: "Description for the output"
#       Value: "Some output value"

For now, let’s just remove all comments in order to have a cleaner file. The other file is a Python script, which have our first function. Let’s see it:

import json


def hello(event, context):
    body = {
        "message": "Go Serverless v1.0! Your function executed successfully!",
        "input": event
    }

    response = {
        "statusCode": 200,
        "body": json.dumps(body)
    }

    return response

    # Use this code if you don't use the http event with the LAMBDA-PROXY
    # integration
    """
    return {
        "message": "Go Serverless v1.0! Your function executed successfully!",
        "event": event
    }
    """

As we can see, is a pretty simple script. All we have to do is create a function that receives 2 parameters, context and event. Event is used to pass the input data on which the lambda will work. Context is used by AWS to pass information about the environment on which the lambda is running. For example, if we wanted to know how much time is left before our running time limit is reached, we could do the following call:

print("Time remaining (MS):", context.get_remaining_time_in_millis())

The dictionary returned by the function is the standard response for a lambda that acts as a API, proxied by AWS API Gateway.

For now, let’s leave the script as it is, as we will add more functions to the project. Let’s begin by adding the Dynamodb table we will use on our lab, alongside other configurations.

Creating Dynamodb table

In order to create the table, we modify our YAML as follows:

service: MyAmazingAWSLambdaService

provider:
  name: aws
  runtime: python3.6
  stage: ${opt:stage, 'dev'}
  region: ${opt:region, 'us-east-1'}
  profile: personal

functions:
  hello:
    handler: handler.hello

resources:
  Resources:
    product:
      Type: AWS::DynamoDB::Table
      Properties:
        TableName: product
        AttributeDefinitions:
          - AttributeName: id
            AttributeType: S
        KeySchema:
          - AttributeName: id
            KeyType: HASH
        ProvisionedThroughput:
          ReadCapacityUnits: 1
          WriteCapacityUnits: 1

We added a resources section, where we defined a dynamodb table called product and defined a atribute called id to be key in table’s items. We also defined the stage and region to be collected as command-line options – stages are used as application environments, such as QA and Production. Finally, we defined that we want the deploys to use a IAM profile called personal. This is useful when having several accounts on the same machine.

Let’s deploy the stack by entering:

serverless deploy --stage prod

After some time, we will see that our stack was successfully deployed, as we can see on the console:

Serverless: Packaging service...
Serverless: Excluding development dependencies...
Serverless: Creating Stack...
Serverless: Checking Stack create progress...
.....
Serverless: Stack create finished...
Serverless: Uploading CloudFormation file to S3...
Serverless: Uploading artifacts...
Serverless: Uploading service .zip file to S3 (3.38 KB)...
Serverless: Validating template...
Serverless: Updating Stack...
Serverless: Checking Stack update progress...
..................
Serverless: Stack update finished...
Service Information
service: MyAmazingAWSLambdaService
stage: prod
region: us-east-1
stack: MyAmazingAWSLambdaService-prod
api keys:
 None
endpoints:
 None
functions:
 hello: MyAmazingAWSLambdaService-prod-hello

During the deployment, Serverless generated a zip file with all our resources, uploaded to a bucket, created a CloudFormation stack and deployed our lambda with it, alongside the necessary permissions to run. It also created our dynamodb table, as required.

Now that we have our stack and table, let’s begin by creating a group of lambdas to implement CRUD operations on our table.

Creating CRUD lambdas

Now, let’s create our lambdas. First, let’s create a Python class to encapsulate the operations on our dynamodb table:

# -*- coding: UTF-8 -*-

import boto3

dynamodb = boto3.resource('dynamodb')


class DynamoDbHelper:

    def __init__(self, **kwargs):
        self.table = dynamodb.Table(kwargs.get('table', """missing"""))

    def save(self, entity):
        """
           save entity from DYNAMODB_self.table
        """
        saved = self.table.put_item(Item=entity)
        print('Saving result: ({})'.format(saved))

    def get(self, entity_id):
        """
         get entity from DYNAMODB_self.table
      """
        entity = self.table.get_item(Key={'id': entity_id})

        if 'Item' in entity:
            return entity['Item']
        else:
            return None

    def delete(self, entity_id):
        """
           delete entity from DYNAMODB_self.table
        """
        deleted = self.table.delete_item(Key={'id': entity_id})
        print('Deleting result: ({})'.format(deleted))

Then, we create another script to make a converter. This will be used to read the input data from lambda calls to dynamodb’s data:

# -*- coding: UTF-8 -*-
import json


class ProductConverter:

    def convert(self, event):
        """
           convert entity from input to dictionary to be saved on dynamodb
        """
        if isinstance(event['body'], dict):
            data = event['body']
        else:
            data = json.loads(event['body'])
        return {
            'id': data['id'],
            'name': data.get('name', ''),
            'description': data.get('description', ''),
            'price': data.get('price', '')
        }

Next, we change the script created by Serverless, creating the lambda handlers:

# -*- coding: UTF-8 -*-

import json

from helpers.DynamoDbHelper import DynamoDbHelper
from helpers.ProductConverter import ProductConverter


def get_path_parameters(event, name):
    return event['pathParameters'][name]


dynamodb_helper = DynamoDbHelper(table='product')
product_converter = ProductConverter()


def save(event, context):
    product = product_converter.convert(event)

    if 'id' not in event['body']:
        return {
            "statusCode": 422,
            "body": json.dumps({'message': 'Product ID is required!'})
        }

    try:
        dynamodb_helper.save(product)
        response = {
            "statusCode": 200,
            "body": json.dumps({'message': 'saved successfully'})
        }
    except Exception as e:
        return {
            "statusCode": 500,
            "body": json.dumps({'message': str(e)})
        }

    return response


def get(event, context):
    product = dynamodb_helper.get(get_path_parameters(event, 'product_id'))

    if product is not None:
        response = {
            "statusCode": 200,
            "body": json.dumps(product)
        }
    else:
        response = {
            "statusCode": 404,
            "body": json.dumps({'message': 'not found'})
        }
    return response


def delete(event, context):
    try:
        dynamodb_helper.delete(get_path_parameters(event, 'product_id'))
        response = {
            "statusCode": 200,
            "body": json.dumps({'message': 'deleted successfully'})
        }
    except Exception as e:
        return {
            "statusCode": 500,
            "body": json.dumps({'message': str(e)})
        }

    return response

Finally, we change serverless.yml, defining our lambdas to be deployed on AWS:

service: MyAmazingAWSLambdaService

provider:
  name: aws
  runtime: python3.6
  stage: ${opt:stage, 'dev'}
  region: ${opt:region, 'us-east-1'}
  profile: personal

  iamRoleStatements: # permissions for all of your functions can be set here
      - Effect: Allow
        Action:
          - dynamodb:*
        Resource: "arn:aws:dynamodb:us-east-1:<your_account_id>:table/product"

functions:
  save_product:
    handler: handler.save
    events:
      - http:
          path: product/save
          method: post
  update_product:
    handler: handler.save
    events:
      - http:
          path: product/update
          method: patch
  get_product:
    handler: handler.get
    events:
      - http:
          path: product/{product_id}
          method: get
  delete_product:
    handler: handler.delete
    events:
      - http:
          path: product/{product_id}
          method: delete

resources:
  Resources:
    product:
      Type: AWS::DynamoDB::Table
      Properties:
        TableName: product
        AttributeDefinitions:
          - AttributeName: id
            AttributeType: S
        KeySchema:
          - AttributeName: id
            KeyType: HASH
        ProvisionedThroughput:
          ReadCapacityUnits: 1
          WriteCapacityUnits: 1

After running the deployment again, we can see the functions were deployed, as seen on terminal:

Serverless: Packaging service...
Serverless: Excluding development dependencies...
Serverless: Uploading CloudFormation file to S3...
Serverless: Uploading artifacts...
Serverless: Uploading service .zip file to S3 (4.92 KB)...
Serverless: Validating template...
Serverless: Updating Stack...
Serverless: Checking Stack update progress...
........................................................................................
Serverless: Stack update finished...
Service Information
service: MyAmazingAWSLambdaService
stage: prod
region: us-east-1
stack: MyAmazingAWSLambdaService-prod
api keys:
 None
endpoints:
 POST - https://xxxxxxxxxxxx.execute-api.us-east-1.amazonaws.com/prod/product/save
 PATCH - https://xxxxxxxxxxxx.execute-api.us-east-1.amazonaws.com/prod/product/update
 GET - https://xxxxxxxxxxxx.execute-api.us-east-1.amazonaws.com/prod/product/{product_id}
 DELETE - https://xxxxxxxxxxxx.execute-api.us-east-1.amazonaws.com/prod/product/{product_id}
functions:
 save_product: MyAmazingAWSLambdaService-prod-save_product
 update_product: MyAmazingAWSLambdaService-prod-update_product
 get_product: MyAmazingAWSLambdaService-prod-get_product
 delete_product: MyAmazingAWSLambdaService-prod-delete_product

PS: the rest api id was intentionally masked by me for security reasons.

On terminal, we can also see the URLs to call our lambdas. On AWS lambda, the URLs follows this pattern:

https://{restapi_id}.execute-api.{region}.amazonaws.com/{stage_name}/

Later on our lab we will learn how to test our lambdas. For now, let’s learn how to create our last lambda, the one that will read from S3 events.

Creating S3 lambda to bulk create to Dynamodb

Now, let’s implement a lambda that will bulk process product inserts. This lambda will use a csv file as parameter, receiving chunks of data. The lambda will process the data as a stream, using the streaming interface from boto3 behind the hood, saving products as it reads them. To facilitate, we will use Pandas Python library to read the csv . The lambda code is as follows:

# -*- coding: UTF-8 -*-

import boto3
import pandas as pd
import io

from helpers.DynamoDbHelper import DynamoDbHelper

s3 = boto3.client('s3')
dynamodb_helper = DynamoDbHelper(table='product')


def bulk_insert(event, context):
    for record in event['Records']:
        bucket = record['s3']['bucket']['name']
        key = record['s3']['object']['key']
        print('Bucket: ' + bucket)
        print('Key: ' + key)
        obj = s3.get_object(Bucket=bucket, Key=key)
        products = pd.read_csv(io.BytesIO(obj['Body'].read()))
        products_records = products.fillna('').to_dict('records')
        for product in products_records:
            record = {
                'id': str(product['id']),
                'name': product.get('name', ''),
                'description': product.get('description', ''),
                'price': str(product.get('price', '0'))
            }
            dynamodb_helper.save(record)

You may notice that we iterate over a list to read bucket files. That’s because AWS can bulk S3 changes to call our lambda fewer times, so we need to read all references that are sent to us.

Before moving on to serverless.yml changes, we need to install a plugin called serverless-python-requirements. This plugin is responsible for adding our pip requirements to lambda packaging.

First, let’s create a file called package.json, with the following. This file must be created by the npm init command:

{
  "name": "myamazingawslambdaservice",
  "version": "1.0.0",
  "description": "",
  "main": "index.js",
  "author": "",
  "license": "ISC"
}

Next, let’s install the plugin, using npm:

npm install --save serverless-python-requirements

And finally, add the plugin to serverless.yml. Here it is all the changes needed for the new lambda:

service: MyAmazingAWSLambdaService

plugins:
  - serverless-python-requirements

custom:
  pythonRequirements:
    dockerizePip: non-linux

provider:
  name: aws
  runtime: python3.6
  stage: ${opt:stage, 'dev'}
  region: ${opt:region, 'us-east-1'}
  profile: personal

  iamRoleStatements: # permissions for all of your functions can be set here
      - Effect: Allow
        Action:
          - dynamodb:*
        Resource: "arn:aws:dynamodb:us-east-1:<your_account_id>:table/product"
      - Effect: Allow
        Action:
          - s3:GetObject
        Resource: "arn:aws:s3:::myamazingbuckets3/*"

functions:
  bulk_insert:
    handler: bulk_handler.bulk_insert
    events:
      - s3:
          bucket: myamazingbuckets3
          event: s3:ObjectCreated:*
  save_product:
    handler: handler.save
    events:
      - http:
          path: product/save
          method: post
  update_product:
    handler: handler.save
    events:
      - http:
          path: product/update
          method: patch
  get_product:
    handler: handler.get
    events:
      - http:
          path: product/{product_id}
          method: get
  delete_product:
    handler: handler.delete
    events:
      - http:
          path: product/{product_id}
          method: delete

resources:
  Resources:
    product:
      Type: AWS::DynamoDB::Table
      Properties:
        TableName: product
        AttributeDefinitions:
          - AttributeName: id
            AttributeType: S
        KeySchema:
          - AttributeName: id
            KeyType: HASH
        ProvisionedThroughput:
          ReadCapacityUnits: 1
          WriteCapacityUnits: 1

PS: because of the plugin, is now needed to have Docker running on deployment. This is because the plugin uses Docker to compile Python packages that requires OS binaries to be installed. The first time you run it, you may notice the process ‘hangs’ at docker step. This is because is downloading the docker image, which is quite sizeable (about 600Mb). 

All we had to do is add IAM permissions to the bucket and define the lambda, adding a event to fire at object creations on the bucket. It is not needed to add the bucket to the resource creation section, as Serverless will already create the bucket as we defined that will be used by a lambda on the project.

Now, let’s test the bulk insert. After redeploying, let’s create a csv like following:

id,name,description,price
1,product 1,description 1,125.23
2,product 2,description 2,133.43
3,product 3,description 3,142.24

Let’s save the file and upload to our bucket. After some instants, we will see that our DynamoDB table will be populated with the data, as we can see bellow:

Screen Shot 2018-05-07 at 23.45.56

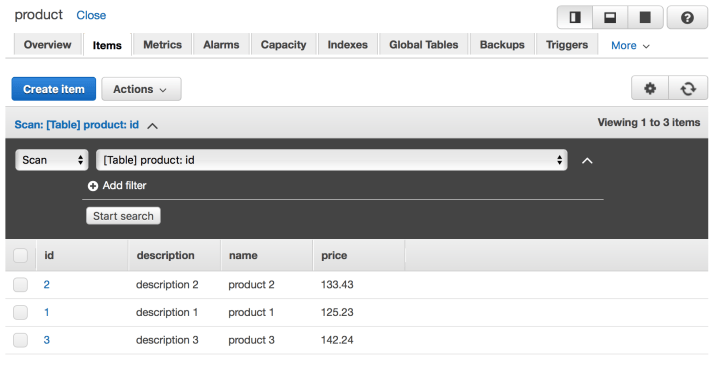
DynamoDB table populated with csv bulk data

Now that we have all our lambdas developed, let’s learn how to test locally and invoke our lambdas from different locations.

Testing local

Let’s test locally our insert product lambda. First, we need to create a json file to hold our test data. Let’s call it example_json.json :

{
  "body": {
    "id": "123",
    "name": "product 1",
    "description": "description 1",
    "price": "123.24"
  }
}

Next, let’s run locally by using Serverless, with the following command:

serverless invoke local --function save_product --path example_json.json

PS: Before running, don’t forget to set the AWS_PROFILE env variable to your profile.

After some instants, we will see the terminal outputting as follows:

Serverless: Invoke invoke:local
Saving result: ({'ResponseMetadata': {'RequestId': '0CDUDLGJEU7UBLLSCQ82SF0B53VV4KQNSO5AEMVJF66Q9ASUAAJG', 'HTTPStatusCode': 200, 'HTTPHeaders': {'server': 'Server', 'date': 'Mon, 14 May 2018 15:13:22 GMT', 'content-type': 'application/x-amz-json-1.0', 'content-length': '2', 'connection': 'keep-alive', 'x-amzn-requestid': '0CDUDLGJEU7UBLLSCQ82SF0B53VV4KQNSO5AEMVJF66Q9ASUAAJG', 'x-amz-crc32': '2745614147'}, 'RetryAttempts': 0}})

{
 "statusCode": 200,
 "body": "{\"message\": \"saved successfully\"}"
}

Behind the hood, Serverless is creating a emulated environment as close as it gets to AWS lambda environment, using the permissions described on the YAML to emulate the permissions set for the function.

It is important to notice that the framework doesn’t guarantee 100% accuracy with a real lambda environment, so more testing in a separate stage – QA, for example – is still necessary before going to production.

Testing on AWS API gateway

To test with AWS API gateway interface, is pretty simple: simply navigate to API Gateway inside Amazon console, then select prod-MyAmazingAWSLambdaService API, navigate to the POST endpoint for example, and select the TEST link.

Provide a JSON like the one we used on our local test – but without the body atribute, moving the attributes to the root – and run it. The API will run successfully, as we can see on the picture bellow:

Screen Shot 2018-05-14 at 16.12.59

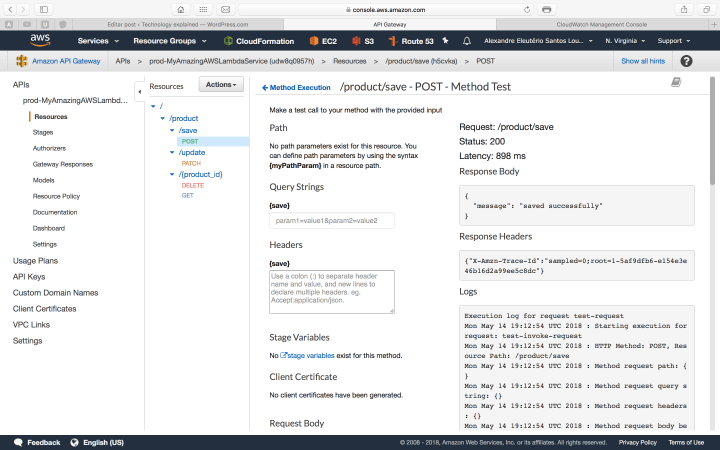
AWS Lambda running on API Gateway

Testing as a consumer

Finally, let’s test like a consumer would call our API. For that, we will use curl. We open a terminal and run:

curl -d '{ "id": "123", "name": "product 1", "description": "description 1", "price": "123.24" }' -H "Content-Type: application/json" -X POST https://<your_rest_api_id>.execute-api.us-east-1.amazonaws.com/prod/product/save

This will produce the following output:

{"message": "saved successfully"}%  

Proving our API is successfully deployed for consuming!

Adding security (API keys)

In our previous example, our API is exposed without security to the open world. Of course, on a real scenario, this is not good. It is possible to integrate lambda with several security solutions such as AWS Cognito, to improve security. In our lab, we will use basic API token authentication provided by AWS API gateway.

Let’s change our YAML as follows:

...omitted....
functions:
  bulk_insert:
    handler: bulk_handler.bulk_insert
    events:
      - s3:
          bucket: myamazingbuckets3
          event: s3:ObjectCreated:*
  save_product:
    handler: handler.save
    events:
      - http:
          path: product/save
          method: post
          private: true
  update_product:
    handler: handler.save
    events:
      - http:
          path: product/update
          method: patch
          private: true
  get_product:
    handler: handler.get
    events:
      - http:
          path: product/{product_id}
          method: get
          private: true
  delete_product:
    handler: handler.delete
    events:
      - http:
          path: product/{product_id}
          method: delete
          private: true
...omitted....

Now, after redeploying, if we try to make our previous curl, we will receive the following error:

{"message":"Forbidden"}% 

So, how do we call it now? First, we need to enter API Gateway and generate a API key, as bellow:

Screen Shot 2018-05-14 at 16.35.10

API gateway keys

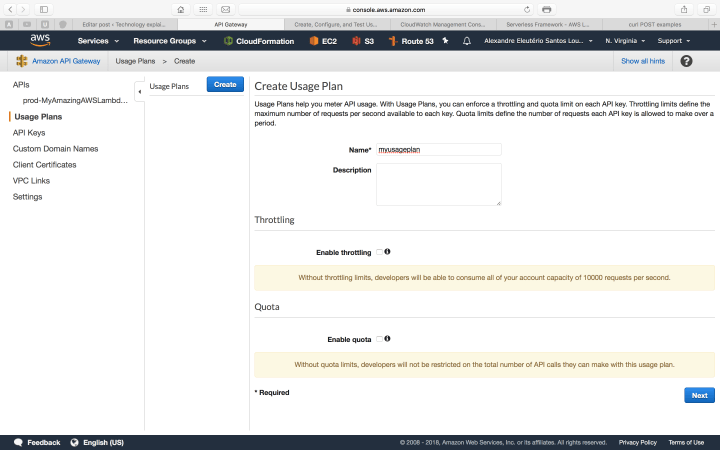
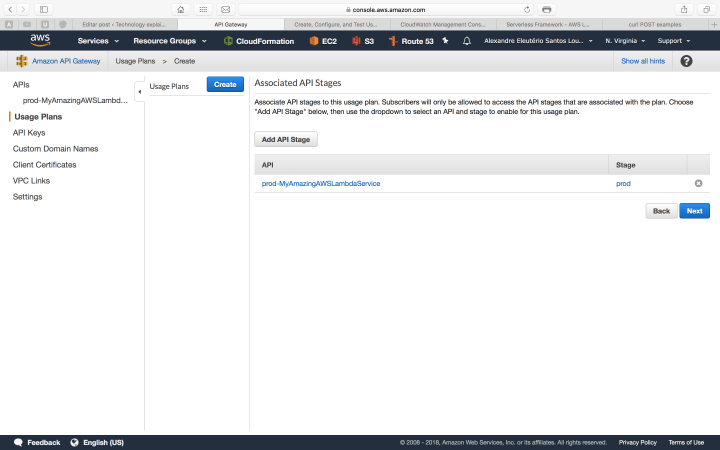
Secondly, we need to create a usage plan, to associate the key with our API. We do this by following the steps bellow inside API gateway interface:

usage1

usage2

usage3

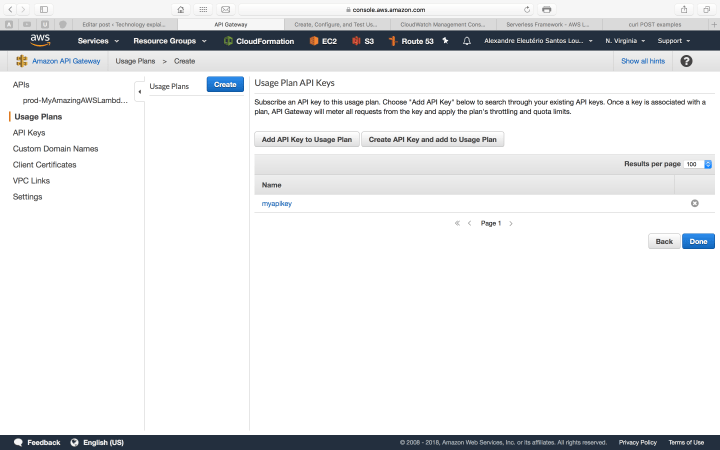
With our key in hand, let’s try again our curl call, adding the header to pass our key:

curl -d '{ "id": "123", "name": "product 1", "description": "description 1", "price": "123.24" }' -H "Content-Type: application/json" -H "x-api-key: <your_API_key>" -X POST https://udw8q0957h.execute-api.us-east-1.amazonaws.com/prod/product/save

After the call, we will receive again the saved successfully response, proving our configuration was successful.

Lambda Logs (CloudWatch)

One last thing we will talk about is logging on AWS Lambda. The reader may noticed the use of Python’s print function in our code. On AWS Lambda, the prints done by Python are collected and organised inside another AWS service, called CloudWatch. We can access CloudWatch on the Amazon Console, as follows:

Screen Shot 2018-05-14 at 17.05.56

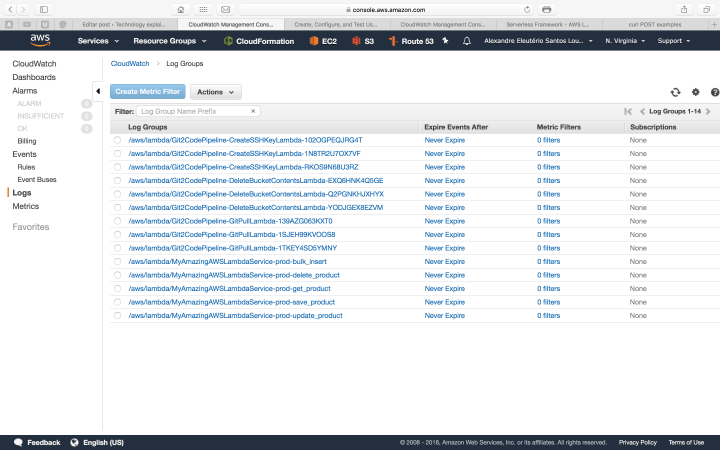
CloudWatch logs list

On the list above, we have each function separated as a link. If we drill down inside one of the links, we will see another link list of each execution made by that function. The print bellow is a example of one of our lambda’s executions:

Screen Shot 2018-05-14 at 17.06.11

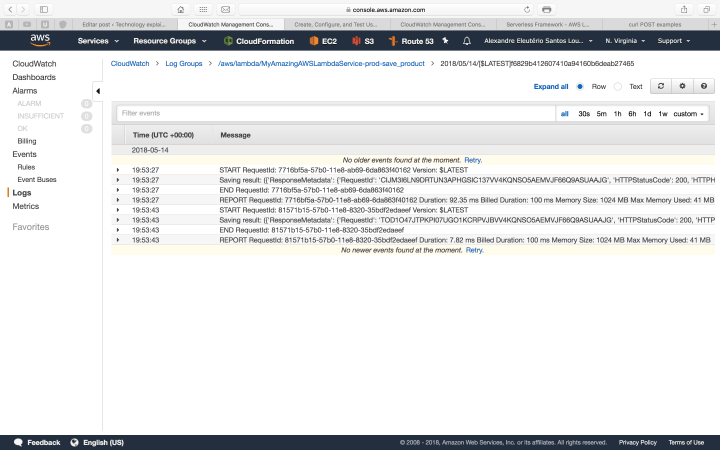
Lambda execution log

Conclusion

And so we concluded our tour through AWS Lambda. With a simple and intuitive approach, it is a good option to deploy applications back-ends following the microservices paradigm. Thank you for following me on this post, until next time.

sources used on this lab

Java 8: Knowing the new features – the new Date API

Standard

Hi, dear readers! Welcome to my blog. On this post, the last on the series, we talk about the new library for Date & Time manipulation, which was inspired by the Joda Time library.

So, without further delay, let’s begin our journey through this feature!

Manipulating Dates & Time on Java

It is a old complain on the Java community how the Java APIs for manipulating Dates has his issues, like limitations, difficult  to work with, etc. Thinking on this, the Java 8 comes with a new API that brings simplicity and strength to the way we work with datetimes on Java. Let’s start by learning how to create instances of the new classes.

To create a new Date instance (without time), representing the current date, all we have to do is:

LocalDate date = LocalDate.now();

To create a new Time instance, based at the time the instance was created, we do this:

LocalTime time = LocalTime.now();

And finally, to create a datetime, in other words, a date and time representation, we use this:

LocalDateTime dateTime = LocalDateTime.now();

The instance above have not timezone information, using only the local timezone. If it is needed to use a specific timezone, we created a class called ZonedDateTime. For example, if we wanted to create a instance from our timezone and them change to Sidney’s timezone, we could do like this:

ZonedDateTime zonedDateTime = ZonedDateTime.now();

System.out.println("Time at my timezone: " + zonedDateTime);

zonedDateTime = zonedDateTime.withZoneSameInstant(ZoneId
.of("Australia/Sydney"));

System.out.println("Time at Sidney: " + zonedDateTime);

The code above print the following at my location:

Time at my timezone: 2015-06-04T14:42:30.850-03:00[America/Sao_Paulo]
Time at Sidney: 2015-06-05T03:42:30.850+10:00[Australia/Sydney]

Another way of instantiating this classes is for a predefined date and/or time. We can do this like the following:

 date = LocalDate.of(2015, Month.DECEMBER, 25);

 dateTime = LocalDateTime.of(2015, Month.DECEMBER, 25, 10, 30);

With all those classes is really simple to add and/or remove days, months or years to a date, or the same to a time object. the code bellow illustrate this simplicity:

System.out.println("Date before adding days: " + date);

date = date.plusDays(10);

System.out.println("Date after adding days: " + date);

date = date.plusMonths(6);

System.out.println("Date after adding months: " + date);

date = date.plusYears(5);

System.out.println("Date after adding years: " + date);

date = date.minusDays(7);

System.out.println("Date after subtracting days: " + date);

date = date.minusMonths(6);

System.out.println("Date after subtracting months: " + date);

date = date.minusYears(10);

System.out.println("Date after subtracting years: " + date);

time = time.plusHours(12);

System.out.println("Time after adding hours: " + time);

time = time.plusMinutes(30);

System.out.println("Time after adding minutes: " + time);

time = time.plusSeconds(120);

System.out.println("Time after adding seconds: " + time);

time = time.minusHours(12);

System.out.println("Time after subtracting hours: " + time);

time = time.minusMinutes(30);

System.out.println("Time after subtracting minutes: " + time);

time = time.minusSeconds(120);

System.out.println("Time after subtracting seconds: " + time);

Running the above code, it prints:

Date before adding days: 2015-12-25
Date after adding days: 2016-01-04
Date after adding months: 2016-07-04
Date after adding years: 2021-07-04
Date after subtracting days: 2021-06-27
Date after subtracting months: 2020-12-27
Date after subtracting years: 2010-12-27
Time after adding hours: 09:28:24.380
Time after adding minutes: 09:58:24.380
Time after adding seconds: 10:00:24.380
Time after subtracting hours: 22:00:24.380
Time after subtracting minutes: 21:30:24.380
Time after subtracting seconds: 21:28:24.380

One important thing to notice is that in all methods we had to “catch” the return of the operations. The reason for this is that, opposite to the old classes we used like the Calendar one, the instances on the new date API are immutable, so they always return a new value. This is useful for scenarios with concurrent access for example, since the instances wont carry states.

Another simplicity is on the way we get the values from a date or time. On the old days, when we wanted to get a year or month from a Calendar, for example, we would need to use the generic get method, with a indication of the field we would want, like Calendar.YEAR. With the new API, we could use specific methods with ease, like the following:

System.out.println("For the date: " + date);

System.out.println("The year from the date is: " + date.getYear());

System.out.println("The month from the date is: " + date.getMonth());

System.out.println("The day from the date is: " + date.getDayOfMonth());

System.out.println("The era from the date is: " + date.getEra());

System.out.println("The day of the week is: " + date.getDayOfWeek());

System.out.println("The day of the year is: " + date.getDayOfYear());

After we run the code above, the following result will be produced:

For the date: 2010-12-27
The year from the date is: 2010
The month from the date is: DECEMBER
The day from the date is: 27
The era from the date is: CE
The day of the week is: MONDAY
The day of the year is: 361

Another simple thing to do is comparing dates with the API. If we code the following:

  // comparing dates
  LocalDate today = LocalDate.now();
  LocalDate tomorrow = today.plusDays(1);

   System.out.println("Is today before tomorrow? "
			+ today.isBefore(tomorrow));

   System.out.println("Is today after tomorrow? "
			+ today.isAfter(tomorrow));

   System.out.println("Is today equal tomorrow? "
			+ today.isEqual(tomorrow));

On the code above, as expected, only  the first print will print true.

One interesting feature of the new API is the locale support. On the code bellow, for example, we print the month of a date in different languages:

System.out.println("English: "+today.getMonth().getDisplayName(TextStyle.FULL, Locale.ENGLISH));
		
System.out.println("Portuguese: "+today.getMonth().getDisplayName(TextStyle.FULL, Locale.forLanguageTag("pt")));
		
System.out.println("German: "+today.getMonth().getDisplayName(TextStyle.FULL, Locale.GERMAN));
		
System.out.println("Italian: "+today.getMonth().getDisplayName(TextStyle.FULL, Locale.ITALIAN));
		
System.out.println("Japanese: "+today.getMonth().getDisplayName(TextStyle.FULL, Locale.JAPANESE));
		
System.out.println("Chinese: "+today.getMonth().getDisplayName(TextStyle.FULL, Locale.CHINESE));

Running the above code, on my current date, we will get the following result:

English: June
Portuguese: Junho
German: Juni
Italian: giugno
Japanese: 6月
Chinese: 六月

Formatting dates is also a easy task with the new API. If we wanted to format a date to a “dd/MM/yyyy” format, all we have to do is pass a DateTimeFormatter with the desired format:

System.out.println(today.format(DateTimeFormatter
			.ofPattern("dd/MM/yyyy")));

One very common requirement we encounter from time to time is the need to calculate the time between two dates. With the new API, we can calculate this very easily, with the ChronoUnit class:

 LocalDateTime oneDate = LocalDateTime.now();
 LocalDateTime anotherDate = LocalDateTime.of(1982, Month.JUNE, 21, 20,
 00);

 System.out.println("Days between the dates: "
 + ChronoUnit.DAYS.between(anotherDate, oneDate));

 System.out.println("Months between the dates: "
 + ChronoUnit.MONTHS.between(anotherDate, oneDate));

 System.out.println("Years between the dates: "
 + ChronoUnit.YEARS.between(anotherDate, oneDate));

System.out.println("Hours between the dates: "
 + ChronoUnit.HOURS.between(anotherDate, oneDate));

 System.out.println("Minutes between the dates: "
 + ChronoUnit.MINUTES.between(anotherDate, oneDate));

 System.out.println("Seconds between the dates: "
 + ChronoUnit.SECONDS.between(anotherDate, oneDate));

On my current day (08/06/2015), the above code produced:

Days between the dates: 12040
Months between the dates: 395
Years between the dates: 32
Hours between the dates: 288962
Minutes between the dates: 17337771
Seconds between the dates: 1040266275

One thing to note is that, if we use the same methods with the objects exchanged, we will receive negative numbers. If our logic needs the calculations to be always positive, we could use the classes Period and Duration to calculate the time between the dates, which have the methods isNegative() and negated() to produce this desired effect.

One final feature we will visit of the new API is the concept of invalid dates. When we were using a Calendar,  if we tried to input the date of February, 30, on a year the month goes to 28 days, the Calendar will adjust the date to March, 2, in other words, it will go past the date inputted, without throwing any errors. This is not always the desired effect, since sometimes this could lead to unpredictable behaviors. On the new API, if we try for example to do the following:

LocalDate invalidDate = LocalDate.of(2014, Month.FEBRUARY, 30);
		
System.out.println(invalidDate);

We will receive a invalid date exception, ensuring a easier way to treat this kind of bug:

Exception in thread "main" java.time.DateTimeException: Invalid date 'FEBRUARY 30'
	at java.time.LocalDate.create(LocalDate.java:431)
	at java.time.LocalDate.of(LocalDate.java:249)
	at com.alexandreesl.handson.DateAPIShowcase.main(DateAPIShowcase.java:174)

References

This series was inspired by a book from the publisher “Casa do Código”, which was used by me on my studies. Unfortunately the book is on Portuguese, but it is a good source for developers who want to quickly learn about the new features of Java 8:

Java 8 prático

Conclusion

And that concludes our series about the new features  of the Java 8. Of course, there is other subjects we didn’t talked about, like the end of the PermGen, that it was replaced by another memory technique called metaspace. If the reader wants to know more about this, this article is very interesting on the subject. However, with this series, the reader can have a good base to start developing on Java 8.

On a programming language like Java, it is normal to have changes from time to time. For a language with so many years, it is impressive how Java can still evolve, reflecting the new tendencies from the more modern languages. Will it Java continue like this forever? Only time will tell….

Thank you for following me on another post from my blog, until next time.

Continue reading

Java 8: Knowing the new features – Streams

Standard

Hi, dear readers! Welcome to my blog. On this post, the second on the series, we talk about streams, a new way to manipulate collections.

So, without further delay, let’s begin our journey through this feature!

Streams

Streams was introduced on Java 8 as a way to create a new form of manipulating Collections. Normally, when we use a Collection, we prepare a list of items, make several operations by this collection, like filtering, sums, etc and finally we use a final result, which could be evaluated as a single operation. That is exactly the goal of the streams API: allow us to program our Collection’s logic like a single operation, using the functional programming paradigm.

So, let’s get started with the preparations for the examples.

First, we create a Client class, which we will use as the POJO for our examples:

public class Client {

private String name;

private Long phone;

private String sex;

private List<Order> orders;

public List<Order> getOrders() {
return orders;
}

public void setOrders(List<Order> orders) {
this.orders = orders;
}

public String getName() {
return name;
}

public void setName(String name) {
this.name = name;
}

public Long getPhone() {
return phone;
}

public void setPhone(Long phone) {
this.phone = phone;
}

public String getSex() {
return sex;
}

public void setSex(String sex) {
this.sex = sex;
}

public void markClientSpecial() {

System.out.println("The client " + getName() + " is special! ");

}

}

Our Client class this time has a reference to another POJO, the Order class, which we will use to enrich our examples:

public class Order {

private Long id;

private String description;

private Double total;

public Long getId() {
return id;
}

public void setId(Long id) {
this.id = id;
}

public String getDescription() {
return description;
}

public void setDescription(String description) {
this.description = description;
}

public Double getTotal() {
return total;
}

public void setTotal(Double total) {
this.total = total;
}

}

Finally, for all the examples, we will use a single Collection’s data, so we create a Utility class to populate our data:

public class CollectionUtils {

public static List<Client> getData() {

List<Client> list = new ArrayList<>();

List<Order> orders;

Order order;

Client clientData = new Client();

clientData.setName("Alexandre Eleuterio Santos Lourenco");
clientData.setPhone(33455676l);
clientData.setSex("M");

list.add(clientData);

orders = new ArrayList<>();

order = new Order();

order.setDescription("description 1");
order.setId(1l);
order.setTotal(32.33);
orders.add(order);

order = new Order();

order.setDescription("description 2");
order.setId(2l);
order.setTotal(42.33);
orders.add(order);

order = new Order();

order.setDescription("description 3");
order.setId(3l);
order.setTotal(72.54);
orders.add(order);

clientData.setOrders(orders);

clientData = new Client();

clientData.setName("Lucebiane Santos Lourenco");
clientData.setPhone(456782387l);
clientData.setSex("F");

list.add(clientData);

orders = new ArrayList<>();

order = new Order();

order.setDescription("description 4");
order.setId(4l);
order.setTotal(52.33);
orders.add(order);

order = new Order();

order.setDescription("description 2");
order.setId(5l);
order.setTotal(102.33);
orders.add(order);

order = new Order();

order.setDescription("description 5");
order.setId(6l);
order.setTotal(12.54);
orders.add(order);

clientData.setOrders(orders);

clientData = new Client();

clientData.setName("Ana Carolina Fernandes do Sim");
clientData.setPhone(345622189l);
clientData.setSex("F");

list.add(clientData);

orders = new ArrayList<>();

order = new Order();

order.setDescription("description 6");
order.setId(7l);
order.setTotal(12.43);
orders.add(order);

order = new Order();

order.setDescription("description 7");
order.setId(8l);
order.setTotal(98.11);
orders.add(order);

order = new Order();

order.setDescription("description 8");
order.setId(9l);
order.setTotal(130.22);
orders.add(order);

clientData.setOrders(orders);

return list;

}

}

So, let’s begin with the examples!

To use the stream API, all we have to to is use the stream() mehod on the Collection’s APIs to get a stream already prepared for our use. The Stream interface use the default methods feature, so we don’t need to implement the interface methods. Another good point on this approach is that consequently all Collections already has support for the Streams feature, so if the reader has that favorite framework for collections (like the commons one from Apache), all you have to do is upgrading the JVM of your projects and the support is added!

The first thing to notice about streams is that they don’t change the Collection. That means that if we do something like this:

public class StreamsExample {

public static void main(String[] args) {

List<Client> clients = CollectionUtils.getData();

clients.stream().filter(
c -> c.getName().equals("Alexandre Eleuterio Santos Lourenco"));

clients.forEach(c -> System.out.println(c.getName()));

}

}

And run the code, we will see that the Collection will still print the 3 clients from our Collection’s test data, not just the one we filtered on our stream! This is a important concept to keep it in mind, since it means we don’t have to populate multiple collections with different data to execute different logic.

So, how we could print the result of our previous filter? All we have to do is link the methods, like this:

.

.

.

clients.stream()
.filter(c -> c.getName().equals(
"Alexandre Eleuterio Santos Lourenco"))
.forEach(c -> System.out.println(c.getName()));

if we run our code again, we will see that now the code only prints the elements we filtered. On this example, as said before, we didn’t received the list we filtered. If we needed to retrieve the Collection formed by the transformations we made on our Streams, we can use the collect method. This method receives 3 functional interfaces as the parameters, but fortunately Java 8 already comes with another interface, called Collectors, that supply common implementations for the interfaces we need to supply to the collect method. Using this features, we could retrieve the Collection coding like this:

.

.

.

List<Client> filteredList = clients
.stream()
.filter(c -> c.getName().equals(
"Alexandre Eleuterio Santos Lourenco"))
.collect(Collectors.toList());

filteredList.forEach(c -> System.out.println(c.getName()));

On our previous examples, we retrieved the whole Client objects on our filtering. But and if we wanted to retrieve a List with the names of the Clients that has orders with total > 90 and print on the console? We could do this:

.

.

.

System.out.println("USING THE MAP METHOD!");

clients.stream()
.filter(c -> c.getOrders().stream()
.anyMatch(o -> o.getTotal() > 90))
.map(Client::getName)
.forEach(System.out::println);

The code above could seen a little strange at first, but if we imagine the size of the code we would do to make the same with traditional Java code – iterating by multiple Collections, creating another collection with just the names and iterating again for the prints – we can see that the new features really help to make a more simple and cleaner code. We also see the use of the anyMatch method, which receives a predicate as parameter and returns true or false if any of the elements on the stream succeeds on the predicate.

Besides the all-purpose map method, there’s also another implementations specific for integers, longs and doubles. The reason for this is to prevent the called “boxing effect” where the primitive values would be wrapped and unwrapped on the operations, which will cause a performance overhead, and since we already informed the type of value we are working with, this implementations provide some interesting methods that return things like the average or the max value of our mapping. Let’s see a example. Imagine that we want to retrieve the max total from the orders on each client and print the name and the total on the console. We could do like this:

.

.

.
clients.stream().forEach(
c -> System.out.println("Name: "
+ c.getName()
+ " Highest Order Total: "
+ c.getOrders().stream().mapToDouble(Order::getTotal)
.max().getAsDouble()));

The reader may notice that the max method’s return is not the primitive itself, but a Object. This object is a OptionalDouble, that together with other classes like the java.util.Optional, it supplies a implementation that allow us to provide a default behavior for the cases in which the operation been used with the Optional – in our case, the max() method – has some null element among the values. For example, if we want in our previous operation that the max returns 0 in case any of the elements was null, we could modify the code as follows:

.

.

.

clients.stream().forEach(
c -> System.out.println("Name: "
+ c.getName()
+ " Highest Order Total: "
+ c.getOrders().stream().mapToDouble(Order::getTotal)
.max().orElse(0)));

One interesting behavior of the streams is their lazy behavior. That means that when we create a flow – also called a pipe – of streams operations, the operations will always execute only at the time they are really needed to produce the final result. We can see this behavior using one method called peek(). Let’s see a example that clearly shows this behavior:

.

.

.

clients.stream()

.filter(c -> c.getName().equals(
"Alexandre Eleuterio Santos Lourenco"))
.peek(System.out::println);

System.out.println("*********** SECOND PEEK TEST ******************");

clients.stream()
.filter(c -> c.getName().equals(
"Alexandre Eleuterio Santos Lourenco"))
.peek(System.out::println)
.forEach(c -> System.out.println(c.getName()));

If we run the example above, we can see that on the first stream the peek method doesn’t print anything. That’s because the filter operation it was not executed, since we didn’t do anything with the stream after the filtering. On the second stream, we used the foreach operation afterwards, so the peek method will print a toString() of all the objects inside the filtered stream.

On our previous examples, we see the max method, which returns the max value from a stream of numbers. That type of operation, that returns a single result from a stream, is called a reduce operation. We can make our own reduce operations, just providing a initial value and the operation itself, using the reduce method. For example, if we wanted to subtract the values from the stream:

.

.

.

clients.stream().forEach(
c -> System.out.println("Name: "
+ c.getName()
+ " TOTAL SUBTRACTED: "
+ c.getOrders().stream().mapToDouble(Order::getTotal)
.reduce(0, (a, b) -> a - b)));

This is a really useful feature to keep in mind when the default arithmetic operations don’t suffice.

Parallel Streams

At last, let’s talk about the last subject on our streams’s journey: parallel streams. When using parallel streams, we run all the operations we see previously with parallel processing mode, instead of just the main thread as usual. The jdk will choose the number of threads, how to break the segments of processing and how to join the parts to the final result. The reader may be asking “what do I have to pass to help the jdk on this settings?” the answer is: nothing! That’s right, all we have to do to use parallel streams is change the beginning of our commands, like the example bellow:

.

.

.
clients.parallelStream()
.filter(c -> c.getOrders().stream()
.anyMatch(o -> o.getTotal() > 90)).map(Client::getName)
.forEach(System.out::println);

As we can see, all we have to do is change from stream() to parallelStream(). One important thing to keep in mind is when to use parallel streams. Since there is a payload of preparing the thread pool and managing the segmentation and joining of the results, unless we have a really big volume of data to use or a really heavy operation to do with the data, we normally will use single thread streams.

Other features

Of course, there is more features we could talk on this post, like the sort method, that as the name implies, make sorting of the items on our streams. Another really powerful feature is on the Collectors’s methods, which has impressive transformation options such as grouping, partitioning, joining and so on. However, with this post we made a very good start with the usage of the feature, sowing the way for his adoption.

Conclusion 

And so we conclude another part of our series. As we can easily see, streams is a very powerful tool, which can help us a lot on keeping a really short code when processing our collections. That is one of the keys – or maybe the master key – of the Java 8 philosophy. For years, the Java scenario was plagued with “accusations” of not being a simple language, since it is so verbose, specially with the appearance of languages like Python or Ruby, for example. With this new features, maybe the burden of “being complex” for Java will finally begone. I thank the reader for following me on another post and invite you to please return to the last part of our series, when we will talk about the last of our pillars, the new Date API. Until next time.

Continue reading

Java 8: Knowing the new features – Lambdas

Standard

Hi, dear readers! Welcome to my blog. On this post, the first of a 3-part series, we will talk about the new features of Java 8, launched on 2014. The new version comes with several features that change the way we think when we code on Java. The series will be split on 3 pillars, each dedicated to one specific subject, as it follows:

  • Lambdas;
  • Streams;
  • java.time (aka the new Date API);

So, without further delay, let’s begin by talking about what probably is the most famous of the new features: Lambdas!

Lambdas

On a nutshell, a lambda on Java is a way that the Java ecosystem aggregated in order to enable the use of functional programming. The functional programming paradigm is a programming paradigm that advocate the use of functions – or in other words, blocks of code with arguments and/or return values – that work on a sequence of calls, without the implications of maintaining states of variables and such. With lambdas, we can create and store functions on our code, that we can use across our programs. One of the major benefits we can take on this method is the simplification of our code, that become simpler then the usual way.

So, let’s begin with the examples!

Let’s imagine we want to print all the numbers from a for looping, using a new thread to print each number. On a Java code made pre-Java 8, we could do this by coding the following:

.

.

.

for (int i = 1; i <= 10; i++) {

final int number = i;

Thread thread = new Thread(new Runnable() {

@Override
public void run() {

System.out.println(“The number is ” + number);

}

});

thread.start();

}

.

.

.

There’s nothing wrong with the above code, except maybe the verbosity of the code, since we need to declare the interface (runnable) and the method (run()) we want to override, in order to create the inner class we need to create the Thread’s implementation. It would be good if the Java language had any feature that could remove this verbosity out of the way. Now, with Java 8, we have such feature: lambdas!

Let’s revisit the same example, now with a lambda:

.

.

.

for (int i = 1; i <= 10; i++) {

int number = i;

Runnable runnable = () -> System.out
.println(“The number with a lambda is ” + number);

Thread thread = new Thread(runnable);

thread.start();

}

.

.

.

As we can see, the lambda version is much simpler then our previous code, taking the creation of the thread’s implementation to a simple one-line command. One interesting thing to notice is that the “runnable” variable we created on our code is it not a object, but a function. That means that the “translation” of the lambda differs from the interpretation of a inner class. This become apparent when we print the result of the getClass method of our lambda, which will produce a print like the following:

The ‘class’ of our lambda: class com.alexandreesl.handson.LambdaBaseExample$$Lambda$1/424058530

This is interesting, because if we search for the compiled folder of our project, we can see that, depending on the strategy the compiler is using, he didn’t even produce a .class file for the lambda, opposed to a inner class! If the reader want to delve more on the subject of the lambda’s interpretation, this link has more information on this subject.

The reader may also notice that we didn’t need to declare the number variable as final in order to the lambda to read the value. That is because on the lambda’s interpretation, the concept that the variable is implicitly final is enough for the compiler to accept our code. If we try to use the variable on any other place of the code, we would receive a compilation error.

Well, everything is good, but the reader may be questioning: “but how does the compiler now which method I am trying to override from the Runnable interface?”

Is to resolve that question that enters another new concept on Java 8: Functional Interfaces!

A functional interface is a interface that has just one abstract method – by default, all methods are abstract on a interface, with the exception of another novelty we will talk about it in a few moments -, which means that when the compiler checks the interface, he interprets that method as the one to infer the lambda. One key point here is that, in order to promote a interface to be a functional interface, all we have to do is having just one abstract method on it, so all the older Java interfaces that has this condition are already functional interfaces, like the Runnable interface, that we used previously. If we want to ensure that a functional interface won’t be demoted from this condition, there is a new annotation called @FunctionalInterface. Let’s see a example of the use of this annotation.

Let’s create a interface called MyInterface, with the@FunctionalInterface annotation:

package com.alexandreesl.handson;

@FunctionalInterface
public interface MyInterface {

void methodA(String message);

}

Now, let’s create a class and test creating a lambda for our functional interface:

package com.alexandreesl.handson;

public class FunctionalInterfaceExample {

public static void main(String[] args) {

MyInterface myFunctionalInterface = (message) -> System.out
.println(“The message is: ” + message);

myFunctionalInterface.methodA(“SECRET MESSAGE!”);

}

}

If we run the code, we can see that works as intended:

The message is: SECRET MESSAGE!

Now, let’s try adding another method to the interface:

package com.alexandreesl.handson;

@FunctionalInterface
public interface MyInterface {

void methodA(String message);

void methodB();

}

When we add this method and save, Eclipse – in case the reader is using a IDE for the examples – will immediately get a compiler error:

Description Resource Path Location Type
The target type of this expression must be a functional interface FunctionalInterfaceExample.java /Java8Lambdas/src/main/java/com/alexandreesl/handson line 7 Java Problem

If we try to run the class we created previously, we will receive the following error:

Exception in thread “main” java.lang.Error: Unresolved compilation problem:
The target type of this expression must be a functional interface

at com.alexandreesl.handson.FunctionalInterfaceExample.main(FunctionalInterfaceExample.java:7)

The reader remembers, a moment ago, we talked about another novelty on the language when we were talking about interfaces having by default abstract methods. Well, now, we also have the possibility to do the unthinkable: implementations on Interfaces! So it enters the default methods!

Default methods

A default method is a method on a interface that, as the name implies, has a default implementation. Let’s see this on our previous interface. Let’s change MyInterface to the following:

package com.alexandreesl.handson;

@FunctionalInterface
public interface MyInterface {

void methodA(String message);

default String methodB(String message) {
System.out.println(“I received: ” + message);
message += ” ALTERED!”;
return message;
}

}

As we can see, it is simple to create a default method, all we have to do is use the keyword default and provide a implementation. To test our modifications, let’s change our test class to:

package com.alexandreesl.handson;

public class FunctionalInterfaceExample {

public static void main(String[] args) {

MyInterface myFunctionalInterface = (message) -> System.out
.println(“The message is: ” + message);

String secret = “SECRET MESSAGE!”;

myFunctionalInterface.methodA(secret);

System.out.println(myFunctionalInterface.methodB(secret));

}

}

If we run the code:

The message is: SECRET MESSAGE!
I received: SECRET MESSAGE!
SECRET MESSAGE! ALTERED!

We can see that our modifications were successful.

Multiple Inheritance

The reader may be asking: “My God! This is multiple inheritance on Java!”. Indeed, on a first look, that could be seen to be the case, but the goal that the Java developer team behind the Java 8 targeted was actually the maintenance of old Java interfaces. On Java 8, the List interface for example has new methods, like the forEach method, that enables us to iterate through a collection using a lambda. Just imagine the chaos that it would be on the whole Java ecosystem – proprietary and open-source frameworks alike – not to mention our own Java project’s code, if we would need to implement this new method on all the places! In order to prevent this, the default methods were created.

Still, if the reader is not convinced, the leaders of the specification had prepared a page with their arguments on this case, like for example the fact that default methods can’t use state variables, since interfaces didn’t accept variables. the link to the page can be found here.

Method References

Another new feature of Java 8’s plethora is method references. With method references, in the same way we did with lambdas, we can shorten our code when accessing methods, making the code more “functional readable”.  Let’s make a POJO for example:

public class Client {

private String name;

private Long phone;

private String sex;

public String getName() {
return name;
}

public void setName(String name) {
this.name = name;
}

public Long getPhone() {
return phone;
}

public void setPhone(Long phone) {
this.phone = phone;
}

public String getSex() {
return sex;
}

public void setSex(String sex) {
this.sex = sex;
}

public void markClientSpecial() {

System.out.println(“The client ” + getName() + ” is special! “);

}

}

Now, let’s imagine that we want to populate a List of this POJOs, and iterate by them, calling the markClientSpecial method. Before Java 8, we could do this by doing the following:

public class MethodReferencesExample {

public static void main(String[] args) {

List<Client> list = new ArrayList<>();

Client clientData = new Client();

clientData.setName(“Alexandre Eleuterio Santos Lourenco”);
clientData.setPhone(33455676l);
clientData.setSex(“M”);

list.add(clientData);

clientData = new Client();

clientData.setName(“Lucebiane Santos Lourenco”);
clientData.setPhone(456782387l);
clientData.setSex(“F”);

list.add(clientData);

clientData = new Client();

clientData.setName(“Ana Carolina Fernandes do Sim”);
clientData.setPhone(345622189l);
clientData.setSex(“F”);

list.add(clientData);

// pre Java 8

System.out.println(“PRE-JAVA 8!”);

for (Client client : list) {

client.markClientSpecial();

}

}

}

We iterate using a for loop, calling the method explicit. Now on Java 8, with Lambdas, we can do the following:

.

.

.

// Java 8 with lambdas

System.out.println(“JAVA 8 WITH LAMBDAS!”);

list.forEach(client -> client.markClientSpecial());

Using the new forEach method, we iterated by the elements of the list, also calling our desired method. But that is not all! With method references, we could also do the following:

.

.

.

// Java 8 with method references

System.out.println(“JAVA 8 WITH METHOD REFERENCES!”);

list.forEach(Client::markClientSpecial);

With the method reference syntax, we indicate the class which we want to execute a method – in our case, the Client class – and a reference of the method we want  to execute. The forEach method interprets that we want to execute this method for all the elements of the List, as we can see on the results of our execution:

PRE-JAVA 8!
The client Alexandre Eleuterio Santos Lourenco is special!
The client Lucebiane Santos Lourenco is special!
The client Ana Carolina Fernandes do Sim is special!
JAVA 8 WITH LAMBDAS!
The client Alexandre Eleuterio Santos Lourenco is special!
The client Lucebiane Santos Lourenco is special!
The client Ana Carolina Fernandes do Sim is special!
JAVA 8 WITH METHOD REFERENCES!
The client Alexandre Eleuterio Santos Lourenco is special!
The client Lucebiane Santos Lourenco is special!
The client Ana Carolina Fernandes do Sim is special!

The method references could also be pointed for methods referring a specific instance. This is interesting for example if we want to make a Thread that only will execute a method from a Object’s instance in her run method:

.

.

.

// Thread with method reference

Client client = list.get(0);

Thread thread = new Thread(client::markClientSpecial);

System.out.println(“THREAD WITH METHOD REFERENCES!”);

thread.run();

On our examples, we are only using method references without parameters and no return values, but is also possible to use methods with parameters or returns, for example using the Consumer and Supplier interfaces:

.

.

.

// Method references with a parameter and return
System.out.println(“METHOD REFERENCES WITH PARAMETERS!”);

client = list.get(1);

Consumer<String> consumer = client::setName;

consumer.accept(“Altering the name! “);

Supplier<String> supplier = client::getName;

System.out.println(supplier.get());

With method references, we can get, in some cases, a even more simple code than with lambdas!

Typing of a Lambda 

One last subject we will talk about on this first part, is the typing of a lambda. To define the type of a lambda, the compiler infer the typing by using a technique we call context, which means that he uses the context of the method or constructor the lambda is being used to identify the type of the lambda. For example, if we see our first lambda example:

.

.

.

Runnable runnable = () -> System.out
.println(“The number with a lambda is ” + number);

Thread thread = new Thread(runnable);

.

.

.

We can see that we declared the lambda as of type Runnable and passed to a Thread class. However, we could also coded like this:

.

.

.

Thread thread = new Thread(() -> System.out
.println(“The number with a lambda is ” + number));

thread.start();

.

.

.

And the code would also work as well. On this case, the compiler would utilize the type of the parameter of the Thread’s class constructor – a Runnable interface implementation – to infer the type of the Lambda.

Conclusion

And that concludes the first part of our series. Proposing a new way to see how we code, searching for more simplicity and enabling the refactoring of old interfaces, the new features of Java 8 come to stay, changing our way of developing and evolving our Java projects. Thank you for following on this post, until next time.

Continue reading