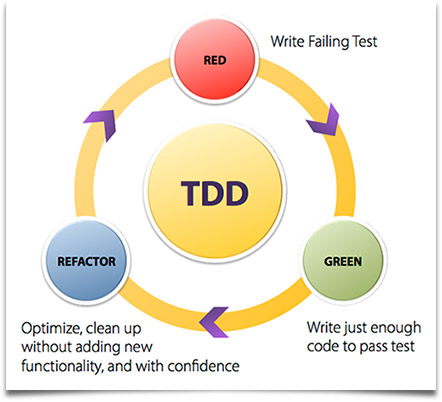
Hi, my dear readers! Welcome to my blog. On this post, we will make a hands-on about Mockito and DBUnit, two libraries from Java’s open source ecosystem which can help us in improving our JUnit tests on focus and independence. But why mocking is so important on our unit tests?
Focusing the tests
Let’s imagine a Java back-end application with a tier-like architecture. On this application, we could have 2 tiers:
- The service tier, which have the business rules and make as a interface for the front-end;
- The entity tier, which have the logic responsible for making calls to a database, utilizing techonologies like JDBC or JPA;
Of course, on a architecture of this kind, we will have the following dependence of our tiers:
Service >>> Entity
On this kind of architecture, the most common way of building our automated tests is by creating JUnit Test Classes which test each tier independently, thus we can make running tests that reflect only the correctness of the tier we want to test. However, if we simply create the classes without any mocking, we will got problems like the following:
- On the JUnit tests of our service tier, for example, if we have a problem on the entity tier, we will have also our tests failed, because the error from the entity tier will reverberate across the tiers;
- If we have a project where different teams are working on the same system, and one team is responsible for the construction of the service tier, while the other is responsible for the construction of the entity tier, we will have a dependency of one team with the other before the tests could be made;
To resolve such issues, we could mock the entity tier on the service tier’s unit test classes, so we can have independence and focus of our tests on the service tier, which it belongs.
independence
One point that it is specially important when we make our JUnit test classes in the independence department is the entity tier. Since in our example this tier is focused in the connection and running of SQL commands on a database, it makes a break on our independence goal, since we will need a database so we can run our tests. Not only that, if a test breaks any structure that it is used by the subsequent tests, all of them will also fail. It is on this point that enters our other library, DBUnit.
With DBUnit, we can use embedded databases, such as HSQLDB, to make our database exclusive to the running of our tests.
So, without further delay, let’s begin our hands-on!
Hands-on
For this lab, we will create a basic CRUD for a Client entity. The structure will follow the simple example we talked about previously, with the DAO (entity) and Service tiers. We will use DBUnit and JUnit to test the DAO tier, and Mockito with JUnit to test the Service tier. First, let’s create a Maven project, without any archetype and include the following dependencies on pom.xml:
.
.
.
<dependencies>
<dependency>
<groupId>junit</groupId>
<artifactId>junit</artifactId>
<version>4.12</version>
</dependency>
<dependency>
<groupId>org.dbunit</groupId>
<artifactId>dbunit</artifactId>
<version>2.5.0</version>
</dependency>
<dependency>
<groupId>org.mockito</groupId>
<artifactId>mockito-all</artifactId>
<version>1.10.19</version>
</dependency>
<dependency>
<groupId>org.hibernate</groupId>
<artifactId>hibernate-entitymanager</artifactId>
<version>4.3.8.Final</version>
</dependency>
<dependency>
<groupId>org.hsqldb</groupId>
<artifactId>hsqldb</artifactId>
<version>2.3.2</version>
</dependency>
<dependency>
<groupId>org.springframework</groupId>
<artifactId>spring-core</artifactId>
<version>4.1.4.RELEASE</version>
</dependency>
<dependency>
<groupId>org.springframework</groupId>
<artifactId>spring-context</artifactId>
<version>4.1.5.RELEASE</version>
</dependency>
<dependency>
<groupId>org.springframework</groupId>
<artifactId>spring-test</artifactId>
<version>4.1.5.RELEASE</version>
</dependency>
<dependency>
<groupId>org.springframework</groupId>
<artifactId>spring-tx</artifactId>
<version>4.1.5.RELEASE</version>
</dependency>
<dependency>
<groupId>org.springframework</groupId>
<artifactId>spring-orm</artifactId>
<version>4.1.5.RELEASE</version>
</dependency>
</dependencies>
.
.
.
On the previous snapshot, we included not only the Mockito, DBUnit and JUnit libraries, but we also included Hibernate to implement the persistence layer and Spring 4 to use the IoC container and the transaction management. We also included the Spring Test library, which includes some features that we will use later on this lab. Finally, to simplify the setup and remove the need of installing a database to run the code, we will use HSQLDB as our database.
Our lab will have the following structure:
- One class will represent the application itself, as a standalone class, where we will consume the tiers, like a real application would do;
- We will have another 2 classes, each one with JUnit tests, that will test each tier independently;
First, we define a persistence unit, where we define the name of the unit and the properties to make Hibernate create the table for us and populate her with some initial rows. The code of the persistence.xml can be seen bellow:
<?xml version=”1.0″ encoding=”UTF-8″?>
<persistence xmlns=”http://java.sun.com/xml/ns/persistence”
version=”1.0″>
<persistence-unit name=”persistence” transaction-type=”RESOURCE_LOCAL”>
<class>com.alexandreesl.handson.model.Client</class>
<properties>
<property name=”hibernate.hbm2ddl.auto” value=”create” />
<property name=”hibernate.hbm2ddl.import_files” value=”sql/import.sql” />
</properties>
</persistence-unit>
</persistence>
And the initial data to populate the table can be seen bellow:
insert into Client(id,name,sex, phone) values (1,’Alexandre Eleuterio Santos Lourenco’,’M’,’22323456′);
insert into Client(id,name,sex, phone) values (2,’Lucebiane Santos Lourenco’,’F’,’22323876′);
insert into Client(id,name,sex, phone) values (3,’Maria Odete dos Santos Lourenco’,’F’,’22309456′);
insert into Client(id,name,sex, phone) values (4,’Eleuterio da Silva Lourenco’,’M’,’22323956′);
insert into Client(id,name,sex, phone) values (5,’Ana Carolina Fernandes do Sim’,’F’,’22123456′);
In order to not making the post burdensome, we will not discuss the project structure during the lab, but just show the final structure at the end. The code can be found on a Github repository, at the end of the post.
With the persistence unit defined, we can start coding! First, we create the entity class:
package com.alexandreesl.handson.model;
import javax.persistence.Column;
import javax.persistence.Entity;
import javax.persistence.Id;
import javax.persistence.Table;
@Table(name = “Client”)
@Entity
public class Client {
@Id
private long id;
@Column(name = “name”, nullable = false, length = 50)
private String name;
@Column(name = “sex”, nullable = false)
private String sex;
@Column(name = “phone”, nullable = false)
private long phone;
public long getId() {
return id;
}
public void setId(long id) {
this.id = id;
}
public String getName() {
return name;
}
public void setName(String name) {
this.name = name;
}
public String getSex() {
return sex;
}
public void setSex(String sex) {
this.sex = sex;
}
public long getPhone() {
return phone;
}
public void setPhone(long phone) {
this.phone = phone;
}
}
In order to create the persistence-related beans to enable Hibernate and the transaction manager, alongside all the rest of the beans necessary for the application, we use a Java-based Spring configuration class. The code of the class can be seen bellow:
package com.alexandreesl.handson.core;
import org.springframework.context.annotation.Bean;
import org.springframework.context.annotation.ComponentScan;
import org.springframework.context.annotation.Configuration;
import org.springframework.jdbc.datasource.DriverManagerDataSource;
import org.springframework.orm.jpa.JpaTransactionManager;
import org.springframework.orm.jpa.LocalContainerEntityManagerFactoryBean;
import org.springframework.orm.jpa.vendor.Database;
import org.springframework.orm.jpa.vendor.HibernateJpaDialect;
import org.springframework.orm.jpa.vendor.HibernateJpaVendorAdapter;
import org.springframework.transaction.annotation.EnableTransactionManagement;
@Configuration
@EnableTransactionManagement
@ComponentScan({ “com.alexandreesl.handson.dao”,
“com.alexandreesl.handson.service” })
public class AppConfiguration {
@Bean
public DriverManagerDataSource dataSource() {
DriverManagerDataSource dataSource = new DriverManagerDataSource();
dataSource.setDriverClassName(“org.hsqldb.jdbcDriver”);
dataSource.setUrl(“jdbc:hsqldb:mem://standalone”);
dataSource.setUsername(“sa”);
dataSource.setPassword(“”);
return dataSource;
}
@Bean
public JpaTransactionManager transactionManager() {
JpaTransactionManager transactionManager = new JpaTransactionManager();
transactionManager.setEntityManagerFactory(entityManagerFactory()
.getNativeEntityManagerFactory());
transactionManager.setDataSource(dataSource());
transactionManager.setJpaDialect(jpaDialect());
return transactionManager;
}
@Bean
public HibernateJpaDialect jpaDialect() {
return new HibernateJpaDialect();
}
@Bean
public HibernateJpaVendorAdapter jpaVendorAdapter() {
HibernateJpaVendorAdapter jpaVendor = new HibernateJpaVendorAdapter();
jpaVendor.setDatabase(Database.HSQL);
jpaVendor.setDatabasePlatform(“org.hibernate.dialect.HSQLDialect”);
return jpaVendor;
}
@Bean
public LocalContainerEntityManagerFactoryBean entityManagerFactory() {
LocalContainerEntityManagerFactoryBean entityManagerFactory = new LocalContainerEntityManagerFactoryBean();
entityManagerFactory
.setPersistenceXmlLocation(“classpath:META-INF/persistence.xml”);
entityManagerFactory.setPersistenceUnitName(“persistence”);
entityManagerFactory.setDataSource(dataSource());
entityManagerFactory.setJpaVendorAdapter(jpaVendorAdapter());
entityManagerFactory.setJpaDialect(jpaDialect());
return entityManagerFactory;
}
}
And finally, we create the classes that represent the tiers itself. This is the DAO class:
package com.alexandreesl.handson.dao;
import javax.persistence.EntityManager;
import javax.persistence.PersistenceContext;
import org.springframework.stereotype.Component;
import org.springframework.transaction.annotation.Transactional;
import com.alexandreesl.handson.model.Client;
@Component
public class ClientDAO {
@PersistenceContext
private EntityManager entityManager;
@Transactional(readOnly = true)
public Client find(long id) {
return entityManager.find(Client.class, id);
}
@Transactional
public void create(Client client) {
entityManager.persist(client);
}
@Transactional
public void update(Client client) {
entityManager.merge(client);
}
@Transactional
public void delete(Client client) {
entityManager.remove(client);
}
}
And this is the service class:
package com.alexandreesl.handson.service;
import org.springframework.beans.factory.annotation.Autowired;
import org.springframework.stereotype.Component;
import com.alexandreesl.handson.dao.ClientDAO;
import com.alexandreesl.handson.model.Client;
@Component
public class ClientService {
@Autowired
private ClientDAO clientDAO;
public ClientDAO getClientDAO() {
return clientDAO;
}
public void setClientDAO(ClientDAO clientDAO) {
this.clientDAO = clientDAO;
}
public Client find(long id) {
return clientDAO.find(id);
}
public void create(Client client) {
clientDAO.create(client);
}
public void update(Client client) {
clientDAO.update(client);
}
public void delete(Client client) {
clientDAO.delete(client);
}
}
The reader may notice that we created a getter/setter to the DAO class on the Service class. This is not necessary for the Spring injection, but we made this way to get easier to change the real DAO by a Mockito’s mock on the tests class. Finally, we code the class we talked about previously, the one that consume the tiers:
package com.alexandreesl.handson.core;
import org.springframework.context.ApplicationContext;
import org.springframework.context.annotation.AnnotationConfigApplicationContext;
import com.alexandreesl.handson.model.Client;
import com.alexandreesl.handson.service.ClientService;
public class App {
public static void main(String[] args) {
ApplicationContext context = new AnnotationConfigApplicationContext(
AppConfiguration.class);
ClientService service = (ClientService) context
.getBean(ClientService.class);
System.out.println(service.find(1).getName());
System.out.println(service.find(3).getName());
System.out.println(service.find(5).getName());
Client client = new Client();
client.setId(6);
client.setName(“Celina do Sim”);
client.setPhone(44657688);
client.setSex(“F”);
service.create(client);
System.out.println(service.find(6).getName());
System.exit(0);
}
}
If we run the class, we can see that the console print all the clients we searched for and that Hibernate is initialized properly, proving our implementation is a success:
Mar 28, 2015 1:09:22 PM org.springframework.context.annotation.AnnotationConfigApplicationContext prepareRefresh
INFO: Refreshing org.springframework.context.annotation.AnnotationConfigApplicationContext@6433a2: startup date [Sat Mar 28 13:09:22 BRT 2015]; root of context hierarchy
Mar 28, 2015 1:09:22 PM org.springframework.jdbc.datasource.DriverManagerDataSource setDriverClassName
INFO: Loaded JDBC driver: org.hsqldb.jdbcDriver
Mar 28, 2015 1:09:22 PM org.springframework.orm.jpa.LocalContainerEntityManagerFactoryBean createNativeEntityManagerFactory
INFO: Building JPA container EntityManagerFactory for persistence unit ‘persistence’
Mar 28, 2015 1:09:22 PM org.hibernate.jpa.internal.util.LogHelper logPersistenceUnitInformation
INFO: HHH000204: Processing PersistenceUnitInfo [
name: persistence
…]
Mar 28, 2015 1:09:22 PM org.hibernate.Version logVersion
INFO: HHH000412: Hibernate Core {4.3.8.Final}
Mar 28, 2015 1:09:22 PM org.hibernate.cfg.Environment <clinit>
INFO: HHH000206: hibernate.properties not found
Mar 28, 2015 1:09:22 PM org.hibernate.cfg.Environment buildBytecodeProvider
INFO: HHH000021: Bytecode provider name : javassist
Mar 28, 2015 1:09:22 PM org.hibernate.annotations.common.reflection.java.JavaReflectionManager <clinit>
INFO: HCANN000001: Hibernate Commons Annotations {4.0.5.Final}
Mar 28, 2015 1:09:23 PM org.hibernate.dialect.Dialect <init>
INFO: HHH000400: Using dialect: org.hibernate.dialect.HSQLDialect
Mar 28, 2015 1:09:23 PM org.hibernate.hql.internal.ast.ASTQueryTranslatorFactory <init>
INFO: HHH000397: Using ASTQueryTranslatorFactory
Mar 28, 2015 1:09:23 PM org.hibernate.tool.hbm2ddl.SchemaExport execute
INFO: HHH000227: Running hbm2ddl schema export
Mar 28, 2015 1:09:23 PM org.hibernate.tool.hbm2ddl.SchemaExport execute
INFO: HHH000230: Schema export complete
Alexandre Eleuterio Santos Lourenco
Maria Odete dos Santos Lourenco
Ana Carolina Fernandes do Sim
Celina do Sim
Now, let’s move on for the tests themselves. For the DBUnit tests, we create a Base class, which will provide the base DB operations which all of our JUnit tests will benefit. On the @PostConstruct method, which is fired after all the injections of the Spring context are made – reason why we couldn’t use the @BeforeClass annotation, because we need Spring to instantiate and inject the EntityManager first – we use DBUnit to make a connection to our database, with the class DatabaseConnection and populate the table using the DataSet class we created, passing a XML structure that represents the data used on the tests.
This operation of populating the table is made by the DatabaseOperation class, which we use with the CLEAN_INSERT operation, that truncate the table first and them insert the data on the dataset. Finally, we use one of JUnit’s event listeners, the @After event, which is called after every test case. On our scenario, we use this event to call the clear() method on the EntityManager, which forces Hibernate to query against the Database for the first time at every test case, thus eliminating possible problems we could have between our test cases because of data that it is different on the second level cache than it is on the DB.
The code for the base class is the following:
package com.alexandreesl.handson.dao.test;
import java.io.InputStream;
import java.sql.SQLException;
import javax.annotation.PostConstruct;
import javax.persistence.EntityManager;
import javax.persistence.EntityManagerFactory;
import javax.persistence.PersistenceUnit;
import org.dbunit.DatabaseUnitException;
import org.dbunit.database.DatabaseConfig;
import org.dbunit.database.DatabaseConnection;
import org.dbunit.database.IDatabaseConnection;
import org.dbunit.dataset.IDataSet;
import org.dbunit.dataset.xml.FlatXmlDataSetBuilder;
import org.dbunit.ext.hsqldb.HsqldbDataTypeFactory;
import org.dbunit.operation.DatabaseOperation;
import org.hibernate.HibernateException;
import org.hibernate.internal.SessionImpl;
import org.junit.After;
public class BaseDBUnitSetup {
private static IDatabaseConnection connection;
private static IDataSet dataset;
@PersistenceUnit
public EntityManagerFactory entityManagerFactory;
private EntityManager entityManager;
@PostConstruct
public void init() throws HibernateException, DatabaseUnitException,
SQLException {
entityManager = entityManagerFactory.createEntityManager();
connection = new DatabaseConnection(
((SessionImpl) (entityManager.getDelegate())).connection());
connection.getConfig().setProperty(
DatabaseConfig.PROPERTY_DATATYPE_FACTORY,
new HsqldbDataTypeFactory());
FlatXmlDataSetBuilder flatXmlDataSetBuilder = new FlatXmlDataSetBuilder();
InputStream dataSet = Thread.currentThread().getContextClassLoader()
.getResourceAsStream(“test-data.xml”);
dataset = flatXmlDataSetBuilder.build(dataSet);
DatabaseOperation.CLEAN_INSERT.execute(connection, dataset);
}
@After
public void afterTests() {
entityManager.clear();
}
}
The xml structure used on the test cases is the following:
<?xml version=”1.0″ encoding=”UTF-8″?>
<dataset>
<Client id=”1″ name=”Alexandre Eleuterio Santos Lourenco” sex=”M” phone=”22323456″ />
<Client id=”2″ name=”Lucebiane Santos Lourenco” sex=”F” phone=”22323876″ />
</dataset>
And the code of our test class of the DAO tier is the following:
package com.alexandreesl.handson.dao.test;
import static org.junit.Assert.assertNotNull;
import static org.junit.Assert.assertNull;
import org.junit.Test;
import org.junit.runner.RunWith;
import org.springframework.beans.factory.annotation.Autowired;
import org.springframework.test.context.ContextConfiguration;
import org.springframework.test.context.junit4.SpringJUnit4ClassRunner;
import org.springframework.test.context.transaction.TransactionConfiguration;
import org.springframework.transaction.annotation.Transactional;
import com.alexandreesl.handson.core.test.AppTestConfiguration;
import com.alexandreesl.handson.dao.ClientDAO;
import com.alexandreesl.handson.model.Client;
@RunWith(SpringJUnit4ClassRunner.class)
@ContextConfiguration(classes = AppTestConfiguration.class)
@TransactionConfiguration(defaultRollback = true)
public class ClientDAOTest extends BaseDBUnitSetup {
@Autowired
private ClientDAO clientDAO;
@Test
public void testFind() {
Client client = clientDAO.find(1);
assertNotNull(client);
client = clientDAO.find(2);
assertNotNull(client);
client = clientDAO.find(3);
assertNull(client);
client = clientDAO.find(4);
assertNull(client);
client = clientDAO.find(5);
assertNull(client);
}
@Test
@Transactional
public void testInsert() {
Client client = new Client();
client.setId(3);
client.setName(“Celina do Sim”);
client.setPhone(44657688);
client.setSex(“F”);
clientDAO.create(client);
}
@Test
@Transactional
public void testUpdate() {
Client client = clientDAO.find(1);
client.setPhone(12345678);
clientDAO.update(client);
}
@Test
@Transactional
public void testRemove() {
Client client = clientDAO.find(1);
clientDAO.delete(client);
}
}
The code is very self explanatory so we will just focus on explaining the annotations at the top-level class. The @RunWith(SpringJUnit4ClassRunner.class) annotation changes the JUnit base class that runs our test cases, using rather one made by Spring that enable support of the IoC container and the Spring’s annotations. The @TransactionConfiguration(defaultRollback = true) annotation is from Spring’s test library and change the behavior of the @Transactional annotation, making the transactions to roll back after execution, instead of a commit. That ensures that our test cases wont change the structure of the DB, so a test case wont break the execution of his followers.
The reader may notice that we changed the configuration class to another one, exclusive for the test cases. It is essentially the same beans we created on the original configuration class, just changing the database bean to point to a different DB then the previously one, showing that we can change the database of our tests without breaking the code. On a real world scenario, the configuration class of the application would be pointing to a relational database like Oracle, DB2, etc and the test cases would use a embedded database such as HSQLDB, which we are using on this case:
package com.alexandreesl.handson.core.test;
import org.springframework.context.annotation.Bean;
import org.springframework.context.annotation.ComponentScan;
import org.springframework.context.annotation.Configuration;
import org.springframework.jdbc.datasource.DriverManagerDataSource;
import org.springframework.orm.jpa.JpaTransactionManager;
import org.springframework.orm.jpa.LocalContainerEntityManagerFactoryBean;
import org.springframework.orm.jpa.vendor.Database;
import org.springframework.orm.jpa.vendor.HibernateJpaDialect;
import org.springframework.orm.jpa.vendor.HibernateJpaVendorAdapter;
import org.springframework.transaction.annotation.EnableTransactionManagement;
@Configuration
@EnableTransactionManagement
@ComponentScan({ “com.alexandreesl.handson.dao”,
“com.alexandreesl.handson.service” })
public class AppTestConfiguration {
@Bean
public DriverManagerDataSource dataSource() {
DriverManagerDataSource dataSource = new DriverManagerDataSource();
dataSource.setDriverClassName(“org.hsqldb.jdbcDriver”);
dataSource.setUrl(“jdbc:hsqldb:mem://standalone-test”);
dataSource.setUsername(“sa”);
dataSource.setPassword(“”);
return dataSource;
}
@Bean
public JpaTransactionManager transactionManager() {
JpaTransactionManager transactionManager = new JpaTransactionManager();
transactionManager.setEntityManagerFactory(entityManagerFactory()
.getNativeEntityManagerFactory());
transactionManager.setDataSource(dataSource());
transactionManager.setJpaDialect(jpaDialect());
return transactionManager;
}
@Bean
public HibernateJpaDialect jpaDialect() {
return new HibernateJpaDialect();
}
@Bean
public HibernateJpaVendorAdapter jpaVendorAdapter() {
HibernateJpaVendorAdapter jpaVendor = new HibernateJpaVendorAdapter();
jpaVendor.setDatabase(Database.HSQL);
jpaVendor.setDatabasePlatform(“org.hibernate.dialect.HSQLDialect”);
return jpaVendor;
}
@Bean
public LocalContainerEntityManagerFactoryBean entityManagerFactory() {
LocalContainerEntityManagerFactoryBean entityManagerFactory = new LocalContainerEntityManagerFactoryBean();
entityManagerFactory
.setPersistenceXmlLocation(“classpath:META-INF/persistence.xml”);
entityManagerFactory.setPersistenceUnitName(“persistence”);
entityManagerFactory.setDataSource(dataSource());
entityManagerFactory.setJpaVendorAdapter(jpaVendorAdapter());
entityManagerFactory.setJpaDialect(jpaDialect());
return entityManagerFactory;
}
}
If we run the test class, we can see that it runs the test cases successfully, showing that our code is a success. If we see the console, we can see that transactions were created and rolled back, respecting our configuration:
.
.
.
ar 28, 2015 2:29:55 PM org.springframework.test.context.transaction.TransactionContext startTransaction
INFO: Began transaction (1) for test context [DefaultTestContext@644abb8f testClass = ClientDAOTest, testInstance = com.alexandreesl.handson.dao.test.ClientDAOTest@1a411233, testMethod = testInsert@ClientDAOTest, testException = [null], mergedContextConfiguration = [MergedContextConfiguration@70325d20 testClass = ClientDAOTest, locations = ‘{}’, classes = ‘{class com.alexandreesl.handson.core.test.AppTestConfiguration}’, contextInitializerClasses = ‘[]’, activeProfiles = ‘{}’, propertySourceLocations = ‘{}’, propertySourceProperties = ‘{}’, contextLoader = ‘org.springframework.test.context.support.DelegatingSmartContextLoader’, parent = [null]]]; transaction manager [org.springframework.orm.jpa.JpaTransactionManager@7c2327fa]; rollback [true]
Mar 28, 2015 2:29:55 PM org.springframework.test.context.transaction.TransactionContext endTransaction
INFO: Rolled back transaction for test context [DefaultTestContext@644abb8f testClass = ClientDAOTest, testInstance = com.alexandreesl.handson.dao.test.ClientDAOTest@1a411233, testMethod = testInsert@ClientDAOTest, testException = [null], mergedContextConfiguration = [MergedContextConfiguration@70325d20 testClass = ClientDAOTest, locations = ‘{}’, classes = ‘{class com.alexandreesl.handson.core.test.AppTestConfiguration}’, contextInitializerClasses = ‘[]’, activeProfiles = ‘{}’, propertySourceLocations = ‘{}’, propertySourceProperties = ‘{}’, contextLoader = ‘org.springframework.test.context.support.DelegatingSmartContextLoader’, parent = [null]]].
Mar 28, 2015 2:29:55 PM org.springframework.test.context.transaction.TransactionContext startTransaction
INFO: Began transaction (1) for test context [DefaultTestContext@644abb8f testClass = ClientDAOTest, testInstance = com.alexandreesl.handson.dao.test.ClientDAOTest@2adddc06, testMethod = testRemove@ClientDAOTest, testException = [null], mergedContextConfiguration = [MergedContextConfiguration@70325d20 testClass = ClientDAOTest, locations = ‘{}’, classes = ‘{class com.alexandreesl.handson.core.test.AppTestConfiguration}’, contextInitializerClasses = ‘[]’, activeProfiles = ‘{}’, propertySourceLocations = ‘{}’, propertySourceProperties = ‘{}’, contextLoader = ‘org.springframework.test.context.support.DelegatingSmartContextLoader’, parent = [null]]]; transaction manager [org.springframework.orm.jpa.JpaTransactionManager@7c2327fa]; rollback [true]
Mar 28, 2015 2:29:55 PM org.springframework.test.context.transaction.TransactionContext endTransaction
INFO: Rolled back transaction for test context [DefaultTestContext@644abb8f testClass = ClientDAOTest, testInstance = com.alexandreesl.handson.dao.test.ClientDAOTest@2adddc06, testMethod = testRemove@ClientDAOTest, testException = [null], mergedContextConfiguration = [MergedContextConfiguration@70325d20 testClass = ClientDAOTest, locations = ‘{}’, classes = ‘{class com.alexandreesl.handson.core.test.AppTestConfiguration}’, contextInitializerClasses = ‘[]’, activeProfiles = ‘{}’, propertySourceLocations = ‘{}’, propertySourceProperties = ‘{}’, contextLoader = ‘org.springframework.test.context.support.DelegatingSmartContextLoader’, parent = [null]]].
Mar 28, 2015 2:29:55 PM org.springframework.test.context.transaction.TransactionContext startTransaction
INFO: Began transaction (1) for test context [DefaultTestContext@644abb8f testClass = ClientDAOTest, testInstance = com.alexandreesl.handson.dao.test.ClientDAOTest@4905c46b, testMethod = testUpdate@ClientDAOTest, testException = [null], mergedContextConfiguration = [MergedContextConfiguration@70325d20 testClass = ClientDAOTest, locations = ‘{}’, classes = ‘{class com.alexandreesl.handson.core.test.AppTestConfiguration}’, contextInitializerClasses = ‘[]’, activeProfiles = ‘{}’, propertySourceLocations = ‘{}’, propertySourceProperties = ‘{}’, contextLoader = ‘org.springframework.test.context.support.DelegatingSmartContextLoader’, parent = [null]]]; transaction manager [org.springframework.orm.jpa.JpaTransactionManager@7c2327fa]; rollback [true]
Mar 28, 2015 2:29:55 PM org.springframework.test.context.transaction.TransactionContext endTransaction
INFO: Rolled back transaction for test context [DefaultTestContext@644abb8f testClass = ClientDAOTest, testInstance = com.alexandreesl.handson.dao.test.ClientDAOTest@4905c46b, testMethod = testUpdate@ClientDAOTest, testException = [null], mergedContextConfiguration = [MergedContextConfiguration@70325d20 testClass = ClientDAOTest, locations = ‘{}’, classes = ‘{class com.alexandreesl.handson.core.test.AppTestConfiguration}’, contextInitializerClasses = ‘[]’, activeProfiles = ‘{}’, propertySourceLocations = ‘{}’, propertySourceProperties = ‘{}’, contextLoader = ‘org.springframework.test.context.support.DelegatingSmartContextLoader’, parent = [null]]].
Now let’s move on to the Service tests, with the help of Mockito.
The class to test the Service tier is very simple, as we can see bellow:
package com.alexandreesl.handson.service.test;
import static org.junit.Assert.assertEquals;
import org.junit.BeforeClass;
import org.junit.Test;
import org.mockito.Mockito;
import org.mockito.invocation.InvocationOnMock;
import org.mockito.stubbing.Answer;
import com.alexandreesl.handson.dao.ClientDAO;
import com.alexandreesl.handson.model.Client;
import com.alexandreesl.handson.service.ClientService;
public class ClientServiceTest {
private static ClientDAO clientDAO;
private static ClientService clientService;
@BeforeClass
public static void beforeClass() {
clientService = new ClientService();
clientDAO = Mockito.mock(ClientDAO.class);
clientService.setClientDAO(clientDAO);
Client client = new Client();
client.setId(0);
client.setName(“Mocked client!”);
client.setPhone(11111111);
client.setSex(“M”);
Mockito.when(clientDAO.find(Mockito.anyLong())).thenReturn(client);
Mockito.doThrow(new RuntimeException(“error on client!”))
.when(clientDAO).delete((Client) Mockito.any());
Mockito.doNothing().when(clientDAO).create((Client) Mockito.any());
Mockito.doAnswer(new Answer<Object>() {
public Object answer(InvocationOnMock invocation) {
Object[] args = invocation.getArguments();
Client client = (Client) args[0];
client.setName(“Mocked client has changed!”);
return client;
}
}).when(clientDAO).update((Client) Mockito.any());
}
@Test
public void testFind() {
Client client = clientService.find(10);
Mockito.verify(clientDAO).find(10);
assertEquals(client.getName(), “Mocked client!”);
}
@Test
public void testInsert() {
Client client = new Client();
client.setId(3);
client.setName(“Celina do Sim”);
client.setPhone(44657688);
client.setSex(“F”);
clientService.create(client);
Mockito.verify(clientDAO).create(client);
}
@Test
public void testUpdate() {
Client client = clientService.find(20);
client.setPhone(12345678);
clientService.update(client);
Mockito.verify(clientDAO).update(client);
assertEquals(client.getName(), “Mocked client has changed!”);
}
@Test(expected = RuntimeException.class)
public void testRemove() {
Client client = clientService.find(2);
clientService.delete(client);
}
}
On this test case, we didn’t need Spring to inject the dependencies, because the only dependency of the Service class is the DAO, which we create as a mock with Mockito on the @BeforeClass event, which executes just once before any test case is executed. On Mockito, we have the concept of Mocks and Spys. With Mocks, we have to define the behavior of the methods that we know our tests will be calling, because the mocks didn’t call the original methods, even if no behavior is declared. If we want to mock just some methods and use the original implementation on the others, we use a Spy instead.
On our tests, we made the following mocks:
- For the find method, we specify that for any call, it will return a client with the name “Mocked client!”;
- For the delete method, we throw a RuntimeException, with the message “error on client!”;
- For the create method, we just receive the argument and do nothing;
- For the update method, we receive the client passed as argument and change his name for “Mocked client has changed!”;
And that is it. We can also see that our test cases use the verify method from Mockito, that ensures that our mock was called inside the service tier. This check is very useful to ensure for example, that a developer didn’t removed the call of the DAO tier by accident. If we run the JUnit class, we can see that everything runs as a success, proving that our coding was successful.
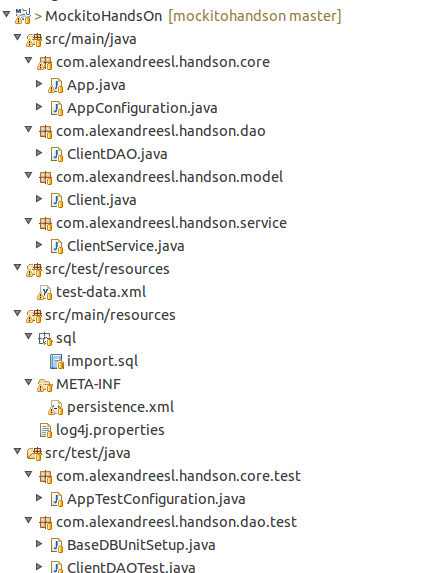
This is the final structure of the project:
Conclusion
And that concludes our hands-on. With a simple usage, but a powerful usability, test libraries like Mockito and DBUnit are useful tools on the development of a powerful testing tier on our applications, improving and ensuring the quality of our code. Thank you for following me, until next time.
Continue reading