Java 9: Learning the new features – part 4

Standard

Hi, dear readers! Welcome to my blog. On this post, last on our series, we will finally talk about the most known new feature of Java 9, Jigsaw. But after all, why do we need a module system? Let’s find out!

In the beginning

At Java’s beginnings, we have several types of ways to encapsulate applications. There is the most generic unit, know as JAR, and there’s also other more specific formats, such as WARs for web applications and EARs for Enterprise Java Beans (EJB) applications.

This applications, typically speaking, do not consist of only code that was written by the developers teams themselves: there is also a plethora of libraries and frameworks that are also imported, such as logging libraries, ORM frameworks, web frameworks, etc.

Generally speaking, each of this libraries and frameworks are packaged as JARs as well, and their dependencies are also packaged as JARs. This results on a scenario that we have a really big amount of dependencies included on a single application, just to make the whole thing work. The picture bellow shows a typical Spring Boot application’s classpath. It is possible to note the overwhelming mountain of dependencies:

Screen Shot 2017-11-01 at 22.38.00

Fragment of a typical Spring Boot Application dependencies list. It is 267 items long!

Jar hell

The situation stated previously leads us to the infamous Jar hell. This term refers to all problems the developers suffer across more then 20 years of Java, such as ClassNotFoundExceptions, when the application can’t found a certain class, or NoClassDefFoundError, when there’s multiple versions of the same class and the application can’t decide which version to use.

Encapsulation problems

Another problem we got is encapsulation. Once a  dependency is formed, all the classes from the imported package are accessible to the importer. Even if we declare a class with the default visibility access, it is still possible to access the class, just by using the same package name of the class we want to use – don’t try this at home, folks!.

This leads to poor possibilities on interface designs, since we can’t really avoid certain classes to not been exposed to the outside world.

Performance degradation

Another big problem is performance. This is specially felt on Java EE containers, since servers need to support a big list of features provided for applications.  It is true that we had efforts on the past to improve this situation, such as EAP profiles on JBoss server, but still, the situation was far from resolved.

This results on heavy, clunky servers, that can be slow to operate and specially to initialize, alongside intensely memory demanding.

Enter the modules

To solve all the problems we saw on the previous sections, on Java 9 we got Jigsaw, the new module system for Java.

With jigsaw, we can create modules from packages inside a application, allowing a much more coherent and organized structure. Not only that, with modules, we have to explicit declare what we want to expose from a module, so we also eliminate the encapsulation problems we talked about earlier.

This also helps with the performance degradation we just saw, since with modules the amount of classes and packages to be loaded from the servers can be significantly reduced, resulting and thinner servers.

So,let’s see how modules work on practice!

Creating a module

Let’s start by creating a simple project. the source code for  this lab is on this link, the project was created using Intellij IDEA.

To create a project, all we have to do is create a java file called module-info.java and place it at the root of the package structure we want to encapsulate on a module. The result is something like the image bellow:

jigsaw1

Inside the file, we define a module, that it is something like this:

module com.alexandreesl.application {
}

Now, the keyword module is reserved on Java. On the code above we defined a module which name must match the package’s name. That’s it! Our first module! Now, let’s see how to make this module to talk with other modules

Separating a application in different modules

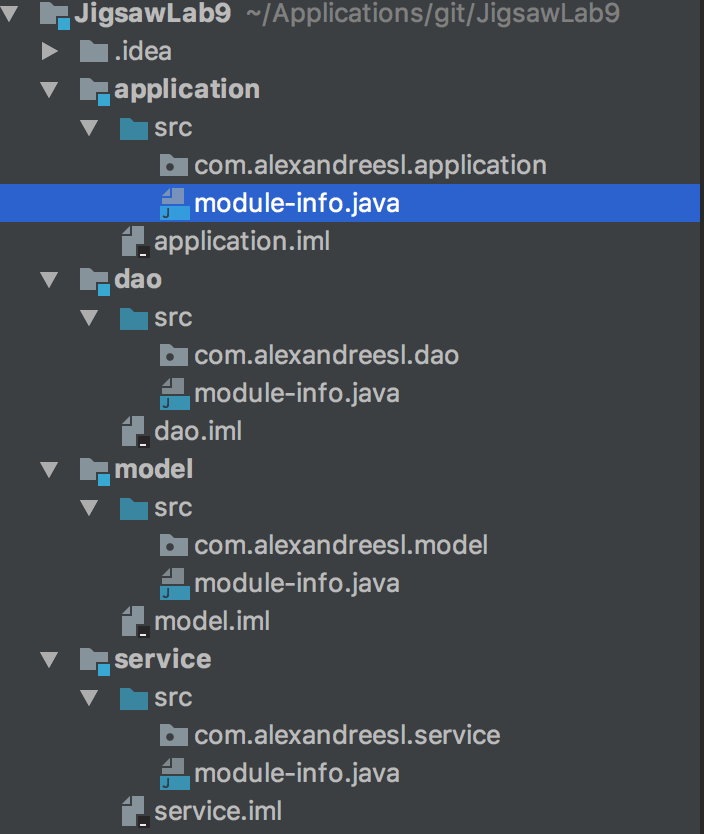
Our sample application will consist of 4 modules: a main module, a dao module, a service module and a model module.

To create the different modules, all we have to do is create the different packages and module definitions – the module-info.java files – , creating the whole module structure.

The image bellow shows the structure:

jigsaw2

And the new module definitions are:

module com.alexandreesl.dao {
}
module com.alexandreesl.model {
}
module com.alexandreesl.service {
}

Exposing a module

Now that we have the modules defined, let’s start coding our project. Our project will represent a simple CRUD of books, for a Bookstore system.

Let’s start by coding the Model module. We will create a Book class, to represent books from the system.

The code for the class is shown bellow:

package com.alexandreesl.model;

public class Book {

    private Long id;

    private String name;

    private String author;

    public Long getId() {
        return id;
    }

    public void setId(Long id) {
        this.id = id;
    }

    public String getName() {
        return name;
    }

    public void setName(String name) {
        this.name = name;
    }

    public String getAuthor() {
        return author;
    }

    public void setAuthor(String author) {
        this.author = author;
    }
}

Then, we modify the module, to expose the model class:

module com.alexandreesl.model {

    exports com.alexandreesl.model;

}

Next, we code the DAO module. We will create  a interface and implementation for the module, separating each other by package segregation. We will also create a object factory.

This is the code for the interface, implementation and object factory of the dao module:

package com.alexandreesl.dao.interfaces;

import com.alexandreesl.model.Book;

public interface IBookDAO {

    void create(Book book);

    void update(Book book);

    Book find(Long id);


}
package com.alexandreesl.dao.impl;

import com.alexandreesl.dao.IBookDAO;
import com.alexandreesl.model.Book;

public class BookDAOImpl implements IBookDAO {
    @Override
    public void create(Book book) {

        System.out.println("INSERTED THE BOOK!");

    }

    @Override
    public void update(Book book) {

        System.out.println("UPDATED THE BOOK!");

    }

    @Override
    public Book find(Long id) {

        Book book = new Book();
        book.setId(id);
        book.setName("Elasticsearch: Consuming real-time data with ELK");
        book.setAuthor("Alexandre Eleutério Santos Lourenço");

        return book;
    }


}
package com.alexandreesl.dao.interfaces;

import com.alexandreesl.dao.impl.BookDAOImpl;

public class BookDAOFactory {

    public static IBookDAO getBookDAO() {

        return new BookDAOImpl();

    }

}

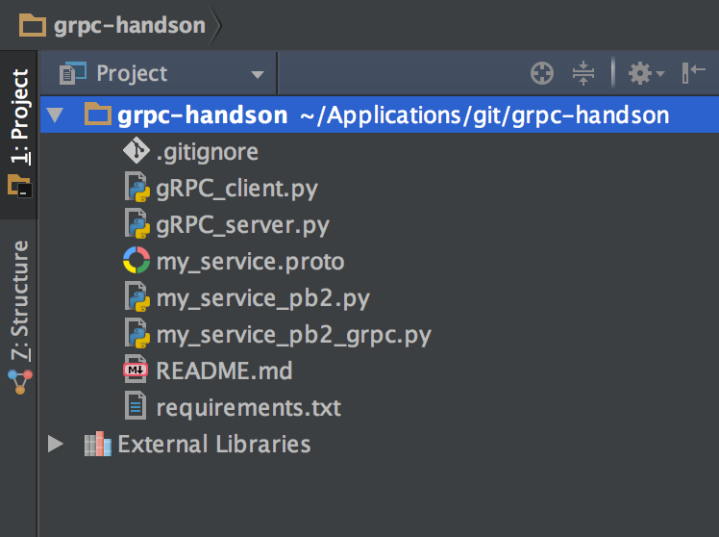
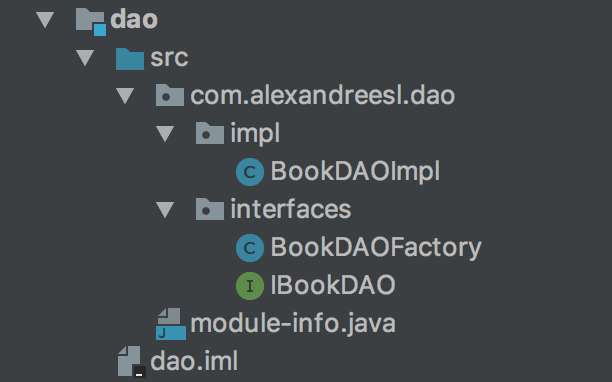
The image bellow shows the final structure of the model with the classes:

jigsaw3

To expose the model and also use the Book class from the Model module, we add the following lines to the module definition:

module com.alexandreesl.dao {

    requires com.alexandreesl.model;
    exports com.alexandreesl.dao.interfaces;

}

Here we can see a important advantage of modules: since we didn’t exported the impl package, the implementation won’t be exposed to code outside the module.

Now we code the service module. To simplify things up, we won’t create a interface-implementation approach this time, just a delegation class to the DAO layer. The code for the service class is shown bellow:

package com.alexandreesl.service;

import com.alexandreesl.dao.interfaces.BookDAOFactory;
import com.alexandreesl.dao.interfaces.IBookDAO;
import com.alexandreesl.model.Book;

public class BookService {

    private IBookDAO bookDAO;

    public BookService() {

        bookDAO = BookDAOFactory.getBookDAO();

    }

    public void create(Book book) {
        bookDAO.create(book);
    }

    public void update(Book book) {
        bookDAO.update(book);
    }

    public Book find(Long id) {
        return bookDAO.find(id);
    }


}

And the module changes are as follows:

module com.alexandreesl.service {

    requires com.alexandreesl.model;
    requires com.alexandreesl.dao;
    exports com.alexandreesl.service;

}

Finally, we code the main module, that it is simply a main method where we test it out our structure:

package com.alexandreesl.application;

import com.alexandreesl.model.Book;
import com.alexandreesl.service.BookService;

public class Main {

    public static void main(String[] args) {

        Book book = new Book();

        book.setAuthor("Stephen King");
        book.setId(1l);
        book.setName("IT - The thing");

        BookService service = new BookService();

        service.create(book);

        book.setName("IT");

        service.update(book);

        Book searchedBook = service.find(2l);

        System.out.println(searchedBook.getName());
        System.out.println(searchedBook.getAuthor());


    }

}

If we run our code, we will see that everything works, just as designed:

/Library/Java/JavaVirtualMachines/jdk-9.jdk/Contents/Home/bin/java "-javaagent:/Applications/IntelliJ IDEA CE.app/Contents/lib/idea_rt.jar=50683:/Applications/IntelliJ IDEA CE.app/Contents/bin" -Dfile.encoding=UTF-8 -p /Users/alexandrelourenco/Applications/git/JigsawLab9/out/production/application:/Users/alexandrelourenco/Applications/git/JigsawLab9/out/production/service:/Users/alexandrelourenco/Applications/git/JigsawLab9/out/production/dao:/Users/alexandrelourenco/Applications/git/JigsawLab9/out/production/model -m com.alexandreesl.application/com.alexandreesl.application.Main
INSERTED THE BOOK!
UPDATED THE BOOK!
Elasticsearch: Consuming real-time data with ELK
Alexandre Eleutério Santos Lourenço

Process finished with exit code 0

Please remember that, if the reader wants it, the code of this project is on Github, on this link.

Static dependencies

One thing that the reader may notice from our code, is that we needed to import the model module on each of the other modules of our system. This is because, as said before, no dependency required by a module is automatically inherited by another module on the hierarchy. All the requirements must be explicit declared to be linked.

However, on this case, if we wanted to declare the dependency on just one module and tell Java on the other modules that the dependency will be met later, we could use the static keyword. Static dependencies on Jigsaw are analogous to the provided scope on Maven, where a dependency is marked just for compilation requirements and it is assumed will be there when the code runs.

To make the changes so the model module is imported on just one module, we change all module definitions to the following:

module com.alexandreesl.application {

    requires com.alexandreesl.model;
    requires com.alexandreesl.service;

}
module com.alexandreesl.dao {

    requires static com.alexandreesl.model;
    exports com.alexandreesl.dao.interfaces;

}
module com.alexandreesl.service {

    requires static com.alexandreesl.model;
    requires com.alexandreesl.dao;
    exports com.alexandreesl.service;

}

If we run again our code, we will see that it runs successfully, just like before.

Package manager support

Since it is a new concept introduced just now, there is still some work undergoing on Java’s package management frameworks, such as Maven and Gradle. Keep it in mind that the objective of Jigsaw is not to replace package management systems.

Think of it more of a complement to this systems, with Jigsaw managing exposure and internal dependencies and the package systems managing issues such as packaging artifacts, running tests, etc.

If the reader is familiar with Gradle, there is some plugins already developed that integrates Jigsaw with it, like chainsaw:

https://github.com/zyxist/chainsaw

Conclusion

And so we conclude our Java 9 series. With several interesting new features, this new edition of Java proves not only that Java has still some relevance on the market, but also can still be evolved with the most modern practices on use. Thank you for following me on this post, until next time.

Java 9: Learning the new features – part 3

Standard

Hi, dear readers! Welcome to my blog. Continuing our series at the new features of Java 9, we will now talk about reactive streams, a new concept on parallel processing that promises to protect our applications from overflows of messages on processing. So, without further delay, let’s begin!

What is Reactive Streams

Let’s imagine a e-commerce that has to send some orders for a distribution center. The e-commerce and DC systems are apart from each other, been able to communicate by a REST service.

Normally, we could simply create a call from the e-commerce system to the DC. So, we implement the call and everything is fine.

However, some day we get a problem on our integration. We notice the e-commerce has overflowed the DC with lots of calls from a Black Friday’s sales, so the REST endpoint starts to fail and lose data.

This scenario illustrates a common integration problem: When a consumer has processing limitations to consume messages above a certain volume, we need to ensure the integration doesn’t end up overflowing the pipeline.

To tackle this problem, it was designed a pattern called Reactive Streams. With Reactive streams, the flow of processing is controlled by the Consumer, not the Publisher, that calls for more data to process as soon as it is ready, keeping his own pace. Not only that, we also have a feature called back pressure, that consists of a kind of throttling to ensure that the Publisher of the data will wait for the Consumer to be available before sending anymore messages and overflow the Consumer, just like we saw on our previous example.

The diagram bellow show us the new Flow API on Java 9, that allows us to implements Reactive Streams. We can see our consumer (the subscriber)  establishing a subscription with the producer and requesting n messages to consume, which are delivered to processing by the onNext method. Don’t worry about the rest of the details: we will see more on the next sections.

The reference site for this diagram, with another good tutorial on Reactive Streams, can be found on the references section at the end of the post.

Creating a Stream: the Publisher

First, let’s create our publisher. the simplest way to create a publisher is by using the SubmissionPublisher class.

Our lab will simulate the orders integration we talked about earlier. We will begin by creating a DTO to hold the data from our orders:

package com.alexandreesl.handson.model;

import java.math.BigDecimal;
import java.util.Date;
import java.util.List;

public class Order {

    private Long id;

    private List<String> products;

    private BigDecimal total;

    private Date orderDate;

    public Long getId() {
        return id;
    }

    public void setId(Long id) {
        this.id = id;
    }

    public List<String> getProducts() {
        return products;
    }

    public void setProducts(List<String> products) {
        this.products = products;
    }

    public BigDecimal getTotal() {
        return total;
    }

    public void setTotal(BigDecimal total) {
        this.total = total;
    }

    public Date getOrderDate() {
        return orderDate;
    }

    public void setOrderDate(Date orderDate) {
        this.orderDate = orderDate;
    }
}

Next, let’s instantiate our publisher, passing the message object DTO as generic:

public static void main(String[] args) {

    SubmissionPublisher<Order> submissionPublisher = new SubmissionPublisher<>();


}

That’s all we need to do for now with our publisher.

Creating a Stream: the Consumer

Now, let’s create our consumer, or subscriber in other words. For this, we will create a class called CDOrderConsumer that implements the Subscriber<T> interface:

package com.alexandreesl.handson.consumer;

import com.alexandreesl.handson.model.Order;

import static java.util.concurrent.Flow.Subscriber;
import static java.util.concurrent.Flow.Subscription;


public class CDOrderConsumer implements Subscriber<Order> {

    private Subscription subscription;

    @Override
    public void onSubscribe(Subscription subscription) {

        this.subscription = subscription;
        subscription.request(1);

    }

    @Override
    public void onNext(Order item) {
        System.out.println("I am sending the Order to the CD!");
        subscription.request(1);

    }

    @Override
    public void onError(Throwable throwable) {

        throwable.printStackTrace();

    }

    @Override
    public void onComplete() {

        System.out.println("All the orders were processed!");

    }
}

On this class we can see several methods implemented, which we saw on the previous diagram. We can explain each of them as:

  • onSubscribe: On this method, we receive a instance of subscription, which we use to request messages to the publisher. On our example, we stored the instance and requested 1 message to be processed – it is possible to establish a limit of more then 1 message per call, allowing the subscriber to process batches of messages  – with the subscription.request(n) method call;
  • onNext(T): On this method, we make the processing of the messages received. On our example, we print a message symbolizing the REST call and ask the publisher for another message;
  •  onError(Throwable throwable): On this method, we receive errors that can occur on the message processing. On our example, we simply print the errors;
  • onComplete(): This method is called after all messages are processed. On our example, we just print a message to signal the completion. It is important to note that, if we didn’t make the onNext(T) method to ask for other messages, this method would be called after the first message, since no more messages would be asked from the publisher;

Now that we understand how to implement our Subscribe, let’s try it out our stream by subscribing with the publisher and sending a message:

public static void main(String[] args) throws IOException {


    SubmissionPublisher<Order> submissionPublisher = new SubmissionPublisher<>();
    submissionPublisher.subscribe(new CDOrderConsumer());

    Order order = new Order();
    order.setId(1l);
    order.setOrderDate(new Date());
    order.setTotal(BigDecimal.valueOf(123));
    order.setProducts(List.of("product1", "product2", "product3"));


    submissionPublisher.submit(order);

    submissionPublisher.close();

    System.out.println("Waiting for processing.......");
    System.in.read();


}

On our script, we instantiate a publisher, create a order and submit the message for processing. Keep in mind that the submit call doesn’t mean that the message was sent to the subscriber: this is only done when the subscriber calls subscription.request(n). Lastly, we close the publisher, as we will not send any more messages.

Note: You may be thinking about why we put it that System.in.read() at the end. this is because all processing of the stream is done on a separate thread from the main one, so we need to make the program wait for the processing to complete, or else it will exit before the message is processed.

If we execute our program, we will see a output like this:

/Library/Java/JavaVirtualMachines/jdk-9.jdk/Contents/Home/bin/java "-javaagent:/Applications/IntelliJ IDEA CE.app/Contents/lib/idea_rt.jar=50218:/Applications/IntelliJ IDEA CE.app/Contents/bin" -Dfile.encoding=UTF-8 -classpath /Users/alexandrelourenco/Applications/git/ReactiveStreamsJava9/out/production/ReactiveStreamsJava9Lab com.alexandreesl.handson.Main
Waiting for processing.......
I am sending the Order to the CD!
All the orders were processed!

Success!!! Now we have a fully functional reactive stream, allowing us to process our messages.

Processors on Reactive Streams

Sometimes, on a stream, there will be logic that can be placed between the publisher and the consumer, such as filtering, transforming, and more. For this purpose, we can implement processors. Processors are like subscribers that also publish messages after the logic is applied. This way, processors can be chained together on a stream, executing one after another, before finally passing the message to a subscriber.

Let’s expand our previous example. We detected a bug on our e-commerce that sometimes places “phantom” orders with 0 total value on the stream. We didn’t identified the cause yet, but it is necessary to prevent this fake orders from been sent to the CD system. We can use a processor to filter this fake orders.

So, let’s implement the following class, OrderFilter, to accomplish this:

package com.alexandreesl.handson.processor;

import com.alexandreesl.handson.model.Order;

import java.util.concurrent.Flow;
import java.util.concurrent.SubmissionPublisher;


public class OrderFilter extends SubmissionPublisher<Order> implements Flow.Processor<Order, Order> {

    private Flow.Subscription subscription;


    @Override
    public void onSubscribe(Flow.Subscription subscription) {

        this.subscription = subscription;
        subscription.request(1);

    }

    @Override
    public void onNext(Order item) {

        if (item.getTotal().doubleValue() > 0) {

            submit(item);

        } else {

            System.out.println("INVALID ORDER! DISCARDING...");

        }

        subscription.request(1);


    }

    @Override
    public void onError(Throwable throwable) {

        throwable.printStackTrace();

    }

    @Override
    public void onComplete() {

        System.out.println("All the orders were processed!");

    }


}

On this class, we implement both publisher and subscriber interfaces. The code is basically the same from our subscriber, except that on the onNext(T) method we implement a logic that checks if a order has a total value bigger then 0. If it has, it is submitted to the subscriber, otherwise, it is discarded.

Next, we modify our code, subscribing the processor on our stream and testing it out with 2 orders, one valid and one fake:

public static void main(String[] args) throws IOException {

    SubmissionPublisher<Order> submissionPublisher = new SubmissionPublisher<>();
    OrderFilter filter = new OrderFilter();
    submissionPublisher.subscribe(filter);
    filter.subscribe(new CDOrderConsumer());

    Order order = new Order();
    order.setId(1l);
    order.setOrderDate(new Date());
    order.setTotal(BigDecimal.valueOf(123));
    order.setProducts(List.of("product1", "product2", "product3"));

    submissionPublisher.submit(order);

    order = new Order();
    order.setId(2l);
    order.setOrderDate(new Date());
    order.setProducts(List.of("product1", "product2", "product3"));

    order.setTotal(BigDecimal.ZERO);

    submissionPublisher.submit(order);

    submissionPublisher.close();

    System.out.println("Waiting for processing.......");
    System.in.read();

}

If we run the code, we will a message indicating that one of the messages was discarded, reflecting that our implementation was a success:

/Library/Java/JavaVirtualMachines/jdk-9.jdk/Contents/Home/bin/java "-javaagent:/Applications/IntelliJ IDEA CE.app/Contents/lib/idea_rt.jar=51469:/Applications/IntelliJ IDEA CE.app/Contents/bin" -Dfile.encoding=UTF-8 -classpath /Users/alexandrelourenco/Applications/git/ReactiveStreamsJava9/out/production/ReactiveStreamsJava9Lab com.alexandreesl.handson.Main
Waiting for processing.......
INVALID ORDER! DISCARDING...
I am sending the Order to the CD!
All the orders were processed!

The source code for our lab can be found here.

Conclusion

And so we conclude our learning on Reactive Streams. With a simple and intuitive approach, Reactive Streams are a good solution to try it out, specially on solutions that have capacity limitations. Please follow me next time for our last chapter on this series, where we will finally see the so famed new module system, Jigsaw. Thank you for following me on this post, until next time.

References

Reactive Streams (Wikipedia)

Reactive Streams Tutorial (another good tutorial to serve as guide)

Java 9: Learning the new features – part 2

Standard

Hi, dear readers! Welcome to my blog. On this post, we will continue our tour on Java 9, now focusing on what changed on Streams and Optionals.

Creating collections

Before Java 9, when we wanted to populate a collection with some data, we commonly would do this:

Map<Long,String> tasks = new HashMap<>();

tasks.put(1l,"Put trash on the street");
tasks.put(2l,"Buy bread");
tasks.put(3l,"Walk with the dog");
tasks.put(4l,"make dinner");

Of course, we could also create the collection like this:

Map<Long, String> tasks = new HashMap<>() {{

    put(1l, "Put trash on the street");
    put(2l, "Buy bread");
    put(3l, "Walk with the dog");
    put(4l, "make dinner");

}};

Still, it is quite a verbose way to create a collection. Finally, on Java 9, we can create a collection this way, much more cleaner:

Map<Long, String> tasks = Map.of(
        1l, "Put trash on the street",
        2l, "Buy bread",
        3l, "Walk with the dog",
        4l, "make dinner"

);

Two points are worth note about the of method, however:

  • There’s no way to choose which implementation will be used;
  • If there is any null values on the data, the creation will fail with a NullPointerException;

New collectors

Another good addition was the new collectors. With them, we can now apply filters or mappers to streams inside of the collecting. Let’s see some examples.

Let’s use the same tasks map from before. Let’s suppose the want a list of task values, filtered by only taks that doesn’t have the word dog. With the new collectors, we can accomplish this by doing:

tasks.values().stream().collect(Collectors.filtering(w -> !w.contains("dog"), Collectors.toList())).forEach(System.out::println);

If we execute the code, we will see that it will print all the tasks except the one about walling with the dog, as we expected.

Now, let’s see another example. Let’s suppose we want to create a list with only the first word of each task. This can be done by using the following code:

tasks.values().stream().collect(Collectors.mapping(w -> w.split(" ")[0], Collectors.toList())).forEach(System.out::println);

If we run the code, we will see that it will print a list with just the first words from the tasks, as we expected.

Iterating with streams

Another interesting new feature included was the dropwhile and takewhile operations. By using them, we can iterate sequentially on collections, discarding or including items while a predicate is not satisfied. Let’s see some examples.

Let’s begin by creating a collection for our tests:

List<String> words = List.of("we", "are", "testing", 
        "new", "features", "of", "Java", "9");

Now, let’s try the dropwhile:

words.stream().dropWhile(e -> !e.equals("new")).forEach(System.out::println);

The result if we execute our stream will be as follows:

new
features
of
Java
9

As we can see, it is the correct result, since we ordered the stream to drop items from our iteration while none of them are equals to “new”.

If we try the takewhile operation, with the same predicate, we will see that the stream will store the items while a item equals to “new” is not found, exactly as expected. This is the code modified for the new example:

words.stream().takeWhile(e -> !e.equals("new")).forEach(System.out::println);

And this is the new result:

we
are
testing

New features on Optionals

Optionals also get their share of improvements. Let’s begin with our previous example from the mapping collector.

Let’s suppose our tasks map uses Optionals for values instead of literal strings:

Map<Long, Optional<String>> tasks = Map.of(
        1l, Optional.ofNullable("Put trash on the street"),
        2l, Optional.ofNullable("Buy bread"),
        3l, Optional.ofNullable("Walk with the dog"),
        4l, Optional.ofNullable("make dinner")

);

If we wanted to use the same map to implement the previous stream, we would have to “extract” all the values from the optionals previous to using them on the stream. That is, until Java 9.

Now, we can implement the previous stream on this new scenario by doing this:

tasks.values().stream().flatMap(Optional::stream).collect(Collectors.mapping(w -> w.split(" ")[0], Collectors.toList())).forEach(System.out::println);

If we run our code, we will see that it will print the list with just the first words from the tasks, just like before.

Another good addition was the ifpresentorelse method. Now, if we need to implement logic that depends if a Optional is empty or not, we can just do:

myOptional.ifPresentOrElse(present -> System.out.println(present), () -> {
    System.out.println("nothing to do");
});

And even more interesting, now Optionals supports the or method, that allows us to create multiple fallback returns! We can see the method in action on the example bellow:

myOptional.or(() -> Optional.ofNullable("this is my first callback"))
        .or(() -> Optional.ofNullable("this is my second callback"))
        .or(() -> Optional.ofNullable("this is my third callback"))
        .or(() -> Optional.ofNullable("this is my fourth callback"));

Conclusion

And so we concluded another post from our series on the new features of Java 9. Please, stay tuned on my series, where we will talk about other features, such as the long waited Jigsaw. Thank you for following me on another post, thank you.

Java 9: Learning the new features – part 1

Standard

Hi, dear readers! Welcome to my blog. This is the first post from a series focused on studying the new features from Java 9.

After waiting so much time for some features like Jigsaw, the so-called Java module feature, Java 9 is finally upon us. Let’s begin our journey by exploring the new REPL console for the language, JShell!

Installing Java 9

To install Java 9, I recommend following the instructions on this link.

REPL

REPL is a acronym that stands for Read-Eval-Print-Loop. A REPL is a terminal where we can input commands and receive immediate feedback about the code we just entered.

The code is readed, his syntax is evaluated, then executed, the results are printed on the console and finally the terminal loops for the next command, hence concluding the execution, just like the acronym dictates.

Starting JShell

To start JShell, we just open a terminal and enter:

JShell

This will initialize the shell, as we can see bellow:

|  Welcome to JShell -- Version 9

|  For an introduction type: /help intro

jshell>

Just to finish our first glance at basic JShell commands, to exit the console, we just type:

jshell> /exit

|  Goodbye

Running commands

Now, let’s enter some commands. First, let’s create a String variable:

jshell> String myString = "Welcome to my JShell!"

myString ==> "Welcome to my JShell!"

jshell>

There’s two things we can notice on the code above: First, we don’t need to use a semicolon. Secondly, we can see the REPL in motion, as the code was processed and the results were printed on the console. If we just type the variable name, we can see that it will print his contents:

jshell> myString

myString ==> "Welcome to my JShell!"

jshell>

We can also use other types of commands as well, such as loops:

jshell> for (int i = 0;i < 10; i++)

   ...> System.out.println(i)

0

1

2

3

4

5

6

7

8

9

jshell>

It is also possible to make simple arithmetical operations. Let’s try a simple addition:

jshell> 1 + 2

$1 ==> 3

jshell>

Did you noticed we didn’t defined a variable? When we don’t include one, JShell do this for us, on this case, $1. This is defined by a $ followed by the command’s index, since JShell stores the commands of our session on a array-like structure.

We can see the command’s structure with the /list command, as follows:

jshell> /list

   1 : 1 + 2

   2 : String myString = "Welcome to my JShell!";

   3 : myString

   4 : for (int i = 0;i < 10; i++)

       System.out.println(i);

jshell>

Of course, variables implicit defined can also be used on other commands, as follows:

jshell> int i = $1 + 1

i ==> 4

jshell>

Editing scripts

JShell also allows us to edit and save scripts – snippets – of code, allowing us to create classes this way. Let’s see how to do it.

JShell comes with a editor, but it is also possible to change the editor for other of your choice. I will change my editor to Vim, using the following command:

jshell> /set editor vim

|  Editor set to: vim

jshell>

Now that our editor is changed, let’s begin by opening the command with the for loop on the editor – on my case, is the command at index 4:

jshell> /edit 4

This will open the snippet on Vim editor. Let’s edit the code as follows and save:

public class MyObject {

public static void myMethod() {

for (int i = 0;i < 10; i++)
System.out.println(i);

}

}

After saving, we will see a message indicating that the class was created:

jshell> /edit 4

|  created class MyObject

0

1

2

3

4

5

6

7

8

9

we can also discard the old code with the /drop command:

/drop 4

Now, let’s try to use our class on the shell:

jshell> MyObject.myMethod()

0

1

2

3

4

5

6

7

8

9

jshell>

As we can see, the code was correctly executed, proving that our class creation was a success.

Importing & Exporting

Importing and exporting is done by the /save and /open commands. Let’s run the following command:

/save <path-to-save>/backup.txt

The result will be a file like the following:

1 + 2
String myString = "Welcome to my JShell!";
myString
int i = $1 + 1;
public class MyObject {

public static void myMethod() {

for (int i = 0;i < 10; i++)
System.out.println(i);

}

}
MyObject.myMethod()

Now, let’s close the shell with the /exit command and open again, cleaning our session.

Now, let’s run the /open command to import our previous commands:

/open <path-to-save>/backup.txt

And finally, let’s run the /list command to see if the commands from our backup were imported:

jshell> /list

   1 : 1 + 2

   2 : String myString = "Welcome to my JShell!";

   3 : myString

   4 : int i = $1 + 1;

   5 : public class MyObject {


       public static void myMethod() {


       for (int i = 0;i < 10; i++)

       System.out.println(i);


       }


       }

   6 : MyObject.myMethod()

jshell>

We can see that our import was a success, successfully importing the commands from the session.

Other commands

Of course there are other commands alongside the ones showed on this post as well. A complete list of all the commands in JShell can be found on JShell’s documentation.

Conclusion

And so we conclude our first glimpse on the new features of Java 9. JShell is a interesting new addition to the Java language, allowing us to quickly test and run Java code. It is not a tool for production use, on my opinion, but it is a good tool for development and learning purposes. Thank you for following me on this post, until next time.


Apache Camel: integrating systems with Java

Standard

Hi, dear readers! Welcome to my blog. On this post, we will talk about Apache Camel, a robust solution for deploying system integrations across various technologies, such as REST, WS, JMS, JDBC, AWS Products, LDAP, SMTP, Elasticsearch etc.

So, let’s get start!

Origin

Apache Camel was created on Apache Service Mix. Apache Service Mix was a project powered by the Spring Framework and implemented following the JBI specification. The Java Business Integration specification specifies a plug and play platform for systems integrations, following the EIP (Enterprise Integration Patterns) patterns.

Terminology

Exchange

Exchanges – or MEPs(Message Exchange Patterns) – are like frames where we transport our data across the integrations on Camel. A Exchange can have 2 messages inside, one representing the input and another one representing the output of a integration.

The output message on Camel is optional, since we could have a integration that doesn’t have a response. Also, a Exchange can have properties, represented as key-value entries, that can be used as data that will be used across the whole route (we will see more about routes very soon)

Message

Messages are the data itself that is transferred inside a Camel route. A Message can have a body, which is the data itself and headers, which are, like properties on a Exchange, key-value entries that can be used along the processing.

One important aspect to keep in mind, however, is that along a Camel route our Messages are changed – when we convert the body with a Type converter, for instance – and when this happens, we lose all our headers. So, Message headers must be seen as ephemeral data, that will not be used through the whole route. For that type of data, it is better to use Exchange properties.

The Message body can de made of several types of data, such as binaries, JSON, etc.

Camel context

The Camel context is the runtime container where Camel runs it. It initializes type converters, routes, endpoints, EIPs etc.

A Camel context has 3 possible status: started, suspended and stopped. When started, the context will serve the routes processing as normal.

When on suspended status, the Camel context will stop the processing – after the Exchanges already on processing are completed – , but keep all the caches, resources etc still loaded. A suspended context can be restarted.

Finally, there’s the stop status. When stopped, the context will stop the processing like the suspended status, but also will release all the resources caches etc, making a complete shutdown. As with the suspended status, Camel will also guarantee that all the Exchanges being processing will be finished before the shutdown.

Route

Routes on Camel are the heart of the processing. It consists of a flow, that start on a endpoint, pass through a stream of processors/convertors and finishes on another endpoint. it is possible to chain routes by calling another route as the final endpoint of a previous route.

A route can also use other features, such as EIPs, asynchronous and parallel processing.

Channel

When Camel executes a route, the controller in which it executes the route is called Channel.

A Channel is responsible for chaining the processors execution, passing the Exchange from one to another, alongside monitoring the route execution. It also allow us to implement interceptors to run any logic on some route’s events, such as when a Exchange is going to a specific Endpoint.

Processor

Processors are the primary extension points on Camel. By creating classes that extend the org.apache.camel.Processor interface, we create programming units that we can use to include our own code on a Camel route, inside a convenient execute method.

Component

A Component act like a factory to instantiate Endpoints for our use. We don’t directly use a Component, we reference instead by defining a Endpoint URI, that makes Camel infer about the Component that it needs to be using in order to create the Endpoint.

Camel provides dozens of Components, from file to JMS, AWS Connections to their products and so on.

Registry

In order to utilize beans from IoC systems, such as OSGi, Spring and JNDI, Camel supplies us with a Bean Registry. The Registry’s mission is to supply the beans referred on Camel routes with the ones create on his associated context, such as a OSGi container, a Spring context etc

Type converter

Type converters, as the name implies, are used in order to convert the body of a message from one type to another. The uses for a converter are varied, ranging from converting a binary format to a String to converting XML to JSON.

We can create our own Type Converter by extending the org.apache.camel.TypeConverter  interface. After creating our own Converter by extending the interface, we need to register it on the Type’s Converter Registry.

Endpoint

A Endpoint is the entity responsible for communicating a Camel Route in or out of his execution process. It comprises several types of sources and destinations as mentioned before, such as SQS, files, Relational Databases and so on. A Endpoint is instantiated and configured by providing a URI to a Camel Route, following the pattern below:

component:option?option1=value1&option2=value2

We can create our own Components by extending the org.apache.camel.Endpoint interface. When extending the interface, we need to override 3 methods, where we supply the logic to create a polling consumer Endpoint, a passive consumer Endpoint and a producer Endpoint.

Lab

So, without further delay, let’s start our lab! On this lab, we will create a route that polls access files from a access log style file, sends the logs to a SQS and backups the file on a S3.

Setup

The setup for our lab is pretty simple: It is a Spring Boot application, configured to work with Camel. Our Gradle.build file is as follows:

apply plugin: 'java'
apply plugin: 'eclipse'
apply plugin: 'org.springframework.boot'
apply plugin: 'maven'
apply plugin: 'idea'

jar {
    baseName = 'apache-camel-handson'
    version = '1.0'
}

project.ext {
    springBootVersion = '1.5.4.RELEASE'
    camelVersion = '2.18.3'

}

sourceCompatibility = 1.8
targetCompatibility = 1.8

repositories {
    mavenLocal()
    mavenCentral()
}

bootRun {
    systemProperties = System.properties
}


dependencies {

    compile group: 'org.apache.camel', name: 'camel-spring-boot-starter', version: camelVersion
    compile group: 'org.apache.camel', name: 'camel-commands-spring-boot', version: camelVersion
    compile group: 'org.apache.camel',name: 'camel-aws', version: camelVersion
    compile group: 'org.apache.camel',name: 'camel-mail', version: camelVersion
    compile group: 'org.springframework.boot', name: 'spring-boot-autoconfigure', version: springBootVersion
    

}
group 'com.alexandreesl.handson'
version '1.0'

buildscript {
    repositories {
        mavenLocal()
        maven {
            url "https://plugins.gradle.org/m2/"
        }
        mavenCentral()
    }
    dependencies {
        classpath("org.springframework.boot:spring-boot-gradle-plugin:1.5.4.RELEASE")
    }
}

And the Java main file is a simple Java Spring Boot Application file, as follows:

package com.alexandreesl.handson;

import org.springframework.boot.SpringApplication;
import org.springframework.boot.autoconfigure.EnableAutoConfiguration;
import org.springframework.boot.autoconfigure.SpringBootApplication;
import org.springframework.context.annotation.ComponentScan;

/**
 * Created by alexandrelourenco on 28/06/17.
 */

@ComponentScan(basePackages = {"com.alexandreesl.handson"})
@SpringBootApplication
@EnableAutoConfiguration
public class ApacheCamelHandsonApp {

    public static void main(String[] args) {
        SpringApplication.run(ApacheCamelHandsonApp.class, args);
    }

}

We also configure a configuration class, where we will register a type converter that we will create on the next section:

package com.alexandreesl.handson.configuration;

import org.apache.camel.CamelContext;
import org.apache.camel.spring.boot.CamelContextConfiguration;
import org.springframework.context.annotation.Bean;
import org.springframework.context.annotation.Configuration;

@Configuration
public class CamelConfiguration {


    @Bean
    public CamelContextConfiguration camelContextConfiguration() {

        return new CamelContextConfiguration() {

            @Override
            public void beforeApplicationStart(CamelContext camelContext) {
               

            }

            @Override
            public void afterApplicationStart(CamelContext camelContext) {

            }

        };

    }

}

We also create a configuration which will create a AmazonS3Client and AmazonSQSClient, that will be used by the AWS-S3 and AWS-SQS Camel endpoints:

package com.alexandreesl.handson.configuration;

import com.amazonaws.auth.BasicAWSCredentials;
import com.amazonaws.internal.StaticCredentialsProvider;
import com.amazonaws.regions.Regions;
import com.amazonaws.services.s3.AmazonS3Client;
import com.amazonaws.services.sqs.AmazonSQSClient;
import org.springframework.beans.factory.annotation.Autowired;
import org.springframework.context.annotation.Bean;
import org.springframework.context.annotation.Configuration;
import org.springframework.core.env.Environment;

@Configuration
public class AWSConfiguration {


    @Autowired
    private Environment environment;

    @Bean(name = "s3Client")
    public AmazonS3Client s3Client() {
        return new AmazonS3Client(staticCredentialsProvider()).withRegion(Regions.fromName("us-east-1"));
    }

    @Bean(name = "sqsClient")
    public AmazonSQSClient sqsClient() {
        return new AmazonSQSClient(staticCredentialsProvider()).withRegion(Regions.fromName("us-east-1"));
    }

    @Bean
    public StaticCredentialsProvider staticCredentialsProvider() {
        return new StaticCredentialsProvider(new BasicAWSCredentials("<access key>", "<secret access key>"));
    }

}

PS: this lab assumes that the reader is familiar with AWS and already has a account. For the lab, a bucket called “apache-camel-handson” and a SQS called “MyInputQueue” were created.

Configuring the route

Now that we have our Camel environment set up, let’s begin creating our route. First, we create a type converter called “StringToAccessLogDTOConverter” with the following code:

package com.alexandreesl.handson.converters;

import com.alexandreesl.handson.dto.AccessLogDTO;
import org.apache.camel.Converter;
import org.apache.camel.TypeConverters;

import java.util.StringTokenizer;

/**
 * Created by alexandrelourenco on 30/06/17.
 */

public class StringToAccessLogDTOConverter implements TypeConverters {

    @Converter
    public AccessLogDTO convert(String row) {

        AccessLogDTO dto = new AccessLogDTO();

        StringTokenizer tokens = new StringTokenizer(row);

        dto.setIp(tokens.nextToken());
        dto.setUrl(tokens.nextToken());
        dto.setHttpMethod(tokens.nextToken());
        dto.setDuration(Long.parseLong(tokens.nextToken()));

        return dto;

    }

}

Next, we change our Camel configuration, registering the converter:

package com.alexandreesl.handson.configuration;

import com.alexandreesl.handson.converters.StringToAccessLogDTOConverter;
import org.apache.camel.CamelContext;
import org.apache.camel.spring.boot.CamelContextConfiguration;
import org.springframework.context.annotation.Bean;
import org.springframework.context.annotation.Configuration;

@Configuration
public class CamelConfiguration {


    @Bean
    public CamelContextConfiguration camelContextConfiguration() {

        return new CamelContextConfiguration() {

            @Override
            public void beforeApplicationStart(CamelContext camelContext) {

                camelContext.getTypeConverterRegistry().addTypeConverters(new StringToAccessLogDTOConverter());

            }

            @Override
            public void afterApplicationStart(CamelContext camelContext) {

            }

        };

    }

}

Our converter reads a String and converts to a DTO, with the following attributes:

package com.alexandreesl.handson.dto;

/**
 * Created by alexandrelourenco on 30/06/17.
 */
public class AccessLogDTO {

    private String ip;

    private String url;

    private String httpMethod;

    private long duration;

    public String getIp() {
        return ip;
    }

    public void setIp(String ip) {
        this.ip = ip;
    }

    public String getUrl() {
        return url;
    }

    public void setUrl(String url) {
        this.url = url;
    }

    public String getHttpMethod() {
        return httpMethod;
    }

    public void setHttpMethod(String httpMethod) {
        this.httpMethod = httpMethod;
    }

    public long getDuration() {
        return duration;
    }

    public void setDuration(long duration) {
        this.duration = duration;
    }

    @Override
    public String toString() {

        StringBuffer buffer = new StringBuffer();
        buffer.append("[");
        buffer.append(ip);
        buffer.append(",");
        buffer.append(url);
        buffer.append(",");
        buffer.append(httpMethod);
        buffer.append(",");
        buffer.append(duration);
        buffer.append("]");

        return buffer.toString();

    }
}

Finally, we have our route, defined on our RouteBuilder:

package com.alexandreesl.handson.routes;

import com.alexandreesl.handson.dto.AccessLogDTO;
import org.apache.camel.LoggingLevel;
import org.apache.camel.spring.SpringRouteBuilder;
import org.springframework.context.annotation.Configuration;

/**
 * Created by alexandrelourenco on 30/06/17.
 */

@Configuration
public class MyFirstCamelRoute extends SpringRouteBuilder {


    @Override
    public void configure() throws Exception {

        from("file:/Users/alexandrelourenco/Documents/apachecamelhandson?delay=1000&charset=utf-8&delete=true")
                .setHeader("CamelAwsS3Key", header("CamelFileName"))
                .to("aws-s3:arn:aws:s3:::apache-camel-handson?amazonS3Client=#s3Client")
                .convertBodyTo(String.class)
                .split().tokenize("\n")
                    .convertBodyTo(AccessLogDTO.class)
                    .log(LoggingLevel.INFO, "${body}")
                    .to("aws-sqs://MyInputQueue?amazonSQSClient=#sqsClient");

    }
}

On the route above, we define a file endpoint that will poll for files on a folder, each 1 second and remove the file if the processing is completed successfully. Then we send the file to Amazon using S3 as a backup storage.

Next, we split the file using a splitter, that generates a string for each line of the file. For each line we convert the line to a DTO, log the data and finally we send the data to a SQS.

Now that we have our code done, let’s run it!

Running

First, we start our Camel route. To do this, we simply run the main Spring Boot class, as we would do with any common Java program.

After firing up Spring Boot, we would receive on our console the output that the route was successful started:

. ____ _ __ _ _
 /\\ / ___'_ __ _ _(_)_ __ __ _ \ \ \ \
( ( )\___ | '_ | '_| | '_ \/ _` | \ \ \ \
 \\/ ___)| |_)| | | | | || (_| | ) ) ) )
 ' |____| .__|_| |_|_| |_\__, | / / / /
 =========|_|==============|___/=/_/_/_/
 :: Spring Boot :: (v1.5.4.RELEASE)

2017-07-01 12:52:02.224 INFO 3042 --- [ main] c.a.handson.ApacheCamelHandsonApp : Starting ApacheCamelHandsonApp on Alexandres-MacBook-Pro.local with PID 3042 (/Users/alexandrelourenco/Applications/git/apache-camel-handson/build/classes/main started by alexandrelourenco in /Users/alexandrelourenco/Applications/git/apache-camel-handson)
2017-07-01 12:52:02.228 INFO 3042 --- [ main] c.a.handson.ApacheCamelHandsonApp : No active profile set, falling back to default profiles: default
2017-07-01 12:52:02.415 INFO 3042 --- [ main] s.c.a.AnnotationConfigApplicationContext : Refreshing org.springframework.context.annotation.AnnotationConfigApplicationContext@475e586c: startup date [Sat Jul 01 12:52:02 BRT 2017]; root of context hierarchy
2017-07-01 12:52:03.325 INFO 3042 --- [ main] trationDelegate$BeanPostProcessorChecker : Bean 'org.apache.camel.spring.boot.CamelAutoConfiguration' of type [org.apache.camel.spring.boot.CamelAutoConfiguration$$EnhancerBySpringCGLIB$$72a2a9b] is not eligible for getting processed by all BeanPostProcessors (for example: not eligible for auto-proxying)
2017-07-01 12:52:09.520 INFO 3042 --- [ main] o.a.c.i.converter.DefaultTypeConverter : Loaded 192 type converters
2017-07-01 12:52:09.612 INFO 3042 --- [ main] roperties$SimpleAuthenticationProperties :

Using default password for shell access: b738eab1-6577-4f9b-9a98-2f12eae59828


2017-07-01 12:52:15.463 WARN 3042 --- [ main] tarterDeprecatedWarningAutoConfiguration : spring-boot-starter-remote-shell is deprecated as of Spring Boot 1.5 and will be removed in Spring Boot 2.0
2017-07-01 12:52:15.511 INFO 3042 --- [ main] o.s.j.e.a.AnnotationMBeanExporter : Registering beans for JMX exposure on startup
2017-07-01 12:52:15.519 INFO 3042 --- [ main] o.s.c.support.DefaultLifecycleProcessor : Starting beans in phase 0
2017-07-01 12:52:15.615 INFO 3042 --- [ main] o.a.camel.spring.boot.RoutesCollector : Loading additional Camel XML routes from: classpath:camel/*.xml
2017-07-01 12:52:15.615 INFO 3042 --- [ main] o.a.camel.spring.boot.RoutesCollector : Loading additional Camel XML rests from: classpath:camel-rest/*.xml
2017-07-01 12:52:15.616 INFO 3042 --- [ main] o.a.camel.spring.SpringCamelContext : Apache Camel 2.18.3 (CamelContext: camel-1) is starting
2017-07-01 12:52:15.618 INFO 3042 --- [ main] o.a.c.m.ManagedManagementStrategy : JMX is enabled
2017-07-01 12:52:25.695 INFO 3042 --- [ main] o.a.c.i.DefaultRuntimeEndpointRegistry : Runtime endpoint registry is in extended mode gathering usage statistics of all incoming and outgoing endpoints (cache limit: 1000)
2017-07-01 12:52:25.810 INFO 3042 --- [ main] o.a.camel.spring.SpringCamelContext : StreamCaching is not in use. If using streams then its recommended to enable stream caching. See more details at http://camel.apache.org/stream-caching.html
2017-07-01 12:52:27.853 INFO 3042 --- [ main] o.a.camel.spring.SpringCamelContext : Route: route1 started and consuming from: file:///Users/alexandrelourenco/Documents/apachecamelhandson?charset=utf-8&delay=1000&delete=true
2017-07-01 12:52:27.854 INFO 3042 --- [ main] o.a.camel.spring.SpringCamelContext : Total 1 routes, of which 1 are started.
2017-07-01 12:52:27.854 INFO 3042 --- [ main] o.a.camel.spring.SpringCamelContext : Apache Camel 2.18.3 (CamelContext: camel-1) started in 12.238 seconds
2017-07-01 12:52:27.858 INFO 3042 --- [ main] c.a.handson.ApacheCamelHandsonApp : Started ApacheCamelHandsonApp in 36.001 seconds (JVM running for 36.523)

PS: Don’t forget it to replace the access key and secret with your own!

Now, to test it, we place a file on the polling folder. For testing, we create a file like the following:

10.12.64.3 /api/v1/test1 POST 123
10.12.67.3 /api/v1/test2 PATCH 125
10.15.64.3 /api/v1/test3 GET 166
10.120.64.23 /api/v1/test1 POST 100

We put a file with the content on the folder and after 1 second, the file is gone! Where did it go?

If we check the Amazon S3 bucket interface, we will see that the file was created on the storage:


Screen Shot 2017-07-01 at 13.12.39

And if we check the Amazon SQS interface, we will see 4 messages on the queue, proving that our integration is a success:

Screen Shot 2017-07-01 at 13.38.12

If we check the messages, we will see that Camel correctly parsed the information from the file, as we can see on the example bellow:

[10.12.64.3,/api/v1/test1,POST,123]

Implementing Error Handling

On Camel, we can implement logic designed for handling errors. These are done by defining routes as well, which inputs are the exceptions fired by the routes.

On our lab, let’s implement a error handling. First, we add a option on the file endpoint that makes the file to be moved to a .error folder when a error occurs, and then we send a email to ourselves to alert of the failure. we can do this by changing the route as follows:

package com.alexandreesl.handson.routes;

import com.alexandreesl.handson.dto.AccessLogDTO;
import org.apache.camel.LoggingLevel;
import org.apache.camel.spring.SpringRouteBuilder;
import org.springframework.context.annotation.Configuration;

/**
 * Created by alexandrelourenco on 30/06/17.
 */

@Configuration
public class MyFirstCamelRoute extends SpringRouteBuilder {


    @Override
    public void configure() throws Exception {

        onException(Exception.class)
                .handled(false)
                .log(LoggingLevel.ERROR, "An Error processing the file!")
                .to("smtps://smtp.gmail.com:465?password=xxxxxxxxxxxxxxxx&username=alexandreesl@gmail.com&subject=A error has occurred!");

        from("file:/Users/alexandrelourenco/Documents/apachecamelhandson?delay=1000&charset=utf-8&delete=true&moveFailed=.error")
                .setHeader("CamelAwsS3Key", header("CamelFileName"))
                .to("aws-s3:arn:aws:s3:::apache-camel-handson?amazonS3Client=#s3Client")
                .convertBodyTo(String.class)
                .split().tokenize("\n")
                    .convertBodyTo(AccessLogDTO.class)
                    .log(LoggingLevel.INFO, "${body}")
                    .to("aws-sqs://MyInputQueue?amazonSQSClient=#sqsClient");

    }
}

Then, we restart the route and feed up a file like the following, that will cause a parse exception:

10.12.64.3 /api/v1/test1 POST 123
10.12.67.3 /api/v1/test2 PATCH 125
10.15.64.3 /api/v1/test3 GET 166
10.120.64.23 /api/v1/test1 POST 10a

After the processing, we can see the console and watch how the error was handled:

2017-07-01 14:18:48.695  INFO 3230 --- [           main] o.a.camel.spring.SpringCamelContext      : Apache Camel 2.18.3 (CamelContext: camel-1) started in 11.899 seconds2017-07-01 14:18:48.695  INFO 3230 --- [           main] o.a.camel.spring.SpringCamelContext      : Apache Camel 2.18.3 (CamelContext: camel-1) started in 11.899 seconds2017-07-01 14:18:48.699  INFO 3230 --- [           main] c.a.handson.ApacheCamelHandsonApp        : Started ApacheCamelHandsonApp in 35.612 seconds (JVM running for 36.052)2017-07-01 14:18:52.737  WARN 3230 --- [checamelhandson] c.amazonaws.services.s3.AmazonS3Client   : No content length specified for stream data.  Stream contents will be buffered in memory and could result in out of memory errors.2017-07-01 14:18:53.105  INFO 3230 --- [checamelhandson] route1                                   : [10.12.64.3,/api/v1/test1,POST,123]2017-07-01 14:18:53.294  INFO 3230 --- [checamelhandson] route1                                   : [10.12.67.3,/api/v1/test2,PATCH,125]2017-07-01 14:18:53.504  INFO 3230 --- [checamelhandson] route1                                   : [10.15.64.3,/api/v1/test3,GET,166]2017-07-01 14:18:53.682 ERROR 3230 --- [checamelhandson] route1                                   : An Error processing the file!2017-07-01 14:19:02.058 ERROR 3230 --- [checamelhandson] o.a.camel.processor.DefaultErrorHandler  : Failed delivery for (MessageId: ID-Alexandres-MacBook-Pro-local-52251-1498929510223-0-9 on ExchangeId: ID-Alexandres-MacBook-Pro-local-52251-1498929510223-0-10). Exhausted after delivery attempt: 1 caught: org.apache.camel.InvalidPayloadException: No body available of type: com.alexandreesl.handson.dto.AccessLogDTO but has value: 10.120.64.23 /api/v1/test1 POST 10a of type: java.lang.String on: Message[ID-Alexandres-MacBook-Pro-local-52251-1498929510223-0-9]. Caused by: Error during type conversion from type: java.lang.String to the required type: com.alexandreesl.handson.dto.AccessLogDTO with value 10.120.64.23 /api/v1/test1 POST 10a due java.lang.NumberFormatException: For input string: "10a". Exchange[ID-Alexandres-MacBook-Pro-local-52251-1498929510223-0-10]. Caused by: [org.apache.camel.TypeConversionException - Error during type conversion from type: java.lang.String to the required type: com.alexandreesl.handson.dto.AccessLogDTO with value 10.120.64.23 /api/v1/test1 POST 10a due java.lang.NumberFormatException: For input string: "10a"]. Processed by failure processor: FatalFallbackErrorHandler[Pipeline[[Channel[Log(route1)[An Error processing the file!]], Channel[sendTo(smtps://smtp.gmail.com:465?password=xxxxxx&subject=A+error+has+occurred%21&username=alexandreesl%40gmail.com)]]]]
Message History---------------------------------------------------------------------------------------------------------------------------------------RouteId              ProcessorId          Processor                                                                        Elapsed (ms)[route1            ] [route1            ] [file:///Users/alexandrelourenco/Documents/apachecamelhandson?charset=utf-8&del] [      9323][route1            ] [convertBodyTo2    ] [convertBodyTo[com.alexandreesl.handson.dto.AccessLogDTO]                      ] [      8370][route1            ] [log1              ] [log                                                                           ] [         1][route1            ] [to1               ] [smtps://smtp.gmail.com:xxxxxx@gmail.com&subject=A error ha                    ] [      8366]
Stacktrace---------------------------------------------------------------------------------------------------------------------------------------
org.apache.camel.InvalidPayloadException: No body available of type: com.alexandreesl.handson.dto.AccessLogDTO but has value: 10.120.64.23 /api/v1/test1 POST 10a of type: java.lang.String on: Message[ID-Alexandres-MacBook-Pro-local-52251-1498929510223-0-9]. Caused by: Error during type conversion from type: java.lang.String to the required type: com.alexandreesl.handson.dto.AccessLogDTO with value 10.120.64.23 /api/v1/test1 POST 10a due java.lang.NumberFormatException: For input string: "10a". Exchange[ID-Alexandres-MacBook-Pro-local-52251-1498929510223-0-10]. Caused by: [org.apache.camel.TypeConversionException - Error during type conversion from type: java.lang.String to the required type: com.alexandreesl.handson.dto.AccessLogDTO with value 10.120.64.23 /api/v1/test1 POST 10a due java.lang.NumberFormatException: For input string: "10a"] at org.apache.camel.impl.MessageSupport.getMandatoryBody(MessageSupport.java:107) ~[camel-core-2.18.3.jar:2.18.3] at org.apache.camel.processor.ConvertBodyProcessor.process(ConvertBodyProcessor.java:91) ~[camel-core-2.18.3.jar:2.18.3] at org.apache.camel.management.InstrumentationProcessor.process(InstrumentationProcessor.java:77) [camel-core-2.18.3.jar:2.18.3] at org.apache.camel.processor.RedeliveryErrorHandler.process(RedeliveryErrorHandler.java:542) [camel-core-2.18.3.jar:2.18.3] at org.apache.camel.processor.CamelInternalProcessor.process(CamelInternalProcessor.java:197) [camel-core-2.18.3.jar:2.18.3]

If we look to the folder, we will see that a .error folder was created and the file was moved to the folder:

Screen Shot 2017-07-01 at 14.25.18

And if we check the mailbox, we will see that we received the failure alert:

Screen Shot 2017-07-01 at 14.27.40

Conclusion

And so we conclude our tour through Apache Camel. With a easy-to-use architecture and dozens of components, it is a highly pluggable and robust option on integration developing. Thank you for following me on this post, until next time.

Learning Presentations: your new channel on Youtube for IT learning!

Standard

Hi, dear readers! Welcome to my blog. This time I want your attention please for a announcement. There’s a group of friends of mine that just started a Youtube channel to share knowledge from each other, and to the world! I have just participated with a talk about TDD and liked very much, for sure I will participate more on the future!

The presentations are on Portuguese at the moment, but the slides are on English, if you could, please stop by and watch our content, I will be very honored with your visit!

thank you

Scala: using functional programming on the JVM – part 3

Standard

Hi, dear readers! Welcome to my blog. On this post, the last on this series, we will continue to see more features from the Scala language. If you haven’t read the previous post, please go to the “programming languages” menu option to find all of the series. So, without further delay, let’s begin!

Collections

Collections, as the name implies, are data structures where we can store and organize data. There is various types of Collections that can be used on the Scala language, all common from any programming language and with all the standard behavior from their types, such as lists, sets and maps.

On the next sections, we will see the major methods that Scala offers us to work with their collections.

So, let’s fire up the Scala REPL and begin!

Filter

As the name, implies, filter can be used to filter data from a collection, generating a subset. Let’s begin by creating a List:

val mylist = List[Integer](1,2,3,4,5)

Next, we create a function that returns if a number is even:

def isEven(n:Integer) = n % 2 == 0

And finally, we used the filter function, printing on console the even numbers:

scala> mylist.filter(n => isEven(n)).foreach(println(_))

2

4

As we can see, it printed only 2 and 4 from our list, proving that our filtering was successful.

One important thing to note on this and the other methods is that none of the methods changes the original collection, they always create and returns a new one, since they are designed to work with immutables. We can check this by printing the list:

scala> print(mylist)

List(1, 2, 3, 4, 5)

Find

The find method is similar to the filter one, but instead of returning a subset, it returns only a element from the collection. The return is a optional, typed from the same type of the element type from the collection.

For this example, we will use the same collection from our previous example. If we wanted to return only the number 2 element and print on console, all we have to do is this:

scala> println(mylist.find(n => n == 2).getOrElse(0))

2

Map

The map is another common method for collections on programming languages. His objective is to take a collection and transform his elements on new elements, that could be from a different type, generating a new collection. Let’s see a example.

On our example, we will take the numbers from our previous list and create a new list, where the numbers are transformed on strings on the format “the number is x”. If we wanted to do this transformation and print the result on console, we can do the following:

scala> mylist.map(n => "the number is " + n).foreach(println(_))

the number is 1

the number is 2

the number is 3

the number is 4

the number is 5

Flatmap

Another interesting method is the flatmap. The flatmap is similar to a map, but with one difference: when used against complex objects of nested collections, this method denormalize the results, generating a flat collection. Let’s see a example.

First we create a class:

case class classA(val a: String, val b : List[String])

Then, we create a list with objects from our class:

scala> val myobjectlist = List(classA("A",List("A","B","C")),classA("B",List("A","C")),classA("C",List("C")),classA("D",List("A","B")))

myobjectlist: List[classA] = List(classA(A,List(A, B, C)), classA(B,List(A, C)), classA(C,List(C)), classA(D,List(A, B)))

Now, let’s see the result on the REPL, if we try to map our list, using only the b attribute:

scala> val mapobjectlist = myobjectlist.map(n => n.b)

mapobjectlist: List[List[String]] = List(List(A, B, C), List(A, C), List(C), List(A, B))

As we can see above, the result is a list of lists. This gives us a extra complexity to iterate over our results, since we will need to access each internal list individually in order to obtain all the elements.

Now let’s see the same result, using flatmap this time:

scala> val mapobjectflatlist = myobjectlist.flatMap(n => n.b)

mapobjectflatlist: List[String] = List(A, B, C, A, C, C, A, B)

Now, the list is flatten to a single List, allowing us to iterate over the elements much easier.

Reduce

Another useful feature when working with collections is the reduce method. With result, as on map’s case, we make a transformation on a list, but on this case, instead of generating a new collection, we aggregate the collection, generating a new value.

The simplest and easier example we can demonstrate is simply summing up the values. If we wanted to sum up all the values from our numeric list, all we need to do is this:

scala> println(mylist.reduce((sum,n) => sum+n))

15

A important thing to take note is that, on this case, the order from which the numbers will be iterate is from left to right. If we would like to explicit this ordering or reverse it, we could do this by using the reduceLeft or reduceRight methods instead.

Fold

Fold is pretty similar to the reduce method, but with a fundamental difference: while reduce obligates us that the result must be from the same type of the source elements, fold doesn’t. Let’s see a example to better understand it.

Let’s suppose that, different from our previous example, we wanted to generate a string from the numbers of our numeric collection, separated by parentheses. We can do this using the following:

scala>  val foldlistStr = mylist.fold("")((sum,n) => sum+"("+n+")")

foldlistStr: Comparable[_ >: Integer with String <: Comparable[_ >: Integer with String <: java.io.Serializable] with java.io.Serializable] with java.io.Serializable = (1)(2)(3)(4)(5)

scala> println(foldlistStr)

(1)(2)(3)(4)(5)

scala>

As we can see, on this case, we not only had to declare the folding method, but also a empty string at beginning. That it was the aggregator variable, which is then used at each iteration to form the aggregation. This is necessary in order to allow Scala to infer what it will be the type of the result of our folding operation.

Conclusion

And so we conclude our trip on the Scala language. I hope I could bring for the reader a glimpse of the language and all his power. While is not as popular as languages such as Java or C#, it is definitely a good language worthy to be considered, specially on distributed systems where it could be used with distributed tools, such as Akka.

Thank you for following me on my series, see you next time!

gRPC: Transporting massive data with Google’s serialization

Standard

Hello, dear readers! Welcome to my blog. On this post, we will delve on Google’s RPC style solution, gRPC and his serialization technique, protocol buffers. But what is gRPC and why it is so useful? Let’s find out!

The escalation of data transfer

When developing APIs, one of the most common ways of implementing the interface is with REST, using HTTP and JSON as transportation protocol and data schema, respectively. At first, there is no problem with this approach, and most of the time we won’t need to change from this kind of stack.

However, the problems begin when we get a API that has a big continuous volume of requests. On a situation like this, the amount of memory used on tasks like data transportation could begin to be a burden on the API, making calls more and more slow.

It is on this scenario that gRPC comes in handy. With a server-client model and a serialization technique from Google’s that allows us to shrink the amount of resources used on remote calls, we can scale more capacity per API instance, making our APIs more powerful.

This comes with a price, however: operations like debugging get more difficult on this scenario, because gRPC encapsulates the transportation logic on Google’s solution that utilizes binary serialization to do the transportation, so it is not as easily debuggable as a common plain REST/JSON application.

RPC

RPC is a acronym for Remote Procedure Call, a old model that was much used on the past. On that model, a client-server solution is developed, where the details of transport are abstracted from the developer, been responsible only for implementing the server and client inner logic. Famous RPC models were CORBA, RMI and DCOM.

Despite the name, gRPC only has the concept of a client-server application in common with the old solutions, that suffered from problems such as incompatible protocols between each other, alongside with not offering more advanced techniques from today, such as streams. Their solutions reminds more of the classical request-response model, from the first days of the web.

gRPC

So what is gRPC? This is Google’s approach to a client-server application that takes principles from the original RPC. However, gRPC allows us to use more sophisticated technologies such as HTTP2 and streams. gRPC is also designed as technology-agnostic, which means that can be used and interacted with server and clients from different programming languages.

With gRPC we develop gRPC services, which are generated based on a proto file we provide. Using the proto file, gRPC generates for us a server and a stub (some languages just call it a client) where we develop our server and client logic. The following diagram, taken from gRPC documentation, represents the client-server schematics:

grpc-1

As we can see on the diagram, gRPC supplies us with different types of languages to choose from to develop /expose our gRPC services. At the time of this post, gRPC supports Java, C++, Python, Objective-C, C#, a lite-runtime (Android Java), Ruby, JavaScript and Go – using the golang/protobuf library.

Protocol Buffers

Protocol buffer is gRPC’s serialization mechanism, which allows us to send compressed messages between our services, allowing us in turn to process more data with less network roundtrips between the parts.

According to Protocol Buffers documentation, Protocol Buffers messages offers the following advantages, if we compare to a traditional data schema such as XML:

  • are simpler
  • are 3 to 10 times smaller
  • are 20 to 100 times faster
  • are less ambiguous
  • generate data access classes that are easier to use programmatically

The Protocol Buffers framework supplies us with several code generators for different programming languages. If we want to develop on Java, for instance, we download Protocol Buffers for Java, then we model a proto file where we design the schema for the messages we will transport and then we generate code using the protoc compiler.

The compiler will generate code for us in order to use for serialize/deserialize data on the format we provided on the proto file.

Types of gRPC applications

gRPC applications can be written using 3 types of processing, as follows:

  • Unary RPCs: The simplest type and more close to classical RPC, consists of a client sending one message to a server, that makes some processing and returns one message as response;
  • Server streams: On this type, the client sends one message for the server, but receives a stream of messages from the server. The client keeps reading the messages from the server until there is no more messages to read;
  • Client streams: This type is the opposite of the server streams one, where on this case is the client who sends a stream of messages to make a request for the server and them waits for the server to produce a single response for the series of request messages provided;
  • Bidirecional stream RPC: This is the more complex but also more dynamic of all the types. On this model, we have both client and server reading and writing on streams, which are stablished between the server and client. This streams are independent from each other, which means that could be possible for a client to send a message to a server by one stream and vice-versa at the same time. This allows us to make multiple processing scenarios, such as clients sending all the messages before the responses, clients and servers “ping-poinging” messages between each other and so on.

Synch vs. Asynch

As the name implies, synchronous processing occurs when we have a communication where the client thread is blocked when a message is sent and is been processed.

Asynchronous processing occurs when we have this communication with the processing been done by other threads, making the whole process been non-blocking.

On gRPC we have both styles of processing supported, so it is up to the developer to use the better approach for his solutions.

Deadlines & timeouts

A deadline stipulates how much time a gRPC client will wait on a RPC call to return before assuming a problem has happened. On the server’s side, the gRPC services can query this time, verifying how much time it has left.

If a response couldn’t be received before the deadline is met, a DEADLINE_EXCEEDED error is thrown and the RPC call is terminated.

RPC termination

On gRPC, both clients and servers decide if a RPC call is finished or not locally and independently. This means that a server can decide to end a call before a client has transmitted all their messages and a client can decide to end a call before a server has transmitted one or all of their responses.

This point is important to remember specially when working with streams, in a sense that logic must pay attention to possible RPC terminations when treating sequences of messages.

Channels

Channels are the way a client stub can connect with gRPC services on a given host and port. Channels can be configured specific by client, such as turning message compression on and off for a specific client.

Tutorial

On this lab we will implement a gRPC service, test by making some calls and experimenting a little with streams. It will get us a feel and a head start on how to develop solutions using gRPC.

Set up

For this lab we will use Python 3.4. For the coding, I like to use Pycharm, is a really good IDE for Python that the reader can find it here.

For containerization I used Docker 17.03.1-ce. I also recommend you create a virtual environment for the lab, using virtualenv.

Let’s create a new virtual environment for our lab. On a terminal, let’s type the following:

virtualenv --python=python3.4 -v grpc-handson

After running the command, we will see that a folder was created. That is our virtual environment.

To install gRPC, first we enable the virtual environment on our terminal session. we do this by typing the following, assuming we are inside the virtual environment’s folder:

source ./bin/activate

This will change our terminal, that will now show a prefix with our env’s name, showing it is enabled.

Now on to the installation. First, let’s install gRPC with pip by typing:

python -m pip install grpcio

We also need to install gRPC tools. This tools are responsible for installing the protoc compiler which we will use later on the lab. We install it by typing:

python -m pip install grpcio-tools

That’s it! Now that we have our environment, let’s start with the development.

Creating the gRPC Service definition

First, we create a gRPC Service definition. We create this by coding a proto file, which will have the following:

syntax = "proto3";

option java_multiple_files = true;
option java_package = "com.alexandreesl.handson";
option java_outer_classname = "MyServiceProto";
option objc_class_prefix = "HLW";

package handson;


service MyService {

    rpc MyMethod1 (MyRequest) returns (MyResponse) {
    }

    rpc MyMethod2 (MyRequest) returns (MyResponse) {
    }

}

message MyRequest {
    string name = 1;
    int32 code = 2;
}

message MyResponse {
    string name = 1;
    string sex = 2;
    int32 code = 3;
}

This file is based on examples from the official gRPC repo – you can find the link at the end of this post. Alongside setting some properties such as the service’s package, we defined a service with 2 methods and 2 schemas for the protocol buffers, used by the methods.

With the proto file created (let’s save it as my_service.proto), it is time for us to use gRPC to create the code.

Generating gRPC code

To generate the code, let’s run the following command, with our virtual environment enabled and on the same folder of the proto file:

 python -m grpc_tools.protoc -I. --python_out=. --grpc_python_out=. my_service.proto

After running the command, we will see 2 files created, as we can see bellow:

grpc-2

PS: The source code for our lab can be found at the end of the post.

Building the server

Now that we have our code generated, let’s begin our work. Let’s begin by creating the server side.

The code from our command is auto-generated, so is not a good practice to code on them. Instead, for the server we will extend the servicer class, so we implement our own gRPC service without editing generated code.

Let’s create a file called gRPC_server.py and add the following code:

import time
from concurrent import futures

import grpc

import my_service_pb2 as my_service_pb2
import my_service_pb2_grpc as my_service_pb2_grpc

_ONE_DAY_IN_SECONDS = 60 * 60 * 24


class gRPCServer(my_service_pb2_grpc.MyServiceServicer):
    def __init__(self):
        print('initialization')

    def MyMethod1(self, request, context):
        print(request.name)
        print(request.code)
        return my_service_pb2.MyResponse(name=request.name, sex='M', code=123)

    def MyMethod2(self, request, context):
        print(request.name)
        print(request.code * 12)
        return my_service_pb2.MyResponse(name=request.name, sex='F', code=1234)


def serve():
    server = grpc.server(futures.ThreadPoolExecutor(max_workers=10))
    my_service_pb2_grpc.add_MyServiceServicer_to_server(
        gRPCServer(), server)
    server.add_insecure_port('[::]:50051')
    server.start()
    try:
        while True:
            time.sleep(_ONE_DAY_IN_SECONDS)
    except KeyboardInterrupt:
        server.stop(0)


if __name__ == '__main__':
    serve()

On the code above we created a class that it is a subclass of the class generated by the protoc compiler. We can see that in order to get the request’s parameters, all we have to do is navigate from the request object. To generate a response, all we have to do is instantiate the appropriate class.

We also coded the serve method, where we created a server with 10 worker threads to serve requests and initialized with the class we created to implement the server-side.

To start the server, all we have to do is run:

python gRPC_server.py

And from now on, unless we kill the process, it will be answering on the 50051 port.

Now that we created the server, let’s begin the work on the client.

Constructing the client

In order to consume the server, we need to create a client for our stub. Let’s do this.

Let’s create a file called gRPC_client.py and code the following:

import grpc

import my_service_pb2 as my_service_pb2
import my_service_pb2_grpc as my_service_pb2_grpc


class gRPCClient():
    def __init__(self):
        channel = grpc.insecure_channel('localhost:50051')
        self.stub = my_service_pb2_grpc.MyServiceStub(channel)

    def method1(self, name, code):
        print('method 1')
        return self.stub.MyMethod1(my_service_pb2.MyRequest(name=name, code=code))

    def method2(self, name, code):
        print('method 2')
        return self.stub.MyMethod2(my_service_pb2.MyRequest(name=name, code=code))


def main():
    print('main')

    client = gRPCClient()

    print(client.method1('Alexandre', 123))
    print(client.method2('Maria', 123))


if __name__ == '__main__':
    main()

As we can see, is really simple to create a client: we just needed to establish a channel and instantiate a stub with it. Once instantiated, we just need to call the methods on the stub as we normally would do with any Pythonic object.

Now that we have the coding done, let’s test some calls!

Making the call

To test a call, let’s first start the server. With a terminal session opened and our virtual environment enabled, let’s start the server, by entering the command we talked about earlier:

python gRPC_server.py

And on another terminal, started like the previous one, we call the client by typing:

python gRPC_client.py

After firing up the client, we will see that the client produced the following output:

main
method 1
name: "Alexandre"
sex: "M"
code: 123

method 2
name: "Maria"
sex: "F"
code: 1234

And on the server terminal, we can see the following output:

initialization
Alexandre
123
Maria
1476

Success! We have implemented our first gRPC service. Now, let’s wrap it up our lab by seeing the last topics: using streams and containerization.

Using streams

To learn about streams, let’s add a new method, that it will be a bidirectional streaming.

First, let’s change the proto file, creating a new method, like the following:

syntax = "proto3";

option java_multiple_files = true;
option java_package = "com.alexandreesl.handson";
option java_outer_classname = "MyServiceProto";
option objc_class_prefix = "HLW";

package handson;


service MyService {

    rpc MyMethod1 (MyRequest) returns (MyResponse) {
    }

    rpc MyMethod2 (MyRequest) returns (MyResponse) {
    }

    rpc MyMethod3 (stream MyRequest) returns (stream MyResponse) {
    }

}

message MyRequest {
    string name = 1;
    int32 code = 2;
}

message MyResponse {
    string name = 1;
    string sex = 2;
    int32 code = 3;
}

That’s right, this is everything we need to do. After generating the files from the proto again, we need to modify our server to reflect the changes. We do this modifying the file as follows:

import time
from concurrent import futures

import grpc

import my_service_pb2 as my_service_pb2
import my_service_pb2_grpc as my_service_pb2_grpc

_ONE_DAY_IN_SECONDS = 60 * 60 * 24


class gRPCServer(my_service_pb2_grpc.MyServiceServicer):
    def __init__(self):
        print('initialization')

    def MyMethod1(self, request, context):
        print(request.name)
        print(request.code)
        return my_service_pb2.MyResponse(name=request.name, sex='M', code=123)

    def MyMethod2(self, request, context):
        print(request.name)
        print(request.code * 12)
        return my_service_pb2.MyResponse(name=request.name, sex='F', code=1234)

    def MyMethod3(self, request_iterator, context):
        for req in request_iterator:
            print(req.name)
            print(req.code)

            yield my_service_pb2.MyResponse(name=req.name, sex='M', code=123)


def serve():
    server = grpc.server(futures.ThreadPoolExecutor(max_workers=10))
    my_service_pb2_grpc.add_MyServiceServicer_to_server(
        gRPCServer(), server)
    server.add_insecure_port('[::]:50051')
    server.start()
    try:
        while True:
            time.sleep(_ONE_DAY_IN_SECONDS)
    except KeyboardInterrupt:
        server.stop(0)


if __name__ == '__main__':
    serve()

As we can see, the new MyMethod3 receives a iterator of request messages and also send a series of responses as well, by using the yield keyword, which teaches Python to create a generator from our function. We can read more about the yield keyword on this link.

Now we modify the client. We also use a generator with the yield keyword, but on this case, we make the generator create each item at random time intervals, to simulate a real life application with data entering at intervals. The response stream is read with a simple for loop, that it will continue to run until there is no data to output:

import random
import time

import grpc

import my_service_pb2 as my_service_pb2
import my_service_pb2_grpc as my_service_pb2_grpc


class gRPCClient():
    def __init__(self):
        channel = grpc.insecure_channel('localhost:50051')
        self.stub = my_service_pb2_grpc.MyServiceStub(channel)

    def method1(self, name, code):
        print('method 1')
        return self.stub.MyMethod1(my_service_pb2.MyRequest(name=name, code=code))

    def method2(self, name, code):
        print('method 2')
        return self.stub.MyMethod2(my_service_pb2.MyRequest(name=name, code=code))

    def method3(self, req):
        print('method 3')
        return self.stub.MyMethod3(req)


def generateRequests():
    reqs = [my_service_pb2.MyRequest(name='Alexandre', code=123), my_service_pb2.MyRequest(name='Maria', code=123),
            my_service_pb2.MyRequest(name='Eleuterio', code=123), my_service_pb2.MyRequest(name='Lucebiane', code=123),
            my_service_pb2.MyRequest(name='Ana Carolina', code=123)]

    for req in reqs:
        yield req
        time.sleep(random.uniform(2, 4))


def main():
    print('main')

    client = gRPCClient()

    print(client.method1('Alexandre', 123))
    print(client.method2('Maria', 123))

    res = client.method3(generateRequests())

    for re in res:
        print(re)


if __name__ == '__main__':
    main()

If we restart the server and run the new client, we will receive the following output:

main
method 1
name: "Alexandre"
sex: "M"
code: 123

method 2
name: "Maria"
sex: "F"
code: 1234

method 3
name: "Alexandre"
sex: "M"
code: 123

name: "Maria"
sex: "M"
code: 123

name: "Eleuterio"
sex: "M"
code: 123

name: "Lucebiane"
sex: "M"
code: 123

name: "Ana Carolina"
sex: "M"
code: 123


Process finished with exit code 0

Please note that all this calls were made using the synchronous approach, so the client thread is locked each time a call is made. If we wanted to call the server asynchronously, we would use Python’s futures to do so. I suggest the reader to explore this option as a post-lab exercise.

Running gRPC on Docker

Finally, we would want to run our gRPC server on a Docker container. That is a very simple task to do.

First, let’s create a Dockerfile like the following:

FROM grpc/python:1.0-onbuild
CMD [ "python", "./gRPC_server.py" ]

Yup, that’s all! This is a official image from gRPC which makes a pip install on a requirements file and adds the current directory on the container, so we don’t need to add the files ourselves. Let’s build the container:

docker build -t alexandreesl/grpc-lab .

And finally, launch it with our image:

docker run --rm -p 50051:50051 alexandreesl/grpc-lab

If we run again the client, we will see that the server was successfully started. If the reader want, you can also start the container directly by a image I created on Docker Hub for this lab, already built with the source code from our lab. To pull the image, just type the following:

docker pull alexandreesl/grpc-lab

Conclusion

And so we concludes another journey on our great world of technology. I hope I could help the reader to understand what is gRPC and how it can be used to improve our capacity on high demanding API scenarios. Thank you for following me on this post, see you next time.

Continue reading

Scala: using functional programming on the JVM – part 2

Standard

Hi, dear readers! Welcome to my blog. On this post, we will continue to see more features from the Scala language, such as abstract classes, traits and optionals. If you haven’t read the previous post, please go to the “programming languages” menu option to find all of the series. So, without further delay, let’s begin!

Abstract classes

Abstract classes on Scala are just like in any other OO language, that is, they are classes that have methods without implementation, that must be implemented by other classes in order to be used.

On Scala, we can create a abstract class like this, for example:

abstract class MyAbstractClass {
 def methodA(str: String): Set[String]
}

On this code, we are creating a abstract class MyAbstractClass and declaring a method called methodA which has a string as parameter and returns a Set of strings.

In order to implement the class, we could have a class as follows:

class MyAbstractClassImpl extends MyAbstractClass {
 
 def methodA(str: String): Set[String] = ???

}

On this code, we are extending the abstract class – on Scala, like Java, we can’t have multiple inheritance, so we can just extend one class – and provide a empty implementation for the method, with the keyword ???. This keyword produces the equivalent on Java as when we create a method that throws a NotImplementedError. We can see this if we try to instantiate and call the method, which will give us the following output:

scala.NotImplementedError: an implementation is missing

at scala.Predef$.$qmark$qmark$qmark(Predef.scala:284)

at MyAbstractClassImpl.methodA(MyAbstractClassImpl.scala:3)

at Main$.delayedEndpoint$Main$1(Myscript.scala:17)

at Main$delayedInit$body.apply(Myscript.scala:1)

at scala.Function0.apply$mcV$sp(Function0.scala:34)

at scala.Function0.apply$mcV$sp$(Function0.scala:34)

at scala.runtime.AbstractFunction0.apply$mcV$sp(AbstractFunction0.scala:12)

at scala.App.$anonfun$main$1$adapted(App.scala:76)

at scala.collection.immutable.List.foreach(List.scala:378)

at scala.App.main(App.scala:76)

at scala.App.main$(App.scala:74)

at Main$.main(Myscript.scala:1)

at Main.main(Myscript.scala)

at sun.reflect.NativeMethodAccessorImpl.invoke0(Native Method)

........omitted........

On the next post on the series, we will see how Scala’s inheritance mechanisms work on more detail. For now, let’s move on to our next topic, Traits.

Traits

Traits can be thought out like interfaces. With traits, we can create several different contracts to standardize our classes, while also providing default implementations for any method that requires it – just like default methods from Java 8 onwards.

To create a trait with 2 methods, one with a implementation and one without it, we can code like this:

trait MyLogger {
 
 def logPrintln(msg: String): Unit = println(msg)

 def log(msg: String): Unit

}

On this code, we declared 2 methods that receive a string as parameter and have void returns, one with a implementation and one without it. To test multiple traits inheritance, let’s create another trait as follows:

trait MyMathLibrary {
 
 def add(a: Double, b: Double): Double = a + b

}

If we wanted our previous class to implement our traits as well, we could just change the code as follows:

class MyAbstractClassImpl extends MyAbstractClass with MyLogger with MyMathLibrary {
 
def methodA(str: String): Set[String] = Set[String]("a","b","c")

def log(msg: String): Unit = { 

 println("this log is the same as the other method")
 println(msg)

 }

}

On the code we see that we chained the traits with the with keyword. We also provided a implementation for the abstract class’s method so we don’t receive a not implemented exception anymore.


Sealed traits & classes

Another cool feature from Scala are sealed classes and traits. If we want a class or trait to be prohibited of been extended outside of their own source file, we use the keyword sealed. This is particularly useful when implementing libraries, in order to prevent users from the library from changing the behavior of the library.

To seal a class or trait, we just change like this:

sealed abstract class MyAbstractClass {
 def methodA(str: String): Set[String]
}

Now, if we try to compile our code, we will receive the following error:

MyAbstractClassImpl.scala:1: error: illegal inheritance from sealed class MyAbstractClass

class MyAbstractClassImpl extends MyAbstractClass with MyLogger with MyMathLibrary {

                                  ^

one error found

Showing that our seal was successful. To allow our class to compile again without removing the seal, the only way is moving the abstract class to the same file of the implementation, like the following:

sealed abstract class MyAbstractClass {
 def methodA(str: String): Set[String]
}

class MyAbstractClassImpl extends MyAbstractClass with MyLogger with MyMathLibrary {
 
def methodA(str: String): Set[String] = Set[String]("a","b","c")

def log(msg: String): Unit = {

println("this log is the same as the other method")
 println(msg)

}

}

If we try to compile again, we will see that now our class can compile again as normal.

Optionals

Optionals on Scala are called options. With options, we can create code that it is resilient, since we won’t need to worry about shielding our code from null values.

When working with options, we can instantiate the Option type using 2 alternatives:

  • Some(value): the Some keyword allows us to return a value on optionals;
  • None: the None keyword allow us to represent the null value, that is, the absence of value;

Also, with options, we have two ways to get a value:

  • get: using this method, we receive the value inside the option, or a NoSuchElementException if the value is null;
  • getOrElse(value): using this method, we receive the value inside the option, or the value passed by parameter if the value is null. This way, we can guarantee a default value in case the data doesn’t exist;

Let’s see a example. On our REPL, let’s create a Map:

val mymap = Map(
 ("1", "value 1"),
 ("2", "value 2")
 )

Next we get values from the map. If we try to get values that exist and don’t exist on the map with the getOrElse method, we receive this output on console:

Welcome to Scala 2.12.1 (Java HotSpot(TM) 64-Bit Server VM, Java 1.8.0_73).
Type in expressions for evaluation. Or try :help.

scala> val mymap = Map(
 | ("1", "value 1"),
 | ("2", "value 2")
 | )
mymap: scala.collection.immutable.Map[String,String] = Map(1 -> value 1, 2 -> value 2)

scala> val value1 = mymap.get("1")
value1: Option[String] = Some(value 1)

scala> val value2 = mymap.get("2")
value2: Option[String] = Some(value 2)

scala> val value3 = mymap.get("3")
value3: Option[String] = None

scala> val value4 = mymap.get("4")
value4: Option[String] = None

scala> println(value1.getOrElse("X"))
value 1

scala> println(value2.getOrElse("X"))
value 2

scala> println(value3.getOrElse("X"))
X

scala> println(value4.getOrElse("X"))
X

scala>

This shows that optionals are a viable option on dealing with optional values on the Scala language.

Error handling

As any other language, Scala also have a error handling system. Like Java, Scala also use exceptions as forms to encapsulate errors. Previously we have seen the ??? keyword and how we receive a NotImplementedError if we try to use a method with that keyword. If we wanted to explicit do what the keyword encapsulates, we could do this:

def methodA(str: String): Set[String] = throw new NotImplementedError()

We can see that it is pretty much very straightforward from anyone who has a background on Java. The catching of exceptions are very similar to Java also, like on the following code, supposing that our method throws several types of exceptions:

try {
 methodA("test")
} catch {
 case e: IOException => println("IO exception")
 case e: Exception => println("general exception")
 case _ => println("general error")
}

Of course, we also have the finally block, that could be used as follows:

try {
 methodA("test")
} catch {
 case e: IOException => println("IO exception")
 case e: Exception => println("general exception")
 case _ => println("general error")
} finally {
 println("this executes no matter what")
}

Did you notice the “_”? That keyword was used to catch not only exceptions, but also error. On Scala we have a exception hierarchy that it is pretty much very similar to his Java counterpart, with two classes, Error and Exception, that extends from a root class called Throwable.

However, there is a key difference: Scala doesn’t have checked exceptions. That means we don’t have exceptions marked on method’s signatures as throwable neither we have the obligation to catch any exceptions that are thrown by a method. This can be considered a bad thing specially when we don’t known all the details from a code we are consuming, but it gives us flexibility to catch the exceptions wherever we want to.

Inheritance on Scala

On Scala, we have 3 types of inheritance, as follows:

  • Invariant: invariant inheritance means that only the exact type is allowed;
  • Covariant: covariant inheritance means that only the exact type and their subclasses are allowed;
  • Contravariant: contravariant inheritance means that only the exact type and their superclasses are allowed;

When using generics on Scala we use square brackets ([]).  When declaring the generic type, we could indicate if it is covariant or contravariant using the “+” and “-” symbols respectively. So, if we wanted to create a generic class to be used for a class and their subclasses, we could declare as:

class mygenericclass[+T](val id: T)

And on the opposite side, if we wanted the class to be using a class and their superclasses, we could declare as:

class mygenericclass[-T](val id: T)

On functions, however, there is a role that must be always remembered: On functions, all the parameters are contravariant, that is, they accept values from the declared type or supertypes, and the return is always covariant, in other words, it accepts values from the declared type or their subtypes.

Implicits

One last feature we will visit on this lab are implicits. With implicits, we can wrap it up classes that already exists with new features, without needing to extend or overload the original class. Even classes from the standard libraries can be wrapped this way!

Let’s see a example. On the REPL, we create a class like this:

case class myclass(val a:String, val b:String)

Now, let’s try to instantiate and use a print method on the class:

scala> val instance = new myclass("a","b")

instance: myclass = myclass(a,b)

scala> instance.print

<console>:13: error: value print is not a member of myclass

       instance.print

                ^

scala>

Of course, we got a error, since this method doesn’t exist. Now, we create a wrapper class:

implicit class myclasswrapper(mycl:myclass) { def print = println(mycl.a+mycl.b) }


Notice the implicit keyword? That means our class was created as a implicit, meaning that if we try to invoke the print method again:

scala> instance.print

ab

It will now work, as Scala is implicit converting our class to a myclasswrapper. Please note that, before Scala 2.10, we would need to create a method with the implicit keyword and make the wrapping by hand, instead of the useful declaration on the class level.

It is important to take caution, however, of not abusing of implicits, since we can change the behavior of basically everything on the language, making a application very unpredictable if the feature is overused!

Conclusion

And that concludes our second part on the Scala series. Next, on our last part, we will learn about collections and all that we can benefit from it. Thank you for your attention, until next time!

Scala: using functional programming on the JVM – part 1

Standard

Hello, dear readers! Welcome to my blog. On this post, we will talk about Scala, a powerful language that combines the object paradigm with the functional paradigm. Scala is used on several modern solutions, such as Akka.

Scala is a JVM-based language, which means that Scala programs are transformed in Java bytecode and them are run with the JVM. This guarantees that the robust JVM is used on the background, leaving us to use the rich Scala language for programming.

This is a 3-part series focused on learning the basis of the language. On this first part we will set up our environment and learn about the Scala type system, vars, vals, classes, case classes, objects, companion objects and pattern matching. On the other parts, we will learn other features such as traits, optionals, error handling, inheritance on Scala, collection-related operations such as map, folder, reduce and more. Please don’t miss out!

So, without further delay, let’s begin our journey on the Scala language!

Setting up

In order to prepare our lab environment, first we need to install Scala. You can download the last version of Scala – this lab is using Scala 2.12.1 – on this link. If you are using Mac and homebrew, the installation is as simple as running the following command:

brew install scala

In order to test the installation, run the command:

scala -version

This will print something like the following:

Scala code runner version 2.12.1 -- Copyright 2002-2016, LAMP/EPFL and Lightbend, Inc.

REPL

The REPL is a interactive shell for running Scala programs. The name stands for the sequence of operations it realizes: Read-Eval-Print-Loop. It reads information inputed by the user, evaluates the instruction, prints the result and start over (loops). In order to use the Scala REPL, all we have to do is type scala on a terminal. This will open the REPL shell, like the following snippet:

Welcome to Scala 2.12.1 (Java HotSpot(TM) 64-Bit Server VM, Java 1.8.0_73).

Type in expressions for evaluation. Or try :help.

scala>

When we are done with the REPL, all we have to do is press Crtl+C. Another way of running Scala programs is by creating Scala scripts (.scala files). When using Scala scripts, we first compile the script using the scalac command.

This hints a important thing to notice about Scala: Scala is not dynamic typed. It has some similarities in syntax with languages like Python, but we have to remember that it is static typed, as we will see on the next section.

Scala type system

As we talked before, Scala is compiled, opposed to other languages such as Python, Clojure etc. This means that when we write programs on Scala, the interpreter infers the type of a variable (immutable or not) by the type of value that it is attributed to. Let’s see this in action.

Let’s open the Scala REPL. We type var number=0 and hit enter. The following will be printed on our console:

scala> var number=0

number: Int = 0

As we can notice, the variable was defined as a integer, since we attributed a number to it. The reader could be thinking “but this is exactly like a dynamic typed language!”. It appears so at first, but here is a catch: if we try to change the variable to another type of value, this happens:

scala> number="a string"

:12: error: type mismatch;

 found   : String("a string")

 required: Int

       number="a string"

              ^
scala>

The interpreter throws a error, saying that the variable we defined previously is a integer, so we can’t change to a string, for instance. This is fundamentally different from dynamic typed languages, where we can change the type of a variable as much as we like.

This could be seen as a weak point depending on the point of view, but must be more seeing as a design choice: using a strong typed scheme, we have more security about knowing what exactly to expect from each variable in use on the system.

This is particularly important on the functional paradigm, where we normally use more immutable variables them mutable ones, as we will talk about on the next section. One last thing before we go: although we can use the interpreter inference to create the variables, we can also explicitly define the type during the creation, like with the following variable:

scala> var number2: Int = 1

number2: Int = 1

scala>

Var vs. Val

On Scala, we can declare variables using 2 keywords: var and val. The creation code on the 2 options is essentially the same, but there’s a primary difference between the 2: vars can have theirs values changed during their lifecycles, while vals can’t.

That means vals are immutable. The closest equivalent example we can have on Java code is a constant, which means that once declared, his value will never be changed again.

When working with the functional programming paradigm, essentially we use immutables most of the time. With immutables, we have the security that our functions will always behave as intended, since a function won’t change the data, making new runs with the same parameters always returns the same results.

Let’s test if vals can’t really be changed. Let’s create a string typed val, with the following code:

val mystring = "this is a string"

Then, we try to change the string. When we do this, we will receive the following:

scala> mystring = "this is a new string"

:12: error: reassignment to val

       mystring = "this is a new string"

                ^

scala>

The interpreter has complained that we are trying to change a val, proving that vals are indeed immutable.

Classes

On Scala, everything runs on a object. That’s why despite the fact that Scala allows us to develop using the functional paradigm, we can’t say that Scala is a pure functional programming language, like Haskell, for example.

On Scala’s object hierarchy, the root class for all classes is called Any. This class has 2 subclasses: AnyValue and AnyRef. AnyValue is the root class for primitive values such as integers, floats etc – all primitives on Scala are internally wrappers. AnyRef is for classes that are not primitives, like the classes we will develop on the lab, for example.

So, let’s create our first class! to do this, let’s create a file called Myclass.scala and enter the following code:

class Myclass(val myvalue1: Int, val myvalue2: String)

That’s right. All we have to do is this one line of code, and we have a complete class at our disposal! On this line, we created a class called Myclass, with 2 attributes: myvalue1 and myvalue2. Not only that, with this line we created a constructor that receives the 2 attributes as parameters and getter accessors. All of this with just one line!

The reason because Scala created the attributes to be set at object creation is because we declared the attributes as immutables. If we had declared them as vars, then Scala would have created setter accessors as well.

Since we are talking about constructors, it is important to know that we can also overload the constructor, by defining the constructor with the keyword this. For example, if we would like to have the option of a constructor that don’t need to pass the attributes, instead using default values, we could change the class like this:

class Myclass(val myvalue1: Int, val myvalue2: String) {

  def this() = this("", "")

}

Case classes

Another interesting thing about classes are case classes. With case classes, we have a class that has already coded the hashCode, equals and toString methods. How do we do this? Simple, by modifying our class as follows:

case class Myclass(val myvalue1: Int, val myvalue2: String) {

  def this() = this("", "")

}

That’s all we have to do, we just have to include the keyword case and the methods are implemented with a default implementation. That is another good example of how Scala can simplify the developer’s life.

Objects

We talked earlier about how everything on Scala are classes. However, there are cases when we want a class to have only one instance on the entire system. We commonly call this type of class Singletons. To achieve this on Scala, we declare objects.

Objects are like classes on their body, just that they can’t be instantiated, since they already are instances. Let’s create a simple Hello World script in order to learn how to create objects.

Let’s create a file called Myscript.scala. On the file, we code this:

object Myscript extends App {

print("Hello World!")

}

And then we compile with scalac Myscript.scala. When running with scala Myscript, we get the following on the console:

Hello World!%

The App that we extended with is the hint for Scala that this object is the main script for our Scala application to run. We will see more about inheritance on future parts of this series.

Companion objects

Companion objects are like the ones we just saw previously, with just one big difference: this objects must have the same name of a class, be declared on the same file of that class and they have access to attributes and methods from that class, even the private ones.

The use of companion classes could be to create factory methods. One example of this use is the case classes we saw before, that create methods such as toString for us. Internally, when we declare case classes, Scala creates a companion object for that class.

Pattern matchers

The last feature we will talk about are pattern matchers. With pattern matchers, we can run pieces of codes by case statements, similar with switch clauses on Java. Let’s see a example.

We will use the Myclass class we created earlier. Let’s suppose we have a scenario where we want to perform a different print depending on the value of the myvalue1 attribute and print the value itself if it doesn’t fit on any of the clauses. We can do this by coding the following:

object Myscript extends App {

case class Myclass(val myvalue1: Int, val myvalue2: String)

val myclass = new Myclass(1,"Myvalue2")

val result = myclass match {
 case Myclass(1, _) => "this is value 1"
 case Myclass(2, _) => "this is value 2"
 case m => s"$m"
 }

print(result)

}

On the code above, we stated that if we have a class with the value 1 as first attribute – the second one is defined with the “_” keyword, which means that we are accepting any value for that attribute – we output the string “this is value 1”, the string “this is value 2” for the 2 value and we will output the values from the class itself for any other value. If we run the code above, we will receive this message on the terminal:

this is value 1%

Showing that our code is correct. One important thing to notice, due to good practices recommended for Scala, is that when using pattern matchers, when you get the content from the variable been matched – the case of our last clause – always use lower-case only names. That is because when declaring the name starting with a upper-case letter, the Scala interpreter will try to find a variable with that name, instead of creating a new one. So, always remember to use lower-case variables on this cases.

Conclusion

And that concludes our first trip to the Scala language. On our next parts, we will see more interesting features of the language, such as traits, inheritance and optionals. Stay tuned!

Thanks you for your attention, until next time.