Hello, dear readers! Welcome to another post from my blog. On this post, we will talk about the virtualization technology called Docker, which gained a ton of popularity this days, specially when we talk about Microservices architectures. But after all, what it is virtualization?
Virtualization
Virtualization, as the name implies, consists in the use of software to emulate any part of a environment, ranging from hardware components to a entire OS. In this world, there is several traditional technologies such as VMWare, Virtualbox, etc. This technologies, however, use hypervisors, which creates a intermediate layer responsible for isolating the virtual machine from the physical machine.
On containers, however, we don’t have this hypervisor layer. Instead, containers run directly on top of the kernel itself of the host machine they are running. This leads to a much more lightweight virtualization, allowing us to run a lot more VMs on a single host then we could do with a hypervisor.
Of course that using virtualization with hypervisors over containers has his benefits too, such as more flexibility – since you can’t for example run a windows container from a linux machine – and security, since this shared kernel approach leads to a scenario where if a attacker invades the kernel, he automatically get access to all the containers provided by that kernel, although we can say the same if the attacker invades the hypervisor of a machine running some VMs. This is a very heated debate, which we can find a lot of discussion by the Internet.
The fact is that containers are here to stay and his lightweight implementation provides a very good foundation for a lot of applications, such as a Microservices architecture. So, without further delay, let’s begin do dive in on Docker, one of the most popular container engines on the market today.
Docker Architecture
Docker was developed by Docker inc (formerly DotCloud inc) as a open-source engine for deployment of applications on containers. By providing a logical layer that manages the lifecycle of the containers, we can focus our development on the applications themselves, leaving the implementation of the container management to Docker.
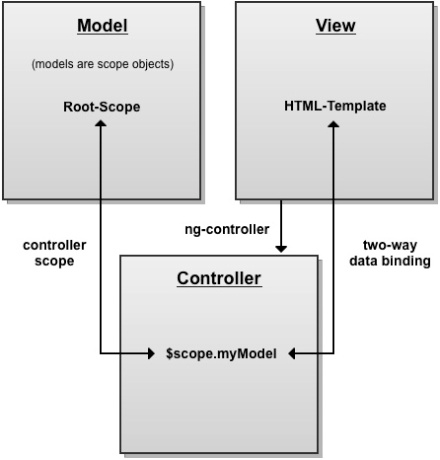
The Docker architecture consists of a client-server model, where we have a Docker client, that could be the command line one provided by Docker, or a consumer of the RESTFul API also provided on the toolset, and the Docker server, also known as Docker daemon, which receives requests to create/start/stop containers, been responsible for the container management. The diagram bellow illustrates this architecture:

On the image above we can see the Docker clients connecting to the daemon, making requests to start/stop/create containers etc. We can also see that the daemon is communicating with a image repository and using images while processing the requests. What are those images for? That’s what we will find out on the next section.
Containers & Images
When we talk about containers on Docker, we talk about processes running from instructions that were set on images. We can understand images as the building blocks from which containers are build, that way organizing the building of containers on a Docker environment.
This images are distributed on repositories, also known as a docker registry, which in turn are versioned using git. The main repository for the distribution of Docker images is, of course, the Docker Hub, managed by Docker itself.
A interesting thing is that the code behind the Docker Hub is open, so it is perfectly possible to host your own image repository. To know more about this, please visit:
github.com/docker/distribution
Docker Union File System
If the reader is familiar with traditional virtualization with hypervisors, he could be thinking: “How Docker manages the file system so the images didn’t get ‘dirt’ from the files generated on the executions of all the created containers?”. This could be even worse when we think that images can be inherited from other images, making a whole image tree.
The answer for this is how Docker utilizes the file system, with a file system called Union File System. On this system, each image is layered as a read-only layer. The layers are then overlapped on top of each other and finally on top of the chain a read-write layer is created, for the use of the container. This way, none of the image’s file systems are altered, making the images clean for use across multiple containers.
Using Docker in other OS
Docker is designed for use on Linux distributions. However, for use as a development environment, Docker inc released a Docker Toolbox that allows it to run Docker both on OSX and Windows environments as well.
In order to do this, the toolbox install virtualbox inside his distribution, as well as a micro linux VM, that only has the minimum kernel packages necessary for the launch of containers. This way, when we launch the terminal of the toolbox, the launcher starts the VM on virtualbox, starting Docker inside the VM.
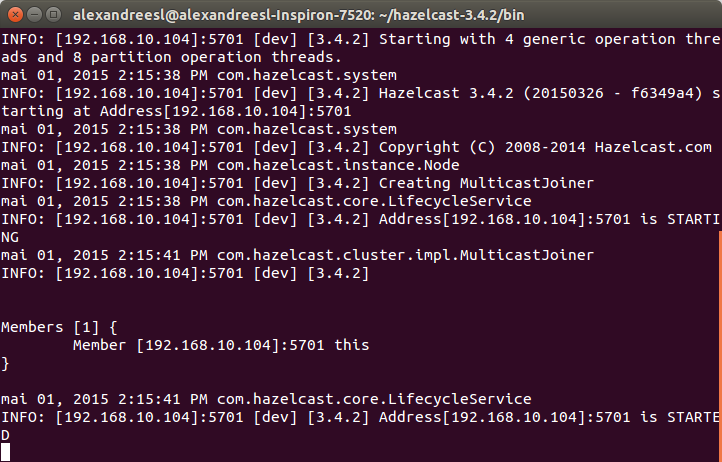
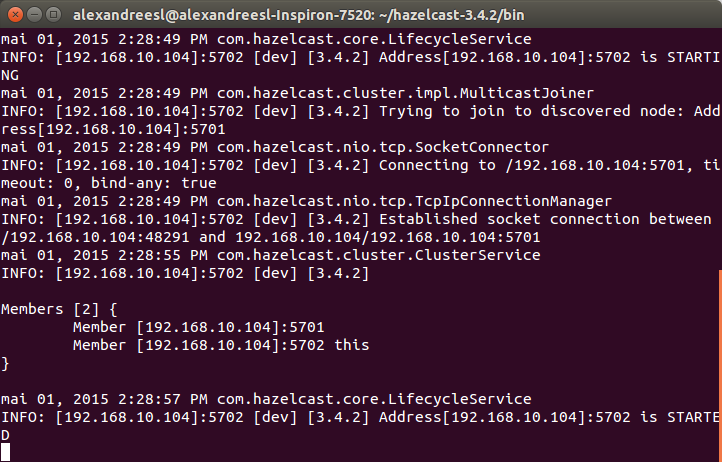
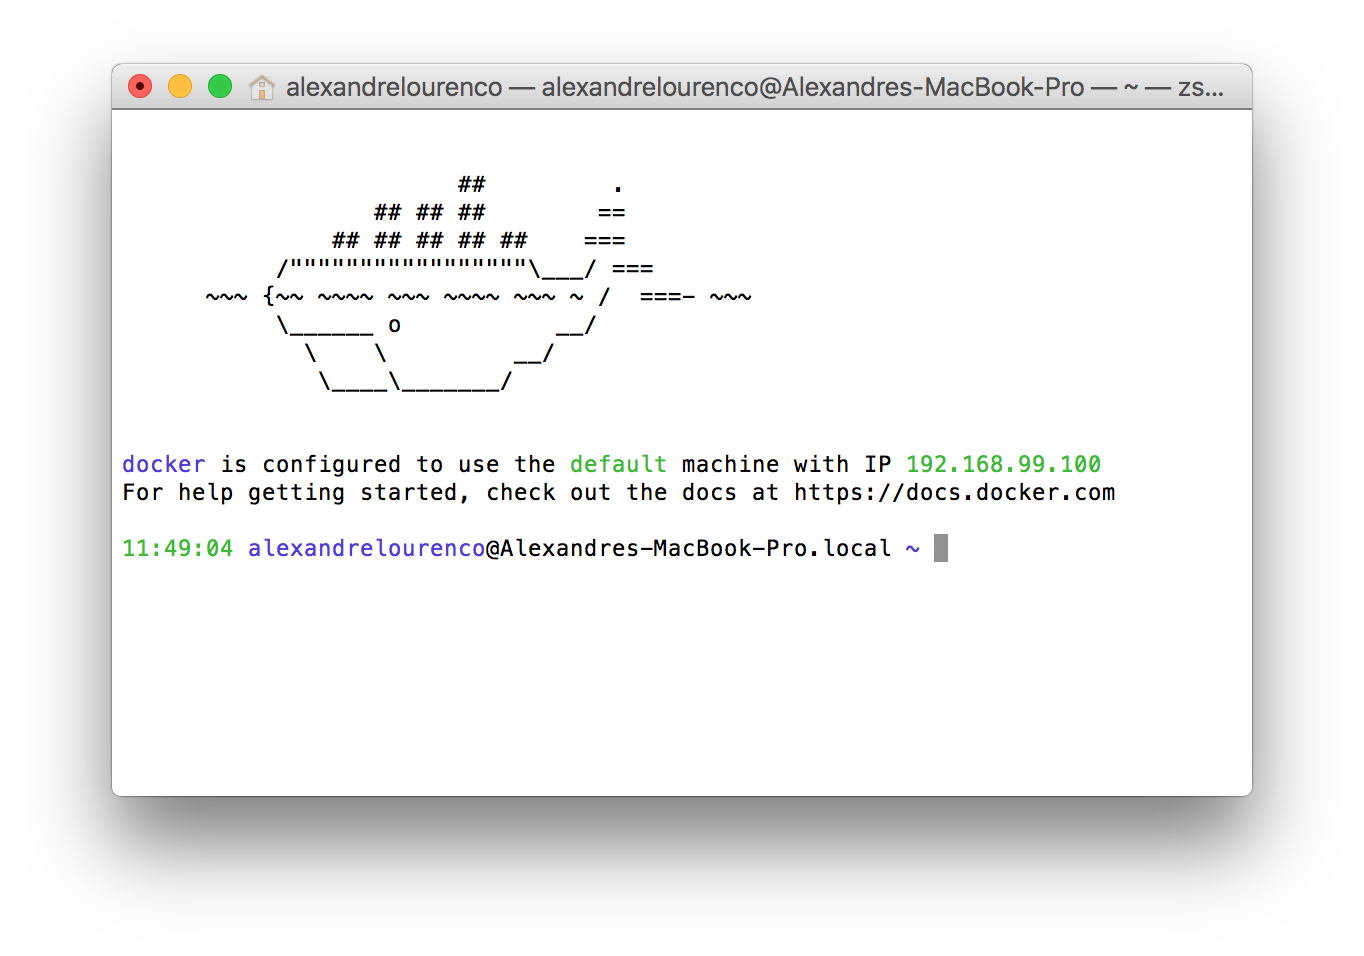
One important thing to notice is that, when we launch Docker this way, we can’t use localhost anymore when we want to access Docker from the same host it is running, since it is binded to a specific ip. We can see the ip Docker is bind to by the initialization messages, as we can see on the image bellow, from a Docker installation on OSX:
Another thing to notice is that, when we use docker on OSX or Windows, we don’t need to use sudo to execute the commands, while on Linux we will need to execute the commands as root. Another way to use Docker that removes the need to use sudo is by having a group called ‘docker’ on the machine, which will make docker apply the permissions necessary to run docker without sudo to the group. Notice, however, that users from this group will have root permissions, so caution is required.
Docker commands
Well, now that we get the concepts out of the way, let’s start using Docker!
As said before, Docker uses image repositories to resolve the images it needs to run the containers. Let’s begin by running a simple container, to make a famous ‘hello world!’, Docker style.
To do this, let’s open a terminal – or the Docker QuickStart Terminal on other OS – and type:
docker run ubuntu echo 'hello, Docker!'
This is the run command, which creates a new container each time is called. On the command above, we simply asked Docker to create a new container, using the image ubuntu – if it doesn’t have already, Docker will search Docker Hub for the latest version of the image and download it. If we wanted to use a specific version, we could specify like this: ‘ubuntu:14.04’ – from Docker Hub. At the end, we specify a command for the container to run, on this case, a simple “echo ‘hello world!’ “.
The image bellow show the command in action, downloading the image and executing:
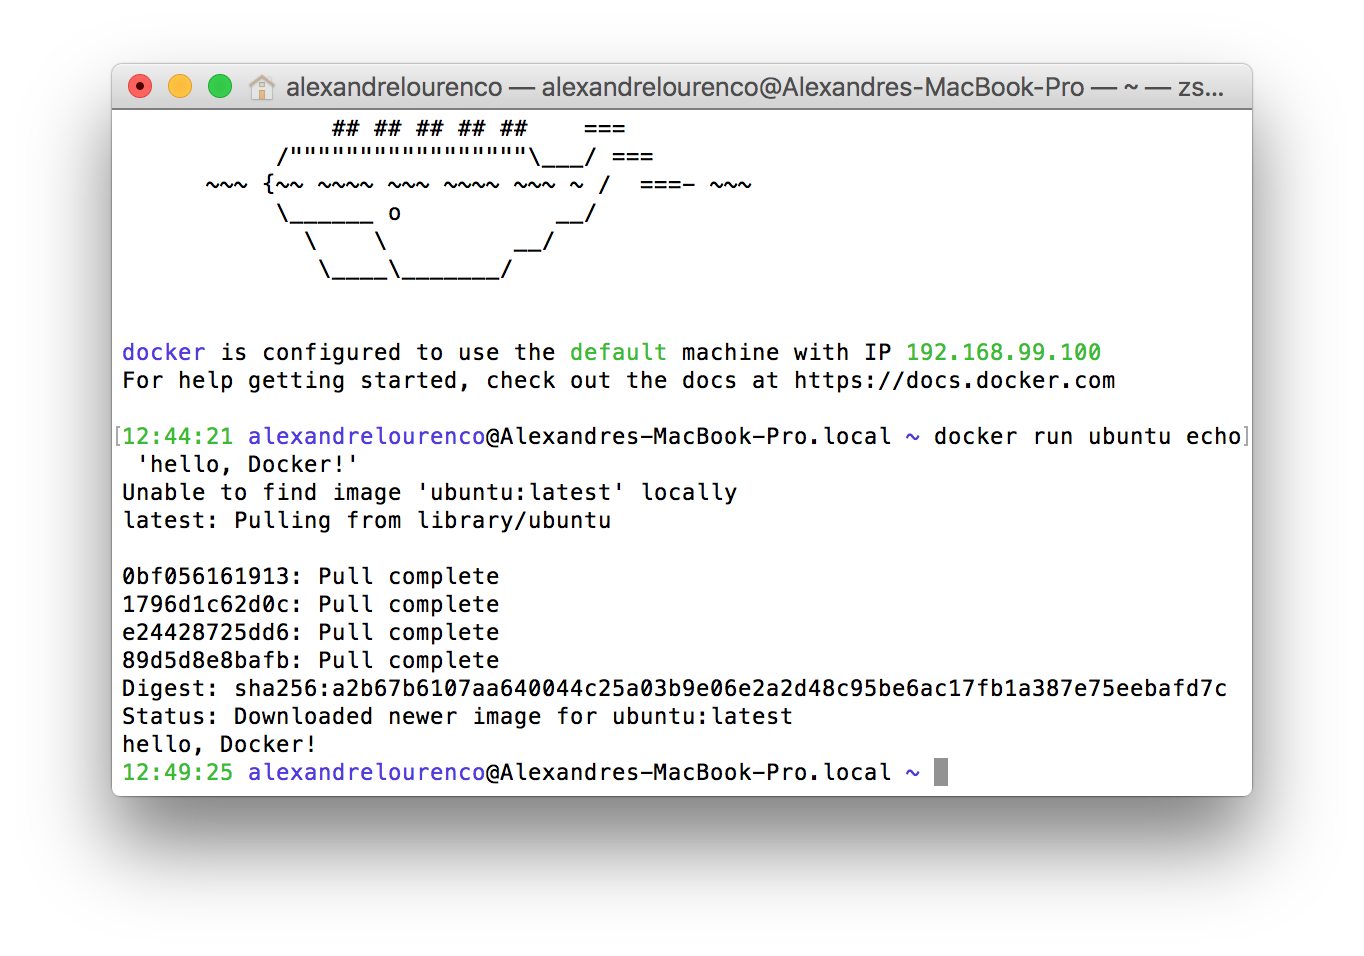
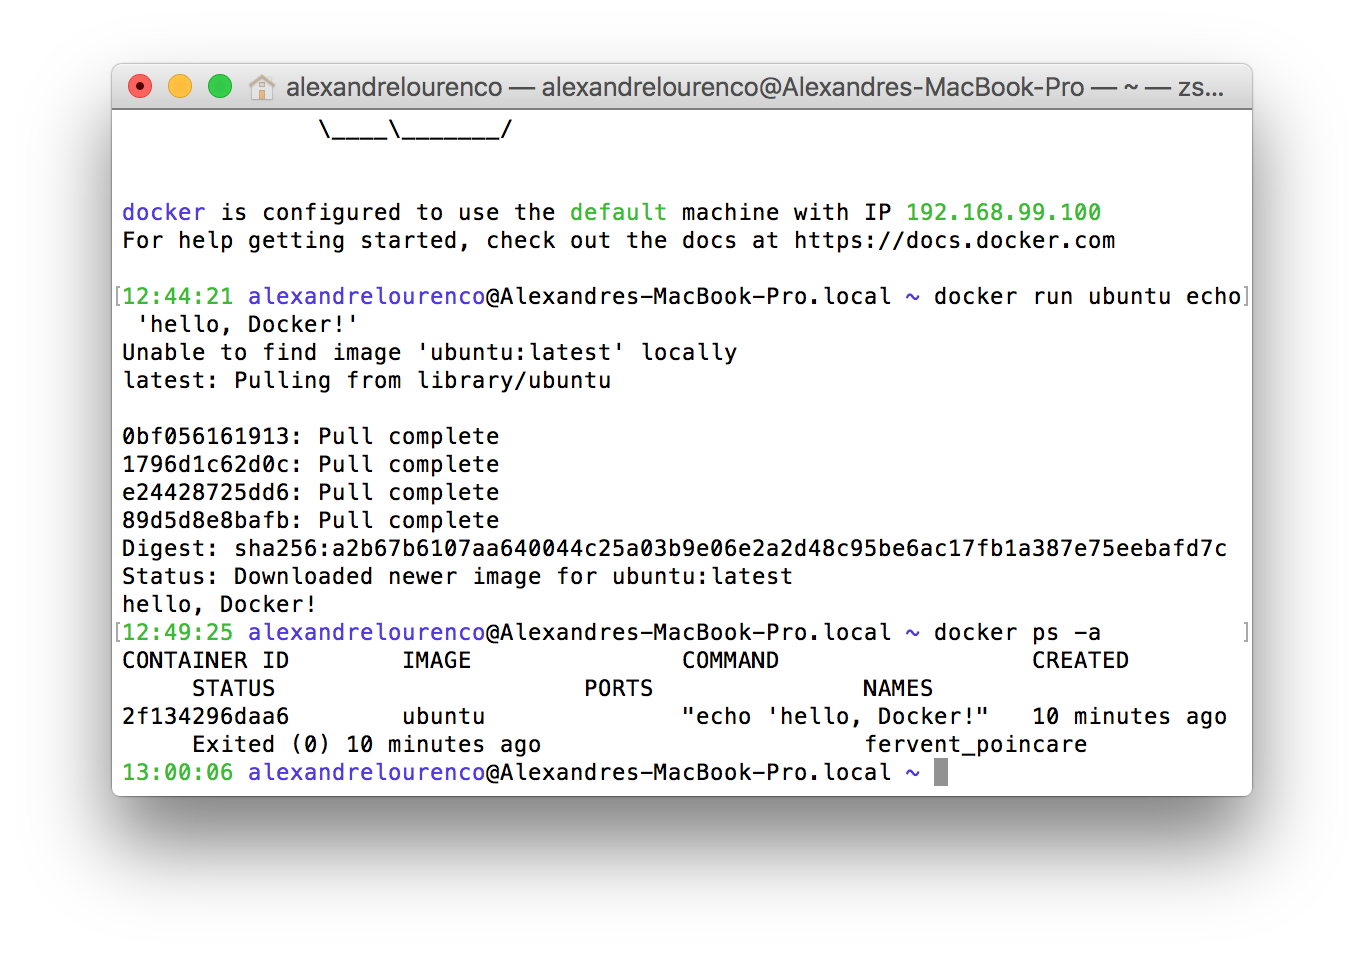
To list the containers created, we run the command ‘docker ps’. If we run the command this way now, however, we won’t see anything, because the command by default only shows the active containers and on our case, our container simply stopped after running the command. If we run the command with the flag -a, we can then see the stopped containers, like the image bellow:
However, there’s a problem: our hello world container was just a test, so we didn’t want to keep with the container. Let’s correct this by removing the container, with the command:
docker rm 2f134296daa6
PS: The hash you can see on the command is part of the ID of the container, that you can see when you list the containers with docker ps.
Now, what about if we wanted to run again our hello world container, or any other container that we need just once, without the need to manually remove the container afterwards? We can do this using the –rm flag, running like this:
docker run --rm ubuntu echo 'hello, Docker!'
If we run docker ps -a again, after running the command above, we can see that there’s no containers from our previous execution, proving that the flag worked correctly.
Let’s now do a little more complex example, starting a container with a Tomcat server. First, let’s search for the name of the image we want on Docker Hub. To do this, open a browser and type it:
https://hub.docker.com
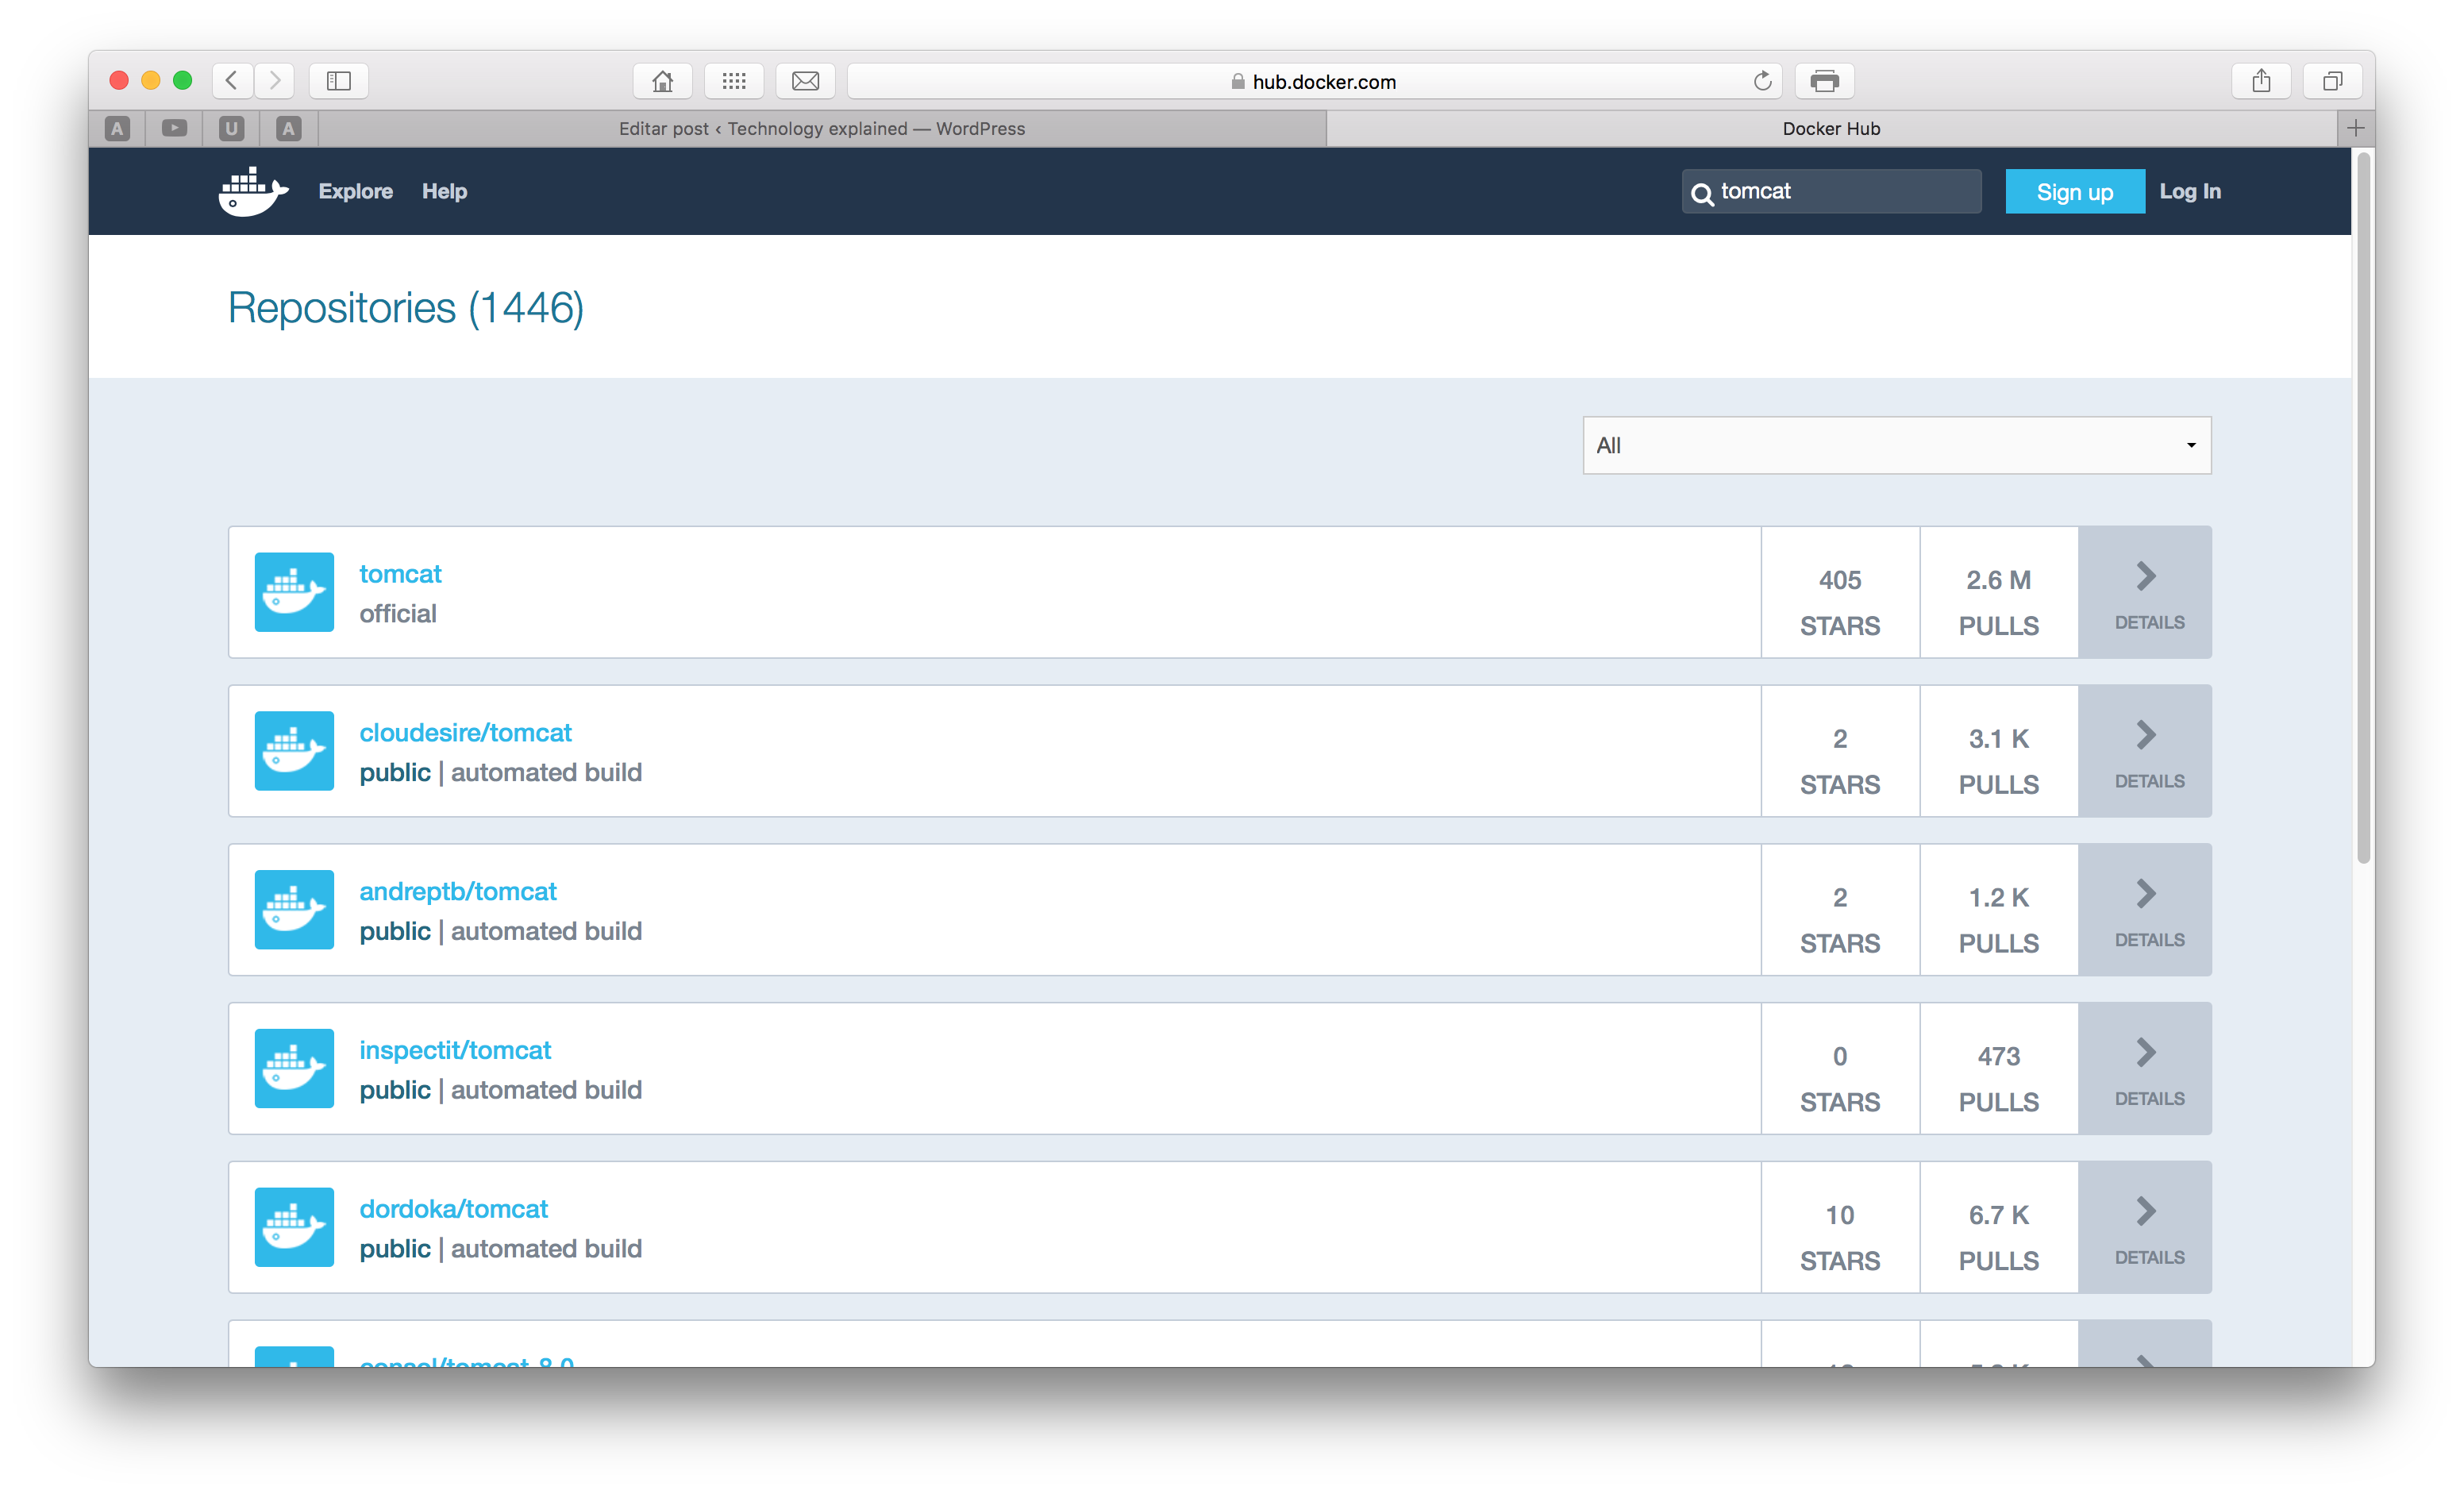
Once inside the Docker Hub, let’s search for the image typing ‘tomcat’ on the search box on the top right corner of the site. We will be send to a screen like the one bellow. You can see the images with some classifiers like ‘official’ and ‘automated’.
Official means that the image is maintained by Docker itself, while automated means that the image is maintained by a CI workload.On the section ‘Publishing on Docker Hub’ we will understand more about the options to publish our own images to the Docker Hub.
From the Docker Hub we get that the name of the official image is ‘tomcat’, so let’s use this image. To use it, we simply run the following command, which will start a new container with the tomcat image:
docker run --name mytomcat -p 8888:8080 tomcat:8.0
You can see that we used some new flags on this command. First, we used the flag –name, which makes a name for our container, so we can refer to this name when running commands afterwards.
The -p flag is used to bind a port from the host machine to a port on the container. On the next sections, we will talk about creating our own images and we will see that we can expose ports from the container to be accessed by clients, like in this case that we exposed the port tomcat will serve on the container (8080) to the port 8888 of the host.
Lastly, when declaring the image we will use, we specified the version, 8.0, meaning that we want to use Tomcat 8.0. Note that we didn’t passed any command to the container, since the image is already configured to start the Tomcat server after the building. After running the command, we can see that tomcat is running inside our container:
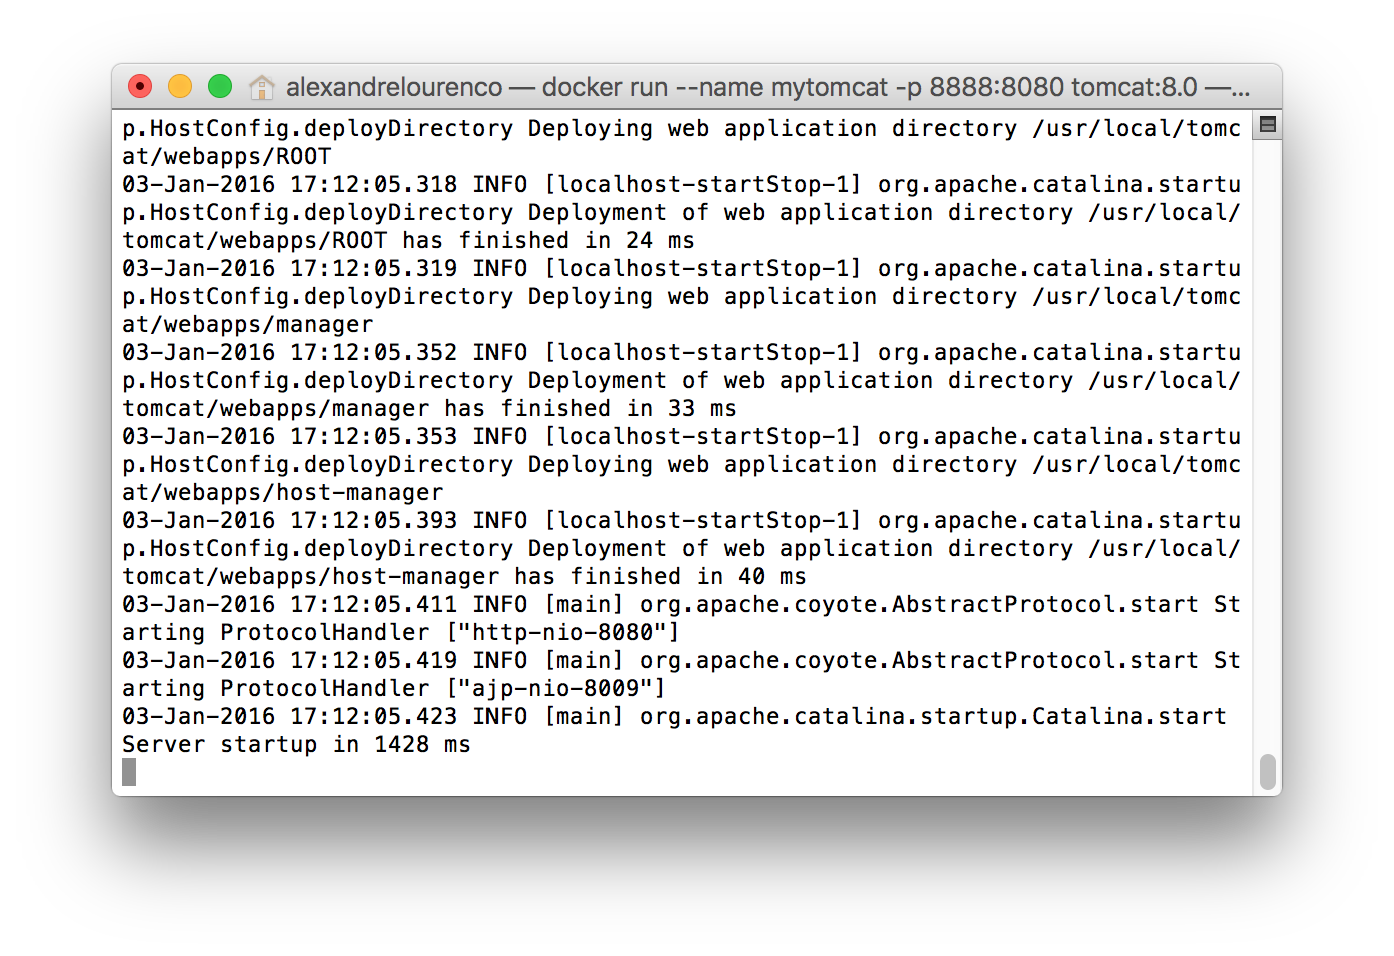
The problem is that now our terminal is occupied by the tomcat process so we can’t issue more commands. Let’s press Crtl+C and type the docker ps command. The container is not active! the reason for this is that, by default, Docker don’t put the containers to run in background when we create a new container. To do this, we use the -d flag, so on the previous command, all we had to do is include this flag to make the container start on background.
Let’s start the container again with the command docker start:
docker start mytomcat
After the start, we can see that the container is running, if we run docker ps:
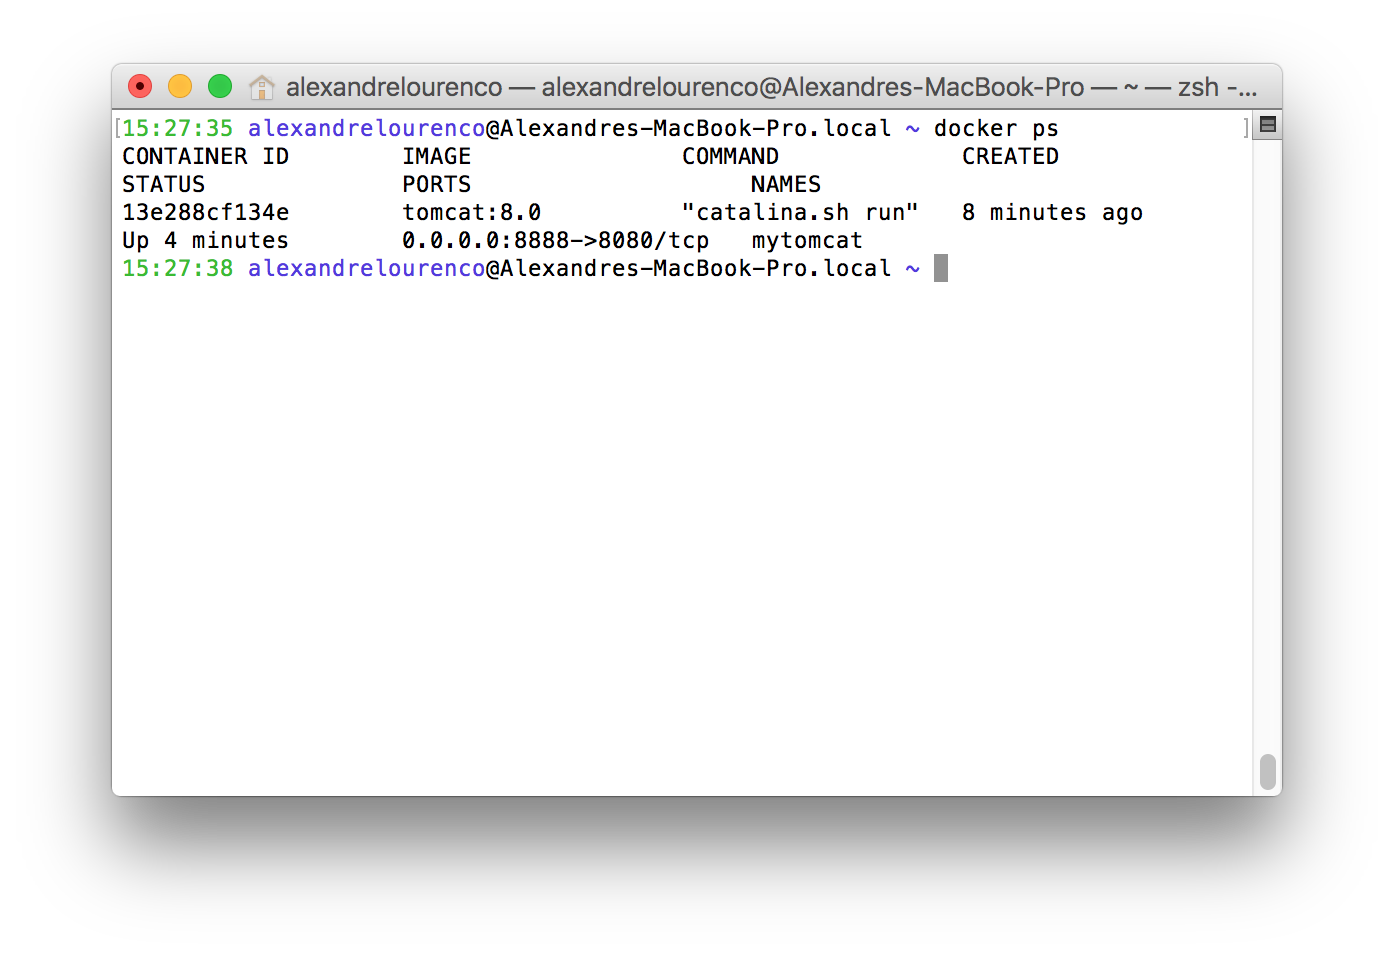
Before we open the server on the browser, let’s just check if the container is exposed on the port we defined. To do this, we use the command:
docker port mytomcat
This command will return the following result:
8080/tcp -> 0.0.0.0:8888
Which means that the container is exposed on the port 8888, as defined. If we open the browser on localhost:8888 – or the ip binded by Docker on a non-linux environment – we will receive the following screen:
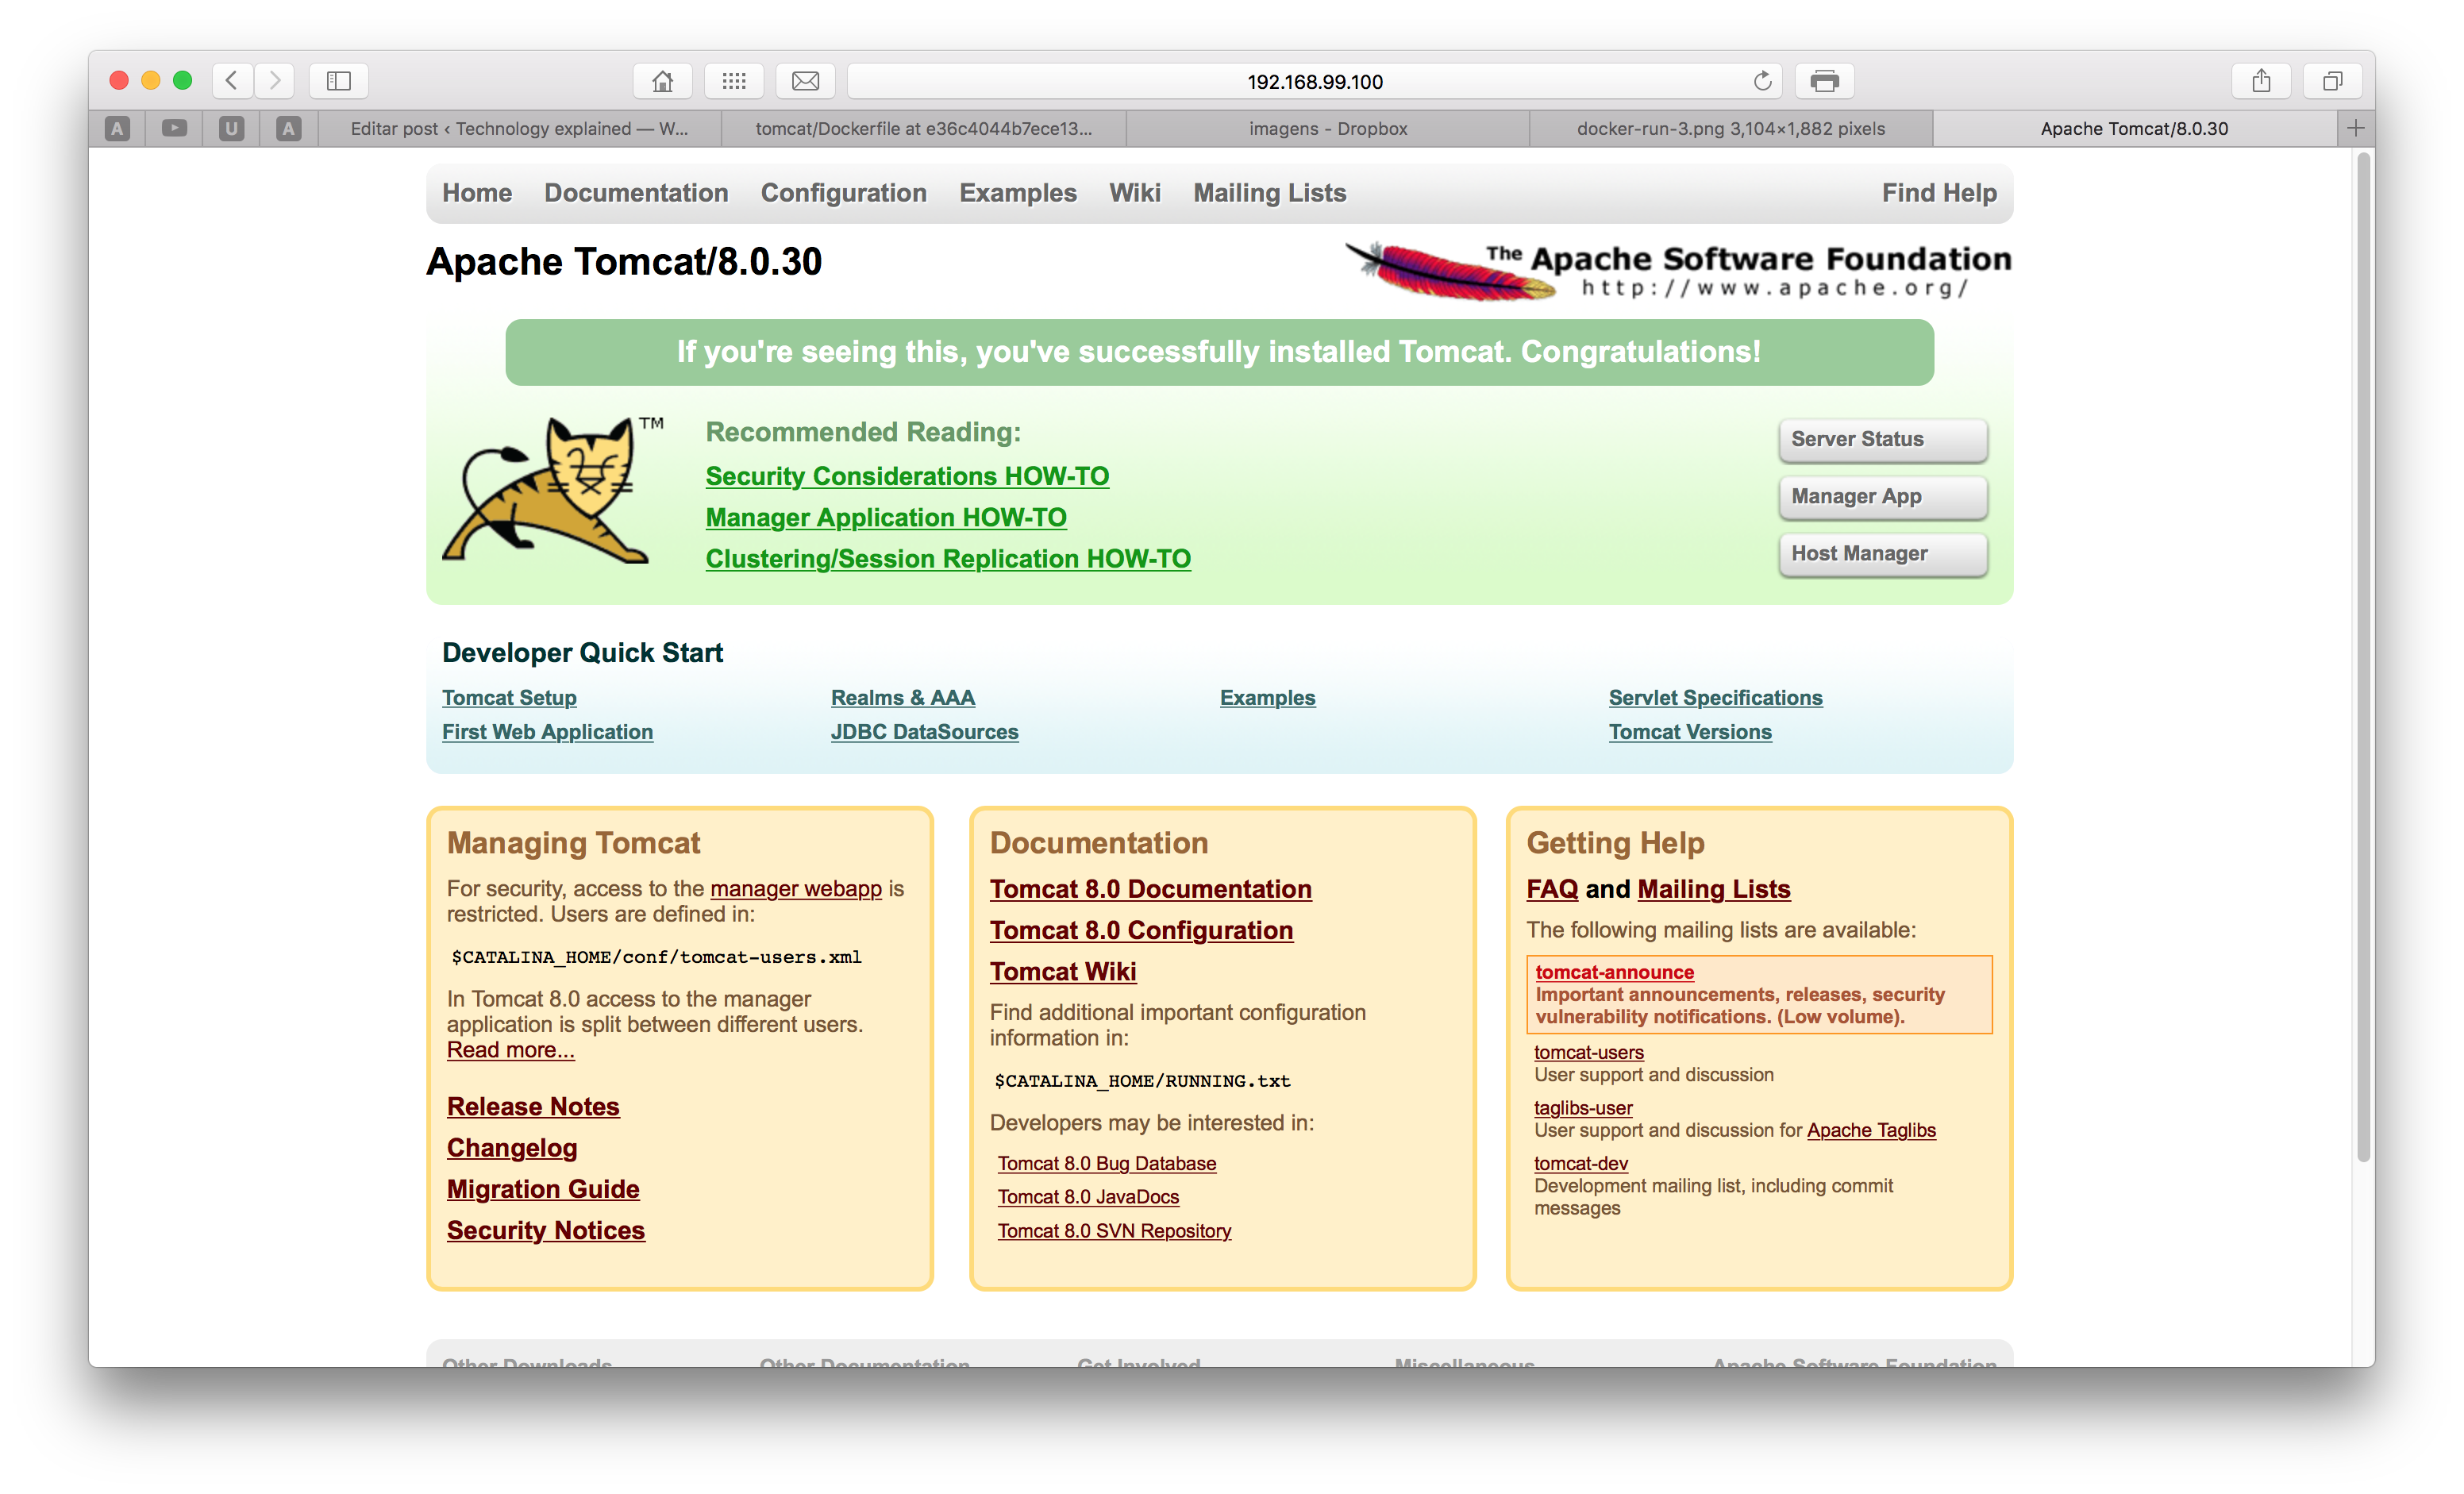
Excellent! Now we have our own dockerized Tomcat! However, by starting the container in background, we couldn’t see the logging of the server, to see if there wasn’t any problem on the startup of the web server. let’s see the last lines of the log of our container by entering the command:
docker logs mytomcat
This will show the last inputs of our container on the stdout. We could also use the command:
docker attach mytomcat
This command has the same effect of the tail command on a file, making it possible to watch the logs of the container. Take notice that after attaching to a container, pressing Ctrl+C will kill him!
Before ending our container, let’s see more detailed information about our container, such as the Java version, network mappings etc. To do this, we run the following command:
docker inspect mytomcat
This will produce a result like the following, in JSON format:
[
{
“Id”: “14598a44a3b4fe2a5b987ea365b2c83a0399f4fda476ad1754acee23c96fcc22”,
“Created”: “2016-01-03T17:59:49.632050403Z”,
“Path”: “catalina.sh”,
“Args”: [
“run”
],
“State”: {
“Status”: “running”,
“Running”: true,
“Paused”: false,
“Restarting”: false,
“OOMKilled”: false,
“Dead”: false,
“Pid”: 4811,
“ExitCode”: 0,
“Error”: “”,
“StartedAt”: “2016-01-03T17:59:49.728287604Z”,
“FinishedAt”: “0001-01-01T00:00:00Z”
},
“Image”: “af28fa31b54b2e45d53e80c5a7cbfd2693f198fdb8ba53d44d8a432832ad1012”,
“ResolvConfPath”: “/mnt/sda1/var/lib/docker/containers/14598a44a3b4fe2a5b987ea365b2c83a0399f4fda476ad1754acee23c96fcc22/resolv.conf”,
“HostnamePath”: “/mnt/sda1/var/lib/docker/containers/14598a44a3b4fe2a5b987ea365b2c83a0399f4fda476ad1754acee23c96fcc22/hostname”,
“HostsPath”: “/mnt/sda1/var/lib/docker/containers/14598a44a3b4fe2a5b987ea365b2c83a0399f4fda476ad1754acee23c96fcc22/hosts”,
“LogPath”: “/mnt/sda1/var/lib/docker/containers/14598a44a3b4fe2a5b987ea365b2c83a0399f4fda476ad1754acee23c96fcc22/14598a44a3b4fe2a5b987ea365b2c83a0399f4fda476ad1754acee23c96fcc22-json.log”,
“Name”: “/mytomcat”,
“RestartCount”: 0,
“Driver”: “aufs”,
“ExecDriver”: “native-0.2”,
“MountLabel”: “”,
“ProcessLabel”: “”,
“AppArmorProfile”: “”,
“ExecIDs”: null,
“HostConfig”: {
“Binds”: null,
“ContainerIDFile”: “”,
“LxcConf”: [],
“Memory”: 0,
“MemoryReservation”: 0,
“MemorySwap”: 0,
“KernelMemory”: 0,
“CpuShares”: 0,
“CpuPeriod”: 0,
“CpusetCpus”: “”,
“CpusetMems”: “”,
“CpuQuota”: 0,
“BlkioWeight”: 0,
“OomKillDisable”: false,
“MemorySwappiness”: -1,
“Privileged”: false,
“PortBindings”: {
“8080/tcp”: [
{
“HostIp”: “”,
“HostPort”: “8888”
}
]
},
“Links”: null,
“PublishAllPorts”: false,
“Dns”: [],
“DnsOptions”: [],
“DnsSearch”: [],
“ExtraHosts”: null,
“VolumesFrom”: null,
“Devices”: [],
“NetworkMode”: “default”,
“IpcMode”: “”,
“PidMode”: “”,
“UTSMode”: “”,
“CapAdd”: null,
“CapDrop”: null,
“GroupAdd”: null,
“RestartPolicy”: {
“Name”: “no”,
“MaximumRetryCount”: 0
},
“SecurityOpt”: null,
“ReadonlyRootfs”: false,
“Ulimits”: null,
“LogConfig”: {
“Type”: “json-file”,
“Config”: {}
},
“CgroupParent”: “”,
“ConsoleSize”: [
0,
0
],
“VolumeDriver”: “”
},
“GraphDriver”: {
“Name”: “aufs”,
“Data”: null
},
“Mounts”: [],
“Config”: {
“Hostname”: “14598a44a3b4”,
“Domainname”: “”,
“User”: “”,
“AttachStdin”: false,
“AttachStdout”: false,
“AttachStderr”: false,
“ExposedPorts”: {
“8080/tcp”: {}
},
“Tty”: false,
“OpenStdin”: false,
“StdinOnce”: false,
“Env”: [
“PATH=/usr/local/tomcat/bin:/usr/local/sbin:/usr/local/bin:/usr/sbin:/usr/bin:/sbin:/bin”,
“LANG=C.UTF-8”,
“JAVA_VERSION=7u91”,
“JAVA_DEBIAN_VERSION=7u91-2.6.3-1~deb8u1”,
“CATALINA_HOME=/usr/local/tomcat”,
“TOMCAT_MAJOR=8”,
“TOMCAT_VERSION=8.0.30”,
“TOMCAT_TGZ_URL=https://www.apache.org/dist/tomcat/tomcat-8/v8.0.30/bin/apache-tomcat-8.0.30.tar.gz”
],
“Cmd”: [
“catalina.sh”,
“run”
],
“Image”: “tomcat:8.0”,
“Volumes”: null,
“WorkingDir”: “/usr/local/tomcat”,
“Entrypoint”: null,
“OnBuild”: null,
“Labels”: {},
“StopSignal”: “SIGTERM”
},
“NetworkSettings”: {
“Bridge”: “”,
“SandboxID”: “37fe977f6a45f4495eae95260a67f0e99a8168c73930151926ad521d211b4ac6”,
“HairpinMode”: false,
“LinkLocalIPv6Address”: “”,
“LinkLocalIPv6PrefixLen”: 0,
“Ports”: {
“8080/tcp”: [
{
“HostIp”: “0.0.0.0”,
“HostPort”: “8888”
}
]
},
“SandboxKey”: “/var/run/docker/netns/37fe977f6a45”,
“SecondaryIPAddresses”: null,
“SecondaryIPv6Addresses”: null,
“EndpointID”: “09477abf22e8019e2f8d3e0deeb18d9362136954a09e336f4a93286cb3b8b027”,
“Gateway”: “172.17.0.2”,
“GlobalIPv6Address”: “”,
“GlobalIPv6PrefixLen”: 0,
“IPAddress”: “172.17.0.3”,
“IPPrefixLen”: 16,
“IPv6Gateway”: “”,
“MacAddress”: “02:42:ac:11:00:03”,
“Networks”: {
“bridge”: {
“EndpointID”: “09477abf22e8019e2f8d3e0deeb18d9362136954a09e336f4a93286cb3b8b027”,
“Gateway”: “172.17.0.2”,
“IPAddress”: “172.17.0.3”,
“IPPrefixLen”: 16,
“IPv6Gateway”: “”,
“GlobalIPv6Address”: “”,
“GlobalIPv6PrefixLen”: 0,
“MacAddress”: “02:42:ac:11:00:03”
}
}
}
}
]
Now, let’s stop our container, by entering:
docker stop mytomcat
Finally, let’s remove the container, since we won’t use him anymore on this practice:
docker rm mytomcat
Let’s also remove the image, since we won’t use it either on our next steps:
docker rmi tomcat:8.0
And that concludes our breaking course on Docker’s commands! There are also other useful commands as well, of course, such as:
- docker build: Used to build a image from a Dockerfile (see next sections);
- docker commit: Creates a image from a container;
- docker push: Pushes the image for a registry (Docker Hub by default);
- docker exec: Submit a command for a running container;
- docker export: Export the file system of a container as a tar file;
- docker images: list the images inside Docker;
- docker kill: force kill a running container;
- docker restart: restart a container;
- docker network: manages docker networks (see next sections);
- docker volume: manages docker volumes (see next sections);
Creating your own images
On the previous section, we used a image from the Docker Hub, that creates a container with a Tomcat Web Server. This image is implemented by a script with building instructions called Dockerfile. On our lab we will create a Dockerfile, but for now, let’s just examine the Dockerfile from the tomcat’s image in order to learn some of the instructions available:
FROM java:7-jre
ENV CATALINA_HOME /usr/local/tomcat
ENV PATH $CATALINA_HOME/bin:$PATH
RUN mkdir -p “$CATALINA_HOME”
WORKDIR $CATALINA_HOME
# see https://www.apache.org/dist/tomcat/tomcat-8/KEYS
RUN gpg –keyserver pool.sks-keyservers.net –recv-keys \
05AB33110949707C93A279E3D3EFE6B686867BA6 \
07E48665A34DCAFAE522E5E6266191C37C037D42 \
47309207D818FFD8DCD3F83F1931D684307A10A5 \
541FBE7D8F78B25E055DDEE13C370389288584E7 \
61B832AC2F1C5A90F0F9B00A1C506407564C17A3 \
79F7026C690BAA50B92CD8B66A3AD3F4F22C4FED \
9BA44C2621385CB966EBA586F72C284D731FABEE \
A27677289986DB50844682F8ACB77FC2E86E29AC \
A9C5DF4D22E99998D9875A5110C01C5A2F6059E7 \
DCFD35E0BF8CA7344752DE8B6FB21E8933C60243 \
F3A04C595DB5B6A5F1ECA43E3B7BBB100D811BBE \
F7DA48BB64BCB84ECBA7EE6935CD23C10D498E23
ENV TOMCAT_MAJOR 8
ENV TOMCAT_VERSION 8.0.30
ENV TOMCAT_TGZ_URL https://www.apache.org/dist/tomcat/tomcat-$TOMCAT_MAJOR/v$TOMCAT_VERSION/bin/apache-tomcat-$TOMCAT_VERSION.tar.gz
RUN set -x \
&& curl -fSL “$TOMCAT_TGZ_URL” -o tomcat.tar.gz \
&& curl -fSL “$TOMCAT_TGZ_URL.asc” -o tomcat.tar.gz.asc \
&& gpg –verify tomcat.tar.gz.asc \
&& tar -xvf tomcat.tar.gz –strip-components=1 \
&& rm bin/*.bat \
&& rm tomcat.tar.gz*
EXPOSE 8080
CMD [“catalina.sh”, “run”]
As we can see, the first instruction is called FROM. This instruction delimits the base image upon the image will be constructed. On this case, the java:7-jre image will create a basic Linux environment, with Java 7 configured.
Then we see some ENV instructions. This commands set environment variables on the OS, as part of Tomcat’s configuration. We can also see a WORKDIR instruction, which defines the directory that, from that point, Docker will use to run the commands.
We also see some RUN instructions. This instructions, as the name implies, run commands on the container.On the case of our image, this instructions make tomcat’s installation process.
Finally we see the EXPOSE instruction, which exposes the 8080 port for the host. Finally, we see the CMD instruction, which defines the start of the server. One important distinction of the CMD command from the RUN ones is that, while the RUN instructions only executes on the build phase, the CMD instruction is executed on the container’s startup, making it the command to be executed on the creation and start of a container. For this reason, it is only allowed to have one CMD command per Dockerfile.
One important side note about the CMD command is that, when starting a container, it allows to override the command on the Dockerfile, so it could lead to security holes when used. For this reason, it is recommended to use the ENTRYPOINT instruction instead, that like the CMD instruction, it defines the command the container will run at startup, but on this case, it will not permit the command to be overridden, making it more secure.
We could also use ENTRYPOINT and CMD combined, making it possible to restrict the user to only pass flags and/or arguments to the running command.
Of course, that is not the only instructions we can use on a Dockerfile. Other instructions are:
- MAINTAINER: Defines the author of the image;
- LABEL: Adds metadata to a image, in a key=value format;
- ADD: Adds a file, folder or remote file URL to a folder inside the container. The current directory from which this instruction point it out is the same directory of the Dockerfile;
- COPY: Analogous to ADD, this instruction also copies files and folders from the host to the container. The two major differences are that COPY doesn’t allow the use of URLs and COPY doesn’t uncompress known files, like ADD can;
- VOLUME: Creates a volume. On the section “creating the base image” we will learn in more detail about what are volumes on Docker;
- USER: Defines the name of the user used to run the RUN, CMD and ENTRYPOINT instructions;
- ARG: Defines build-time variables, that could be used to pass parameters for the image’s buildings, using the —build-arg flag;
- ONBUILD: Defines a command to be triggered by other images, when the image is used as a base image for other images;
- STOPSIGNAL: Defines the code for the container to stop, as a number or in the SIGNAME format, for instance SIGKILL.
Publishing on Docker Hub
As we saw on the previous section, in order to create our own images, all we have to do is create a “Dockerfile” file, with the instructions necessary for the building. However, in order to distribute our images, we need to register them on a image registry, like the Docker Hub, for example.
The simplest way to publish images are with the commit and push commands. For example, if we had made changes to our Tomcat container and wanted to save those changes as a new image, we could do this with this command:
docker commit mytomcat alexandreesl/mytomcat
Where the second argument is the <repository ID>/<image name>. In order to push the images to Docker Hub, the repository ID must be equals to the username of our Docker Hub account.
After committing the changes, all we have to do is push the changes to the Hub, using the following command:
docker push alexandreesl/mytomcat
And that’s it! After the push, if we see our Docker Hub account, we can see that our image was successfully created:
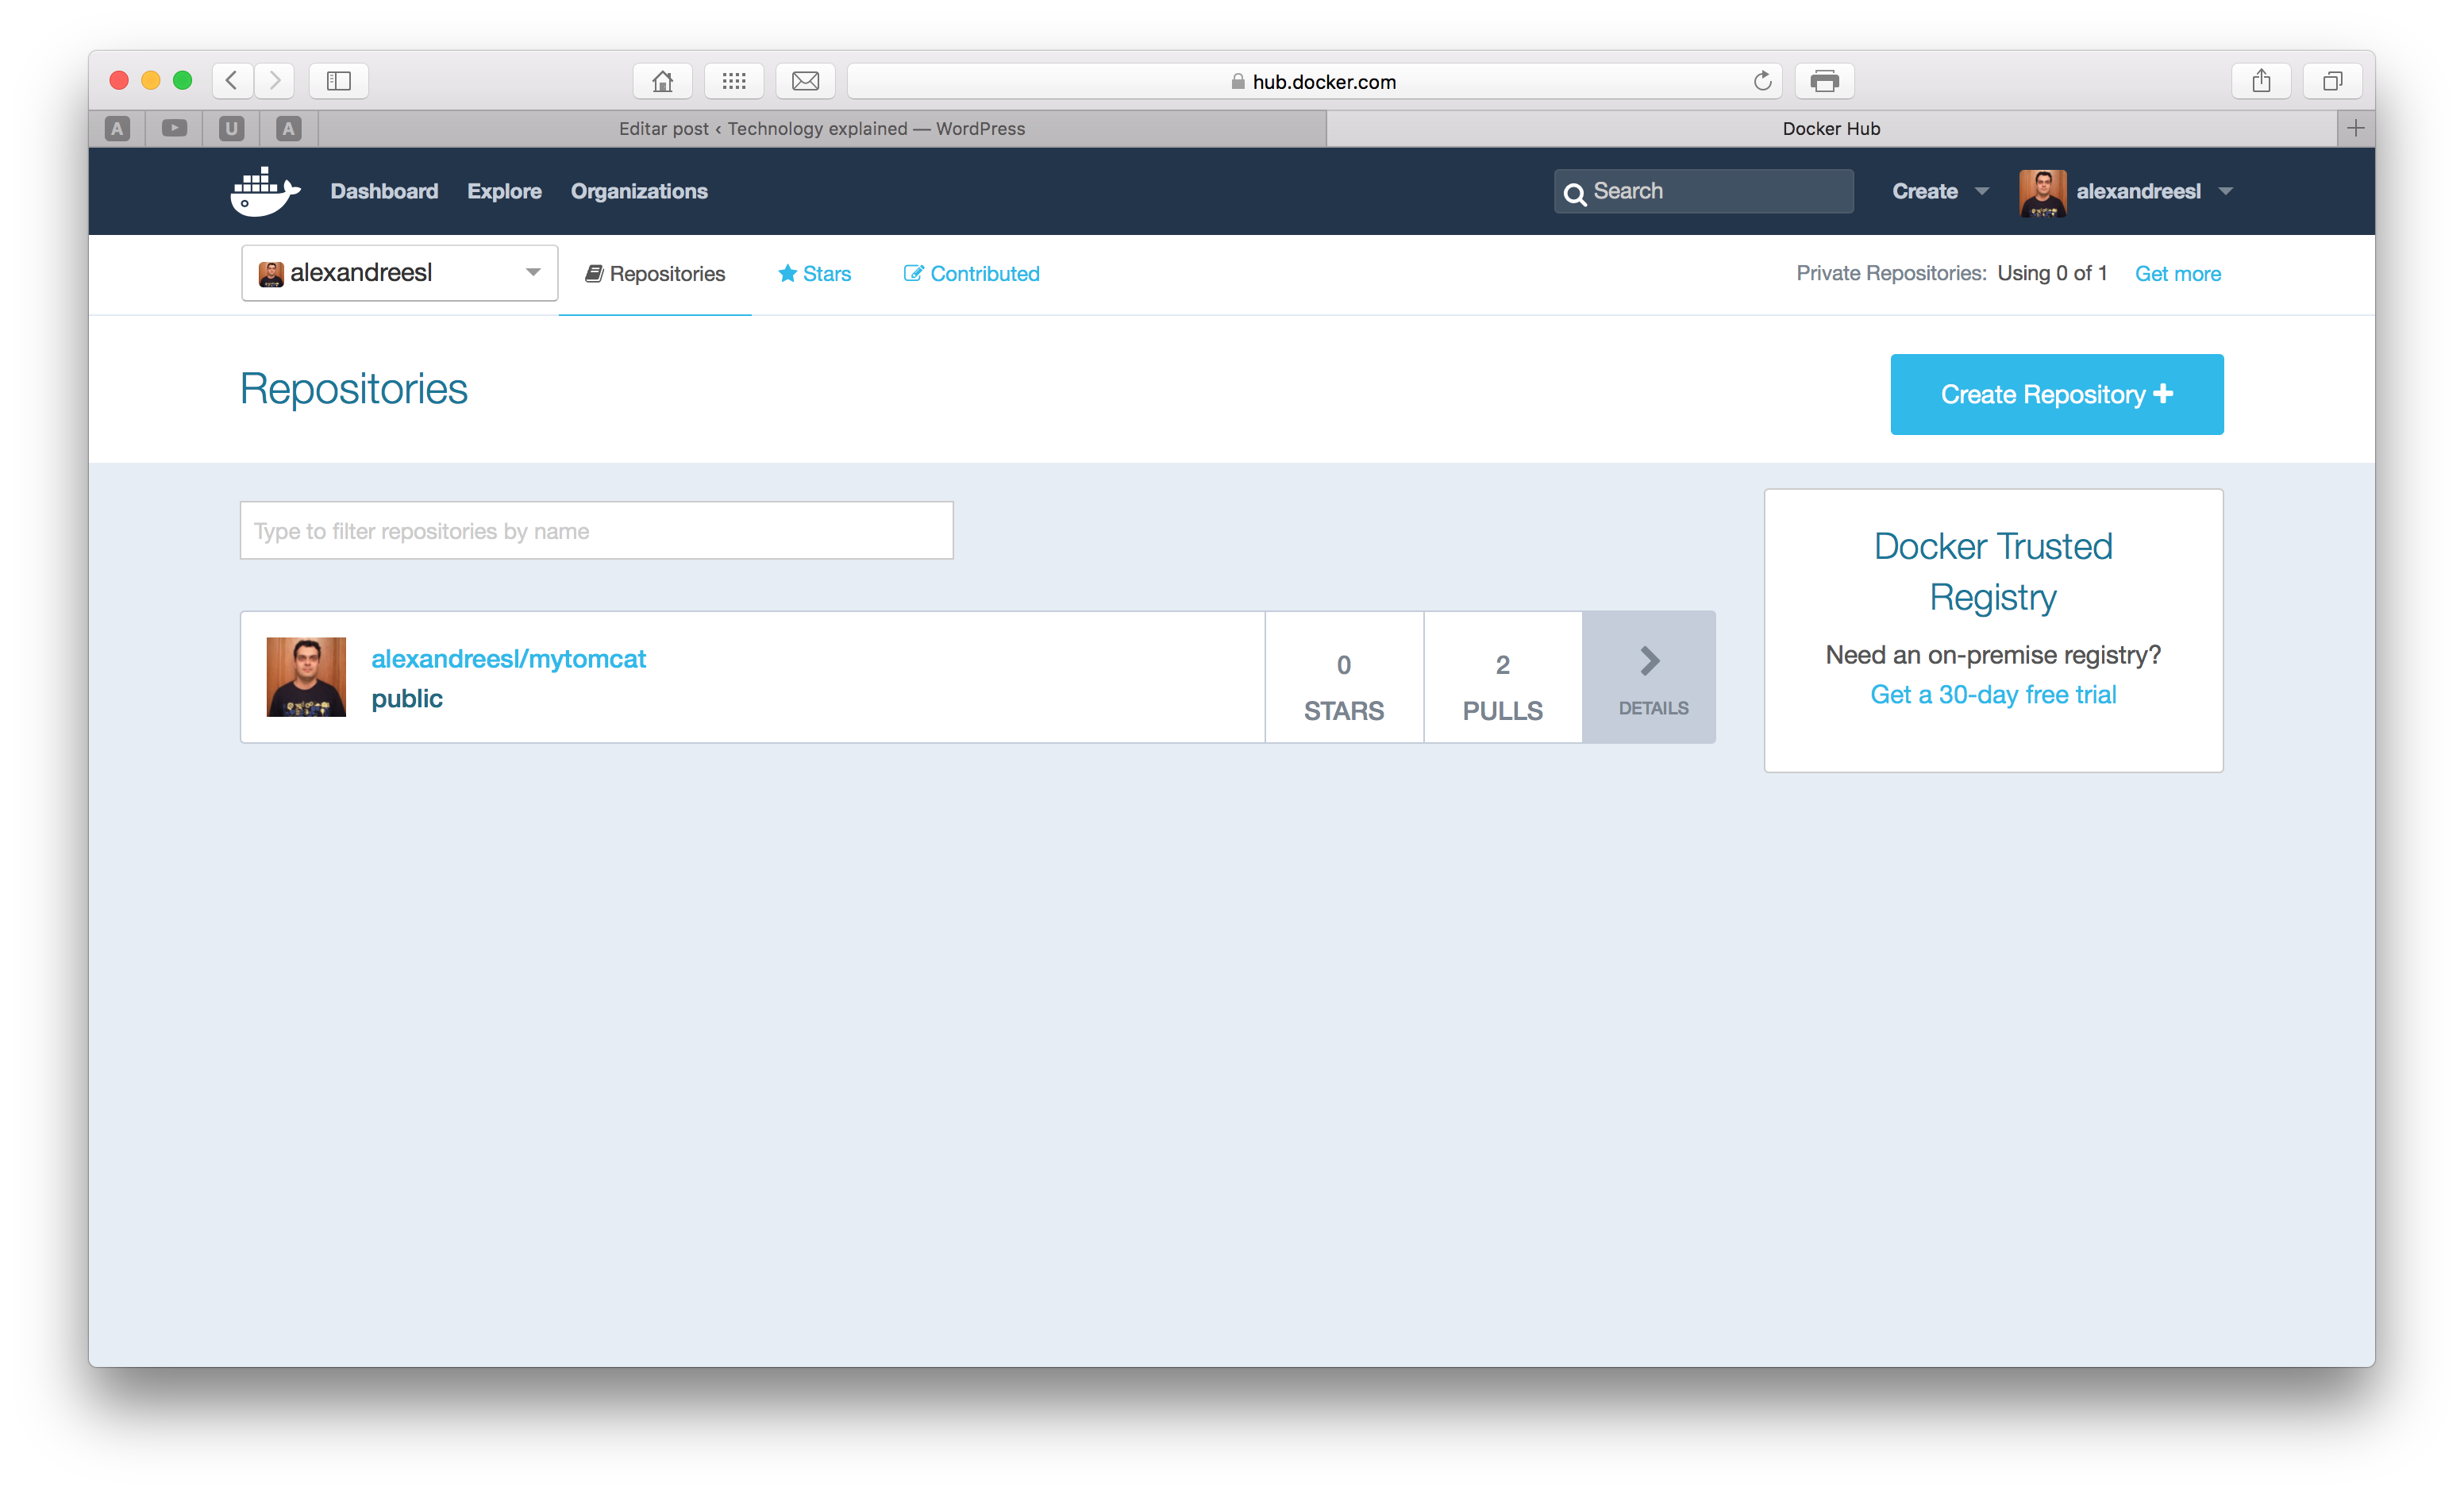
NOTE: before pushing, you could have to run the command docker login to register your credentials from the Docker Hub
Another way of publishing is by linking our images with a git repository, this way the Docker Hub will rebuild the image each time a new version of the Dockerfile is pushed to the repository. Is this method of publishing that generates automated build images, since this way Docker can establish a CI Workload with the git repository. We will see this method in action on the next section, ‘Creating the base image’.
Practice: Using Docker to implement a microservices architecture
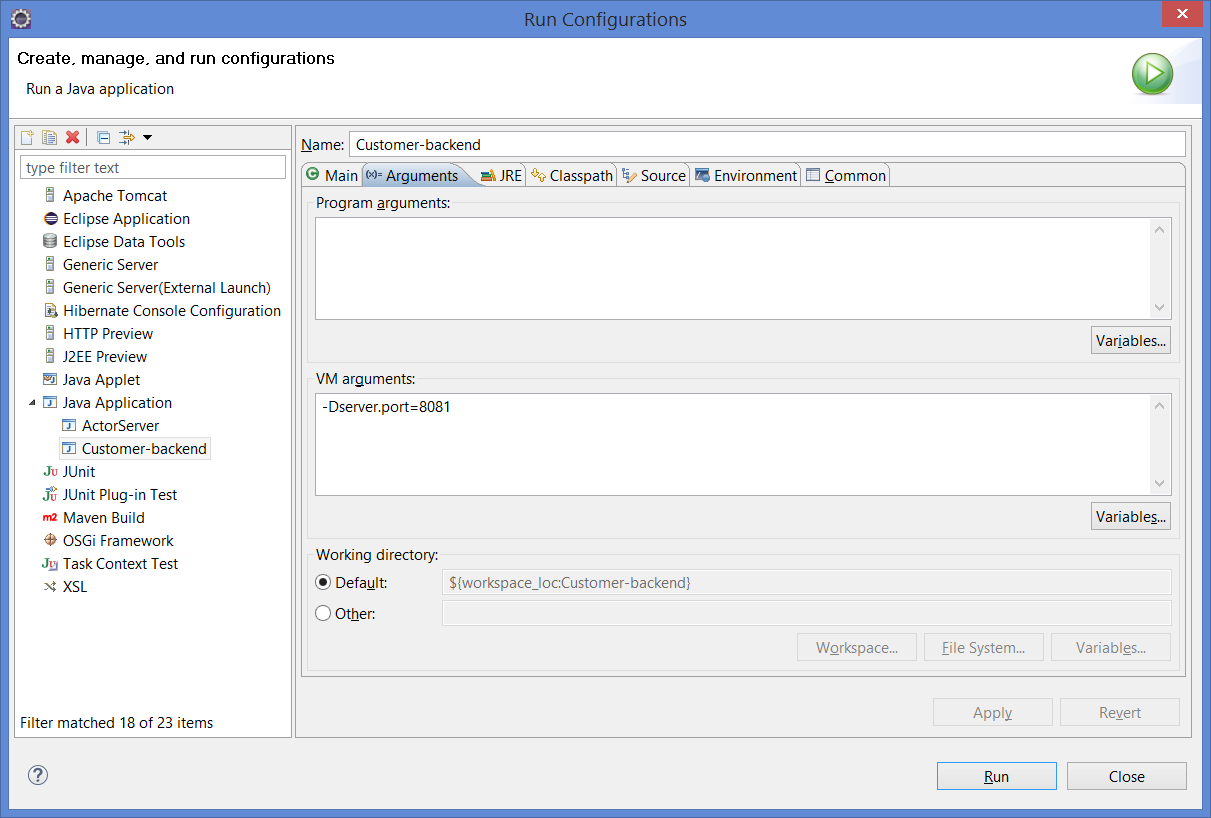
On our lab, we will take a step forward from my previous post about microservices with Spring Boot (haven’t see it? you can find it here, I am really grateful if you read that post as well!), by using a Service Registry called Eureka, designed by Netflix.
On the Service Registry pattern, we have a registry where microservices can register/unregister and also find the addresses of a service dynamically, this way decoupling the bounds between them. We will dockerize (run inside a container) the services of that lab and make them use Eureka, which will also run inside a container. In order to integrate with Eureka, we will modify our applications to use the Spring Cloud project, which according to the project’s description:
Spring Cloud provides tools for developers to quickly build some of the common patterns in distributed systems (e.g. configuration management, service discovery, circuit breakers, intelligent routing, micro-proxy, control bus, one-time tokens, global locks, leadership election, distributed sessions, cluster state). Coordination of distributed systems leads to boiler plate patterns, and using Spring Cloud developers can quickly stand up services and applications that implement those patterns. They will work well in any distributed environment, including the developer’s own laptop, bare metal data centres, and managed platforms such as Cloud Foundry.
Also, to “Springfy” even more our example, we will exchange our implementation from the previous post that uses pure jax-rs to the RestController implementation, present on the Spring Web project.
Creating the base image
Well, so let’s begin our practice! First, we will create a Docker Network to accommodate the containers.
If we see the network adapters from the host machine when the Docker Daemon is up, we will see that he creates a bridge adapter on the host, subsequently appending the containers on network interfaces inside the bridge adapter. This forms a subnet where the containers can see each other and also Docker facilitates the work for us, by mapping the container’s IPs with their names, on the /etc/hosts files inside.
On our scenario, we will use this feature so the microservices can easily find our Eureka registry, by mapping the address to the container’s name. Of course that on a real scenario we would have a cluster of Eurekas with a load balancer on separate hosts, but for simplicity’s sake of our lab, we will just use one Eureka instance.
So, in order to create a network to accommodate our architecture, first we create a network, by running the following command:
docker network create microservicesnet
After running the command we will see a hash’s ID indicating our network was created. We can see the details of our network by running the following command:
docker network inspect microservicesnet
Which will produce a result like the following:
[
{
“Name”: “microservicesnet”,
“Id”: “e8d401a00de26b74f4f2461c13dbf848c14f37127b3337a3e40465eff5897910”,
“Scope”: “local”,
“Driver”: “bridge”,
“IPAM”: {
“Driver”: “default”,
“Config”: [
{}
]
},
“Containers”: {},
“Options”: {}
}
]
Notice that, for now, the containers object is empty. This is why we didn’t add any containers to the network yet, but this will soon change.
Now we will create the Dockerfile. Create a folder in the directory of your choice and create a file called ‘Dockerfile’ (without any extension). On my case, I will push my Dockerfile to a Github repository, in order to create the image on Docker Hub as a automated build image. You can find the repositories with the source for this lab at the end of the post.
So, without further delay, let’s code the Dockerfile. The code for our image will be the following:
FROM java:8-jre

MAINTAINER Alexandre Lourenco <alexandreesl@example.com>

VOLUME [ "/data" ]

WORKDIR /data

EXPOSE 8080
ENTRYPOINT [ "java" ]
CMD ["-?"]
As we can see, it is a simple Dockerfile. We use Java’s 8 official image as the base, define a volume and set his folder as our Workdir, expose the 8080 port which is the default for Spring Boot and finally we combine the entrypoint and cmd commands, meaning that anything we pass when we get up a container will be treated as parameters for the Java command. But what is this volume we have speaked of?
The reader must remember what we saw about the Union File System and how each image is layered as a read-only layer. The volumes on Docker is a technique that bypasses the Union File System, by defining a mount point on the Containers that points for a shared space on the host machine. The uses of this technique are in order to provide a place where the container can read/write information that needs to be persisted, alongside the need to share data between containers.
On our scenario, we will use the volume to point to a place where the jars of our microservices will be generated, so when a container runs a microservice, it runs the last version of the software. On a real-world scenario, this place could be a result of a CI workload, for example from a Jenkins job.
Now that we have our image, let’s build the image to test his correctness:
docker build -t alexandreesl/microservices-spring-boot-base .
At the end, we will see a message that our building was successful, validating the Dockerfile. Out of curiosity, if you see the building process, you will notice that Docker created several temporary containers for each instruction of our script, maintaining a status of the last successful instruction executed, so if we have to rebuild the image after a failure, we can restart from the failed point. We can disable this feature with the flag -no-cache if we want.
Now, let’s register the image on Docker Hub. I have created a Github repository here, so I will register the image directly on the site. To do this, we log in on our account and click on the “create automated build” menu item, as shown on the screen bellow:
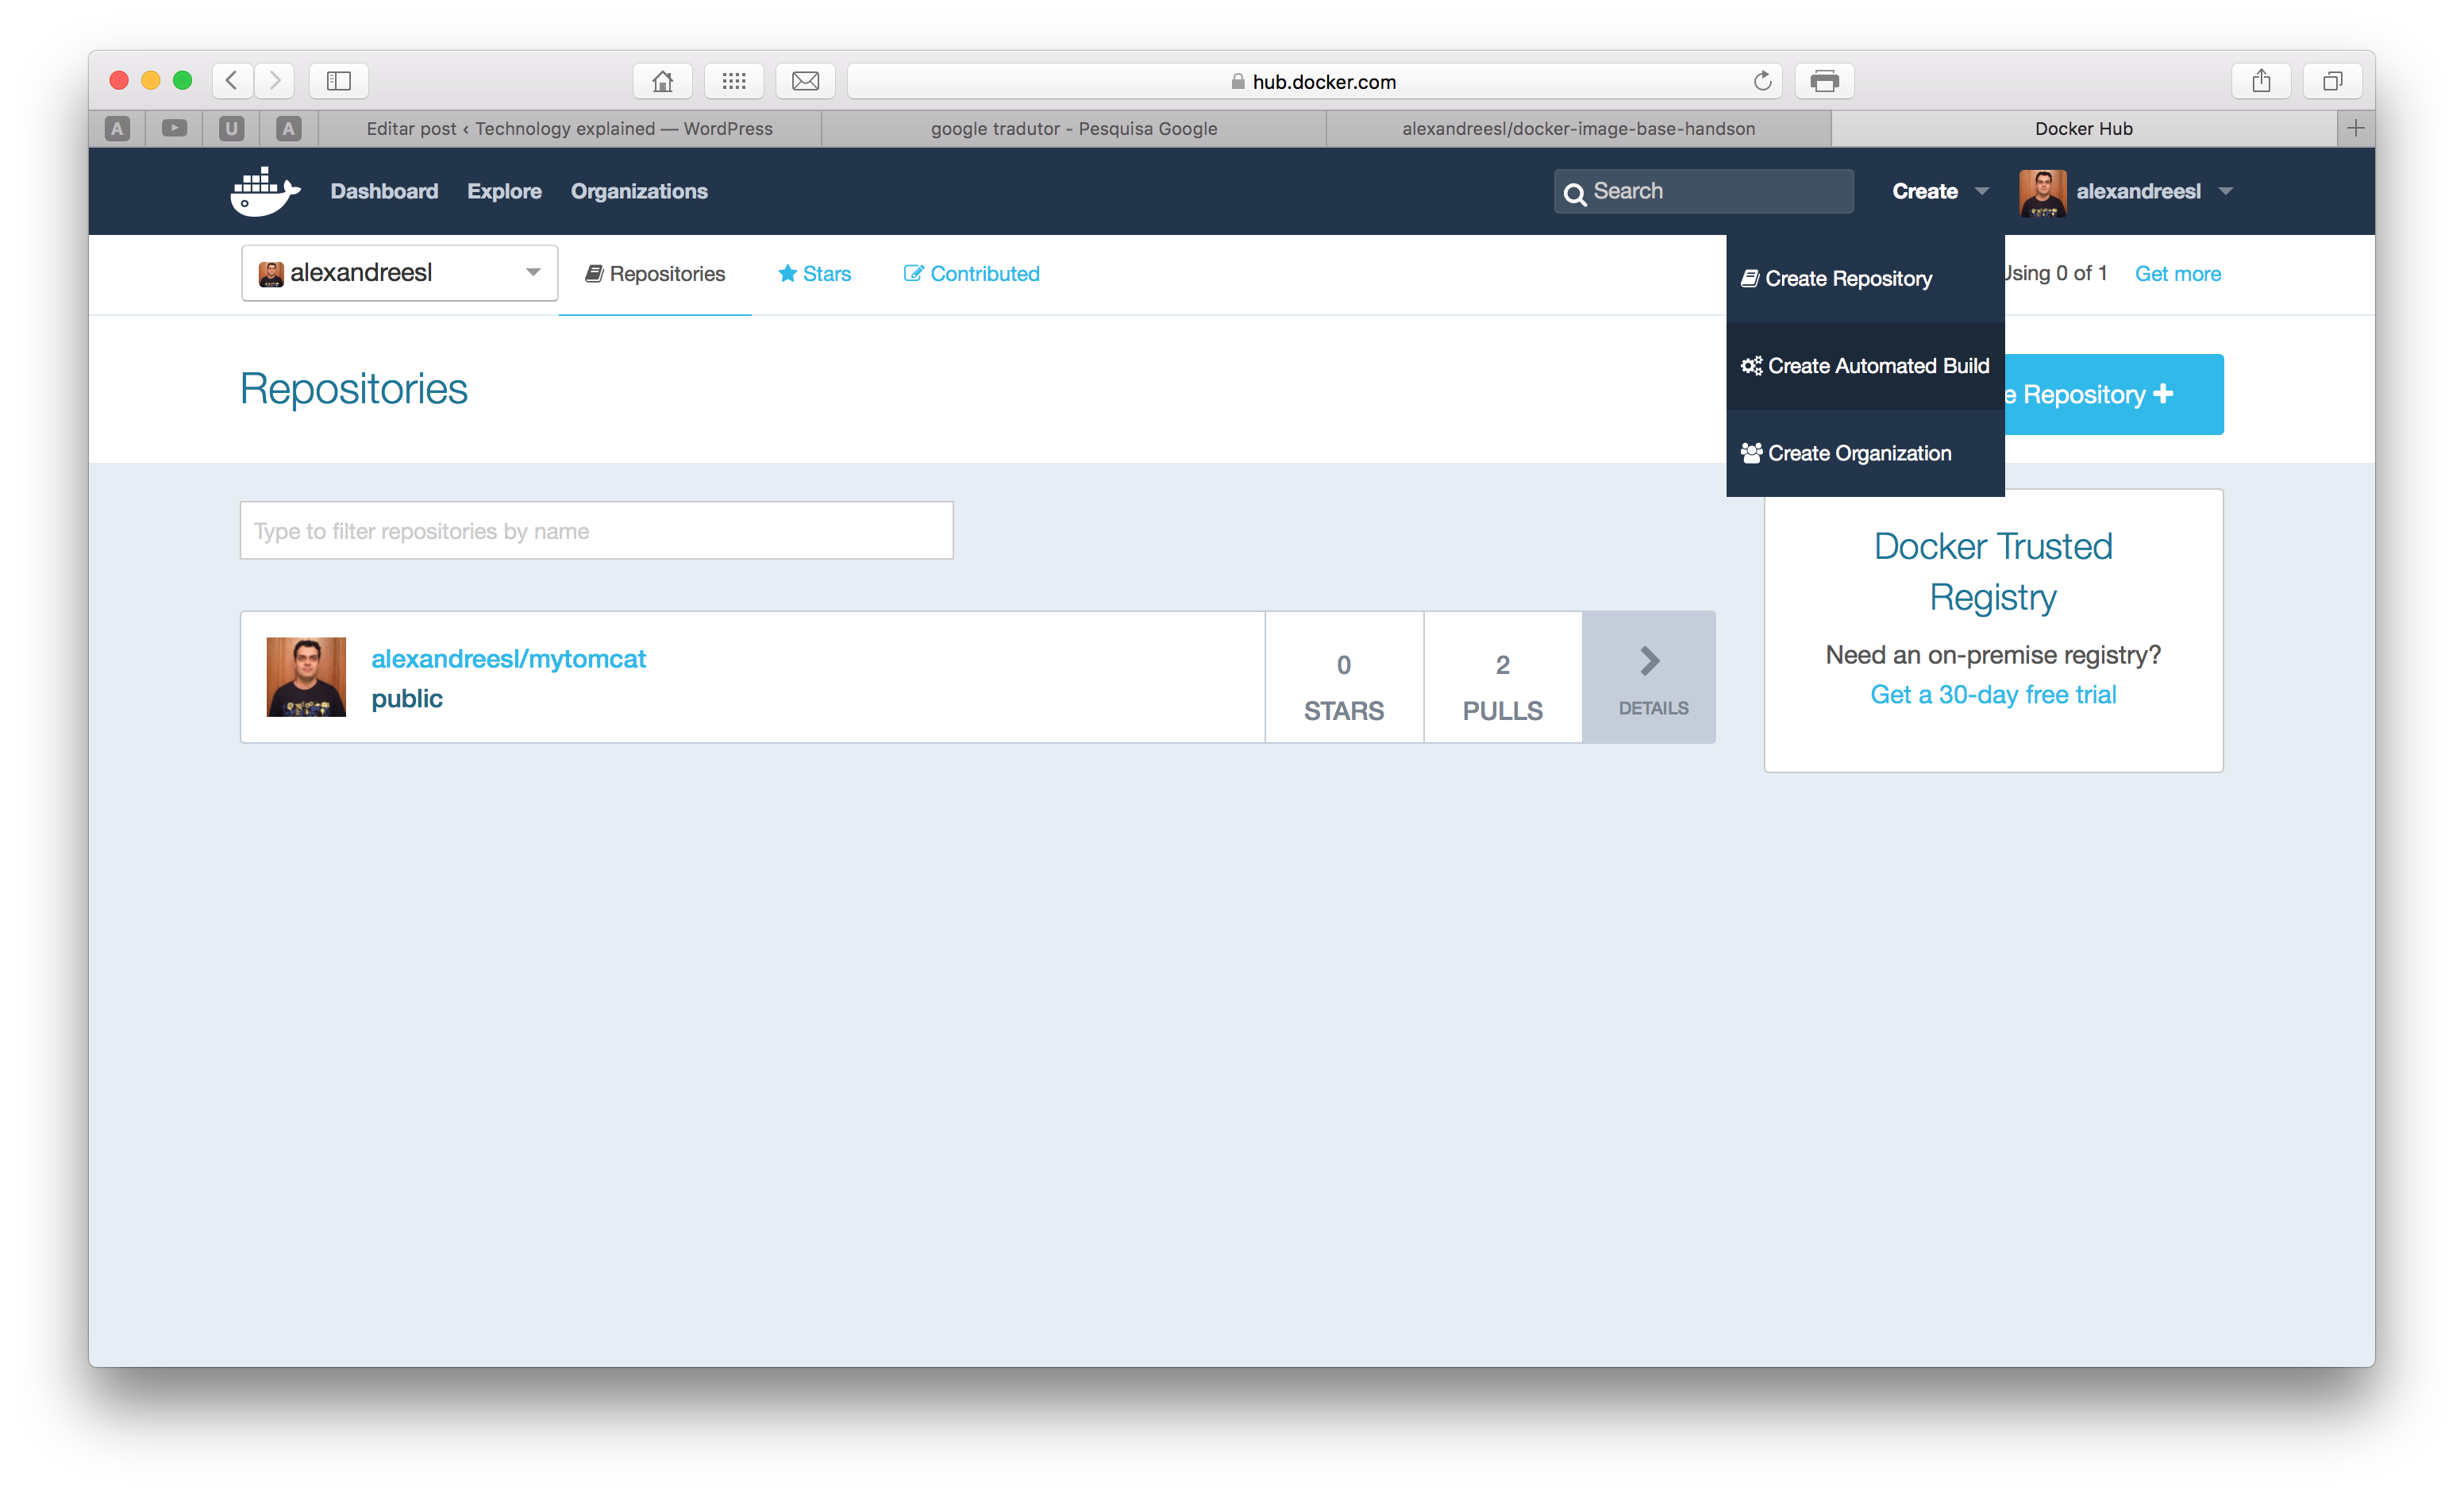
After clicking, if we haven’t linked a github account yet, we will be prompted to do so. after making the linking, we will see a page with the list of our git repositories. We select the one with the Dockerfile and finally create the image, entering the name and a description for the image, as the screen bellow:
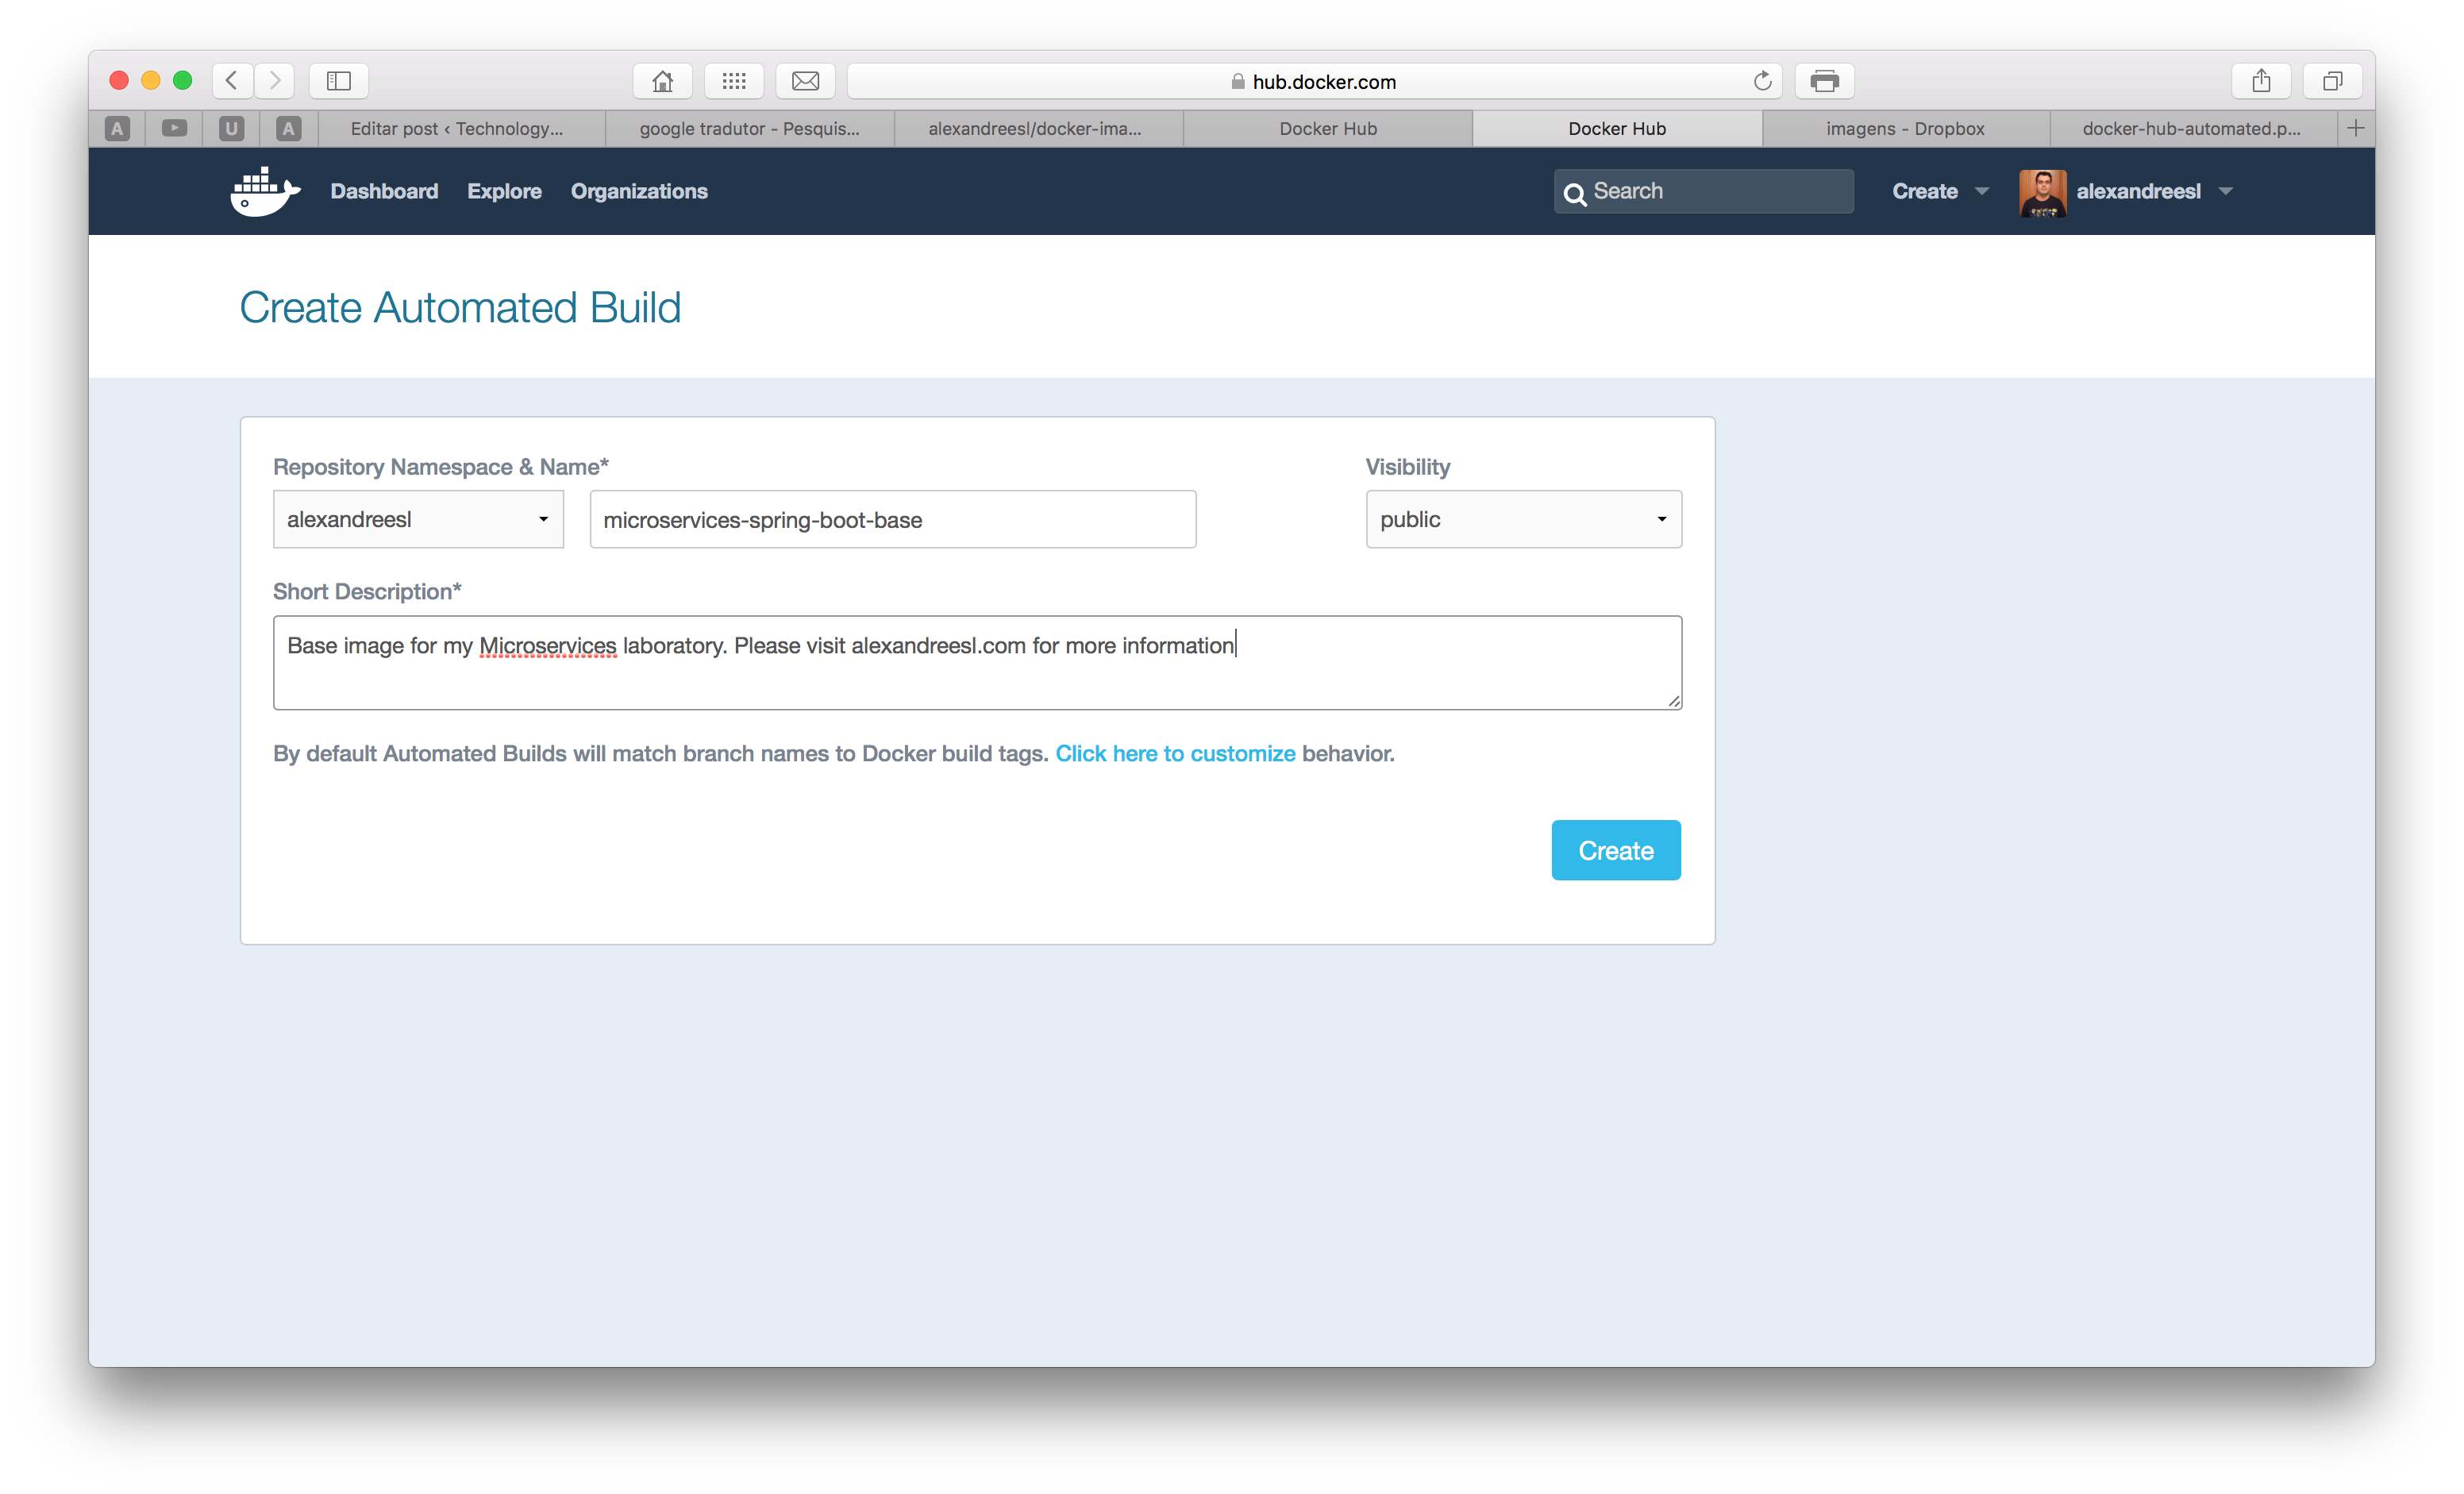
After clicking on the create button, we have completed our step, successfully registering our image on the Docker Hub! You can see my image on this link.
Lastly, just to test if our Docker Hub upload was really successful, we will remove the image from the local cache – that we added with our docker build command – and download using the docker pull command. First, let’s remove the image with the command:
docker rmi alexandreesl/microservices-spring-boot-base
And after, let’s pull the image with the command:
docker pull alexandreesl/microservices-spring-boot-base
After the download, we will have the image from the Docker Hub repository.
Preparing the service registry image
For the service registry image, we actually don’t have to do any coding, since we will use a already made image. We will start the image on the “Launching the containers” section, but the reader can see the image’s page to satisfy his curiosity here.
Preparing the services to use the registry
Now, Let’s prepare the services for the registering/deregistering of microservices, alongside service discovery when a service has dependencies.
To focus on the explanation, I will omit some details like the pom configuration, since the reader can easily get the configuration on the Github repository from the lab. On this lab, we have 3 microservices: a Customer service, a Product service and a Order service. The Order service has dependencies on the other 2 services, in order to mount a Order.
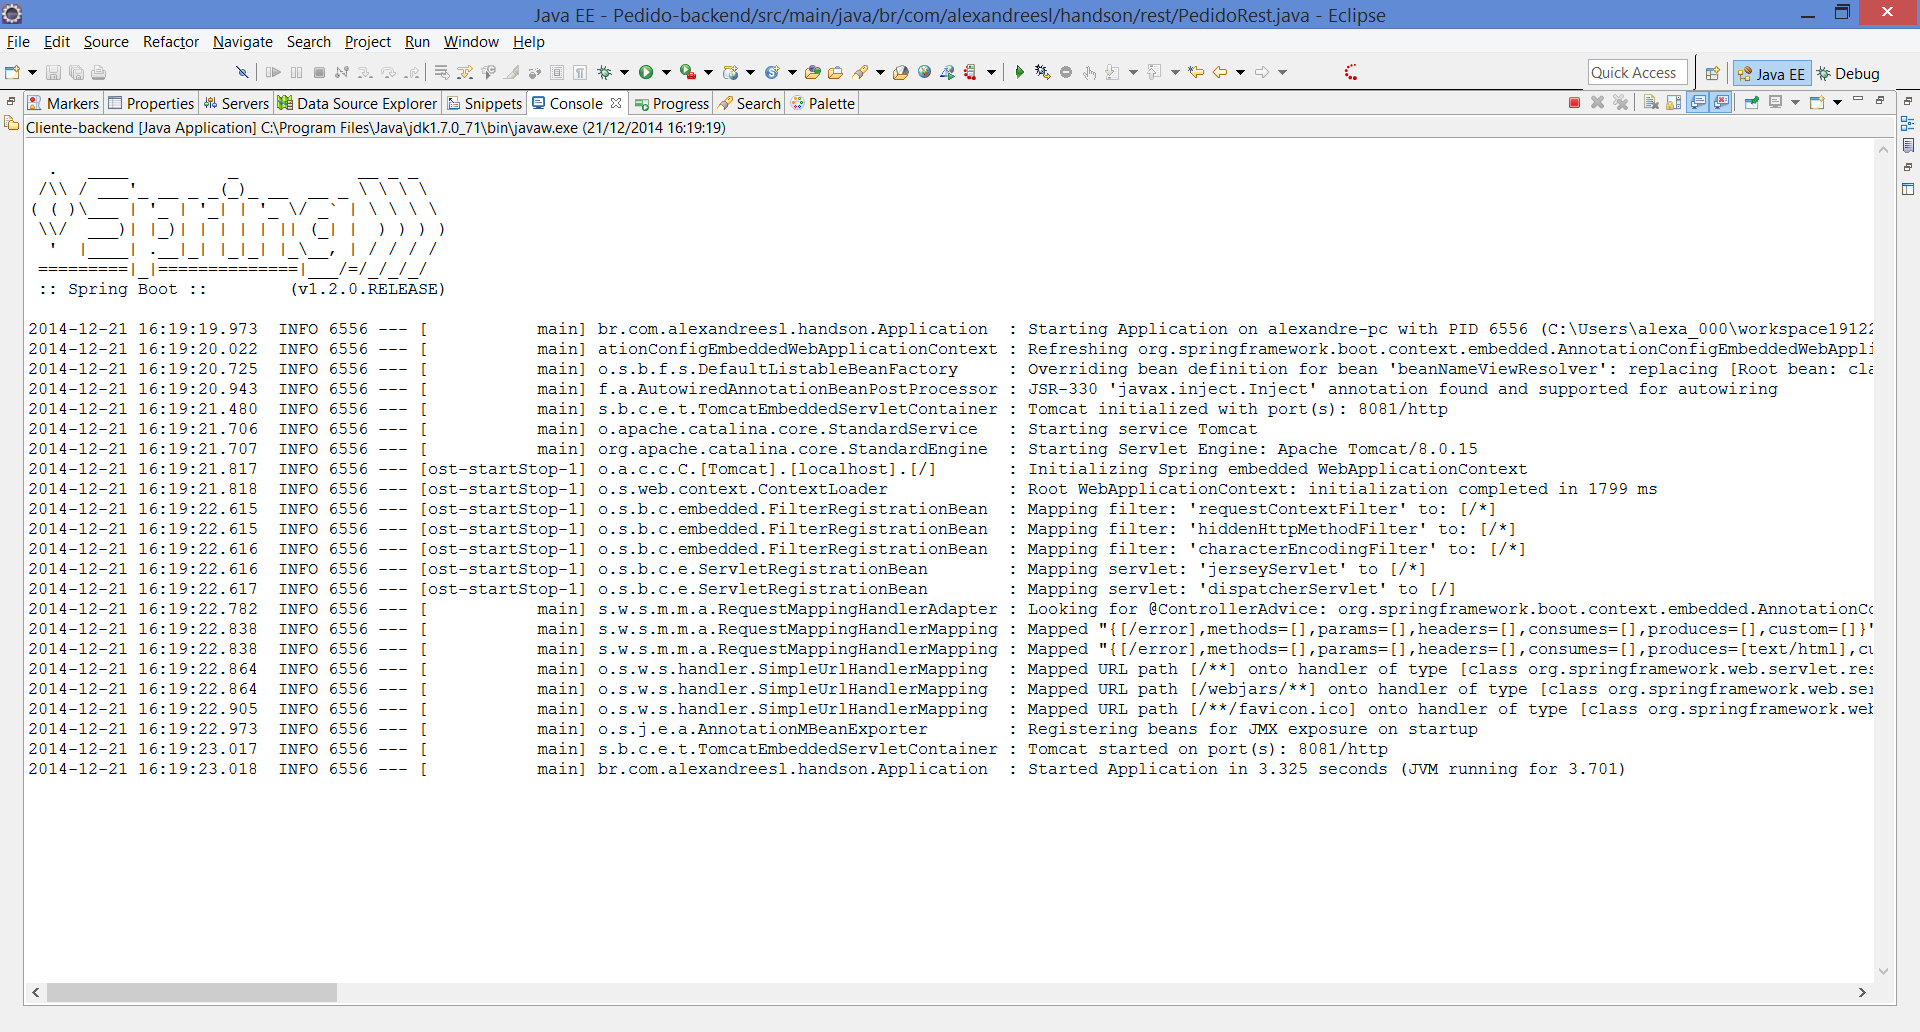
On the 3 projects we will have the same configuration for Spring Boot’s main class, called Application, as follows:
@SpringBootApplication
@Configuration
@EnableAutoConfiguration
@EnableEurekaClient
public class Application {

public static void main(String[] args) {
 SpringApplication.run(Application.class, args);
 }
}
The key line here is the annotation @EnableEurekaClient, which configures the Spring Boot’s application to work with Eureka. Just with these annotation alone, we configure Spring Boot to connect to Eureka at startup and register itself with, send heartbeats during his lifecycle to keep the registration alive and finally make a unregistration when the process is terminated. Also, it instantiate a RestTemplate with a Ribbon load balancer, also made by Netflix, that can easily lookup service addresses from the registry. All of this with just one annotation!
In order to connect to Eureka, we have to provide the registry’s address. this is made by configuring a YAML file, called application.yml, that we put it on the resources source folder. We also configure a application name on this file, in order to inform Eureka about what Application’s ID we would like to use for the microservice.
So, in order to make this configuration, we create the files on our projects. seeing a example, for the Order’s service, we have the following YAML configuration:
spring:
 application:
 name: OrderService
eureka:
 client:
 serviceUrl:
 defaultZone: http://eureka:8761/eureka/
Notice that when we configure Eureka’s address, we used “eureka” as the host name. This is the name of the container that we will use in order to deploy the Eureka server on our Docker Network, so on the /etc/hosts files of our containers, this name will be mapped to Eureka’s container IP, making it possible to point it out dynamically.
Now let’s see how our Microservices were implemented. For the Customer service, we have the following code:
@RestController
@RequestMapping("/")
public class CustomerRest {

private static List<Customer> clients = new ArrayList<Customer>();

static {
Customer customer1 = new Customer();
 customer1.setId(1);
 customer1.setName("Cliente 1");
 customer1.setEmail("customer1@gmail.com");

Customer customer2 = new Customer();
 customer2.setId(2);
 customer2.setName("Cliente 2");
 customer2.setEmail("customer2@gmail.com");

Customer customer3 = new Customer();
 customer3.setId(3);
 customer3.setName("Cliente 3");
 customer3.setEmail("customer3@gmail.com");

Customer customer4 = new Customer();
 customer4.setId(4);
 customer4.setName("Cliente 4");
 customer4.setEmail("customer4@gmail.com");

Customer customer5 = new Customer();
 customer5.setId(5);
 customer5.setName("Cliente 5");
 customer5.setEmail("customer5@gmail.com");

clients.add(customer1);
 clients.add(customer2);
 clients.add(customer3);
 clients.add(customer4);
 clients.add(customer5);
}

@RequestMapping(method = RequestMethod.GET, produces = MediaType.APPLICATION_JSON_VALUE)
 public List<Customer> getClientes() {
 return clients;
 }

@RequestMapping(value = "customer/{id}", method = RequestMethod.GET, produces = MediaType.APPLICATION_JSON_VALUE)
 public Customer getCliente(@PathVariable long id) {

Customer cli = null;

for (Customer c : clients) {

if (c.getId() == id)
 cli = c;

}

return cli;
 }
}
As we can see, nothing out of normal, very simple usage of Spring’s REST Controllers. Now, on to the Product service:
@RestController
@RequestMapping("/")
public class ProductRest {

private static List<Product> products = new ArrayList<Product>();

static {

Product product1 = new Product();
 product1.setId(1);
 product1.setSku("abcd1");
 product1.setDescription("Produto1");

Product product2 = new Product();
 product2.setId(2);
 product2.setSku("abcd2");
 product2.setDescription("Produto2");

Product product3 = new Product();
 product3.setId(3);
 product3.setSku("abcd3");
 product3.setDescription("Produto3");

Product product4 = new Product();
 product4.setId(4);
 product4.setSku("abcd4");
 product4.setDescription("Produto4");

products.add(product1);
 products.add(product2);
 products.add(product3);
 products.add(product4);

}

@RequestMapping(method = RequestMethod.GET, produces = MediaType.APPLICATION_JSON_VALUE)
 public List<Product> getProdutos() {
 return products;
 }

@RequestMapping(value = "product/{id}", method = RequestMethod.GET, produces = MediaType.APPLICATION_JSON_VALUE)
 public Product getProduto(@PathVariable long id) {

Product prod = null;

for (Product p : products) {

if (p.getId() == id)
 prod = p;

}

return prod;
 }

}
Again, nothing unusual on the code. Now, let’s see the Order service, where we will see the registry been used for consuming microservices:
@RestController
@RequestMapping("/")
public class OrderRest {

private static long id = 1;

// Created automatically by Spring Cloud
 @Autowired
 @LoadBalanced
 private RestTemplate restTemplate;

private Logger logger = Logger.getLogger(OrderRest.class);

@RequestMapping(value = "order/{idCustomer}/{idProduct}/{amount}", method = RequestMethod.GET, produces = MediaType.APPLICATION_JSON_VALUE)
 public Order submitOrder(@PathVariable long idCustomer, @PathVariable long idProduct, @PathVariable long amount) {

Order order = new Order();

 Map map = new HashMap();

 map.put("id", idCustomer);

ResponseEntity<Customer> customer = restTemplate.exchange("http://CUSTOMERSERVICE/customer/{id}",
 HttpMethod.GET, null, Customer.class, map);

 map = new HashMap();

 map.put("id", idProduct);

ResponseEntity<Product> product = restTemplate.exchange("http://PRODUCTSERVICE/product/{id}", HttpMethod.GET,
 null, Product.class, map);

order.setCustomer(customer.getBody());
order.setProduct(product.getBody());
order.setId(id);
order.setAmount(amount);
order.setOrderDate(new Date());

logger.warn("The order " + id + " for the client " + customer.getBody().getName() + " with the product "
 + product.getBody().getSku() + " with the amount " + amount + " was created!");

id++;

return order;
 }
}
The first thing we notice is the autowired RestTemplate, that also has a@LoadBalanced annotation. This RestTemplate is automatically instantiated by Spring Cloud, creating a interface which we could use to communicate with Eureka. The annotation informs that we want to use Ribbon to make the load balance, in case we have a cluster of instances of the same service.
The exchange method we use inside of the submitOrder method is where the magic happens. When we make our calls using this method, internally a lookup is made with the Eureka Server, the addresses of the service are passed to Ribbon in order to load balance the calls, and them the call is made. Notice that we used names like “CUSTOMERSERVICE” as the host address on our URIs. This pattern tells the framework the ID of the application we really want to call, been replaced at runtime with one of the IP addresses of the service we want to call.
And that concludes our quick explanation of the Java code involved on our lab. Again, if the reader want to get the full code, just head for the Github repositories at the end of this post. In order to run the lab, I recommend that you clone the whole repository and execute a mvn package command on each of the 3 projects. If you don’t have Maven, you can get it from here.
Launching the containers
Now that we are almost finished with the lab, it is time for the fun part: run our containers! To do this, we will use docker-compose. With docker-compose, we can start/stop/kill etc full stacks of containers, without having to instantiate everything by hand. In order to make our docker-compose stack, let’s create a YAML file called docker-compose.yml and include the following configuration:
eureka:
 image: springcloud/eureka
 container_name: eureka
 ports:
 - "8761:8761"
 net: "microservicesnet"
customer1:
 image: alexandreesl/microservices-spring-boot-base
 container_name: customer1
 hostname: customer1
 net: "microservicesnet"
 ports:
 - "8080:8080"
 volumes:
 - /Users/alexandrelourenco/Applications/git/docker-handson:/data
 command: -jar /data/Customer-backend/target/Customer-backend-1.0.jar
product1:
 image: alexandreesl/microservices-spring-boot-base
 container_name: product1
 hostname: product1
 net: "microservicesnet"
 ports:
 - "8081:8080"
 volumes:
 - /Users/alexandrelourenco/Applications/git/docker-handson:/data
 command: -jar /data/Product-backend/target/Product-backend-1.0.jar
order1:
 image: alexandreesl/microservices-spring-boot-base
 container_name: order1
 hostname: order1
 net: "microservicesnet"
 ports:
 - "8082:8080"
 volumes:
 - /Users/alexandrelourenco/Applications/git/docker-handson:/data
 command: -jar /data/Order-backend/target/Order-backend-1.0.jar
Some things to notice from our configuration:
- In all the containers we configured our “microservicesnet” network, in order to use the Docker Network feature to resolve our needs;
- On the MicroService’s containers, we also defined the hostname, to force Spring Cloud’s registration control to properly register the correct alias for the service’s addresses;
- We have exposed Eureka’s port to the physical host at 8761, so we can see the web interface from outside the Docker environment;
- On the volumes sections, I have mapped the base folder where my Maven projects from the microservices are placed, binding to the /data folder inside the container, which is defined as the workdir on the image we created previously. This way, on the command section, when we map the location of the microservice’s Spring Boot jar, we map the location from the /data folder;
Finally, after saving our file, we run the script by simply running the following command, at the same folder of the YAML file:
docker-compose up
We will see some information about our containers getting up and at the end we will see some log information from all the containers mixed, with the name of the container as a prefix for identification:
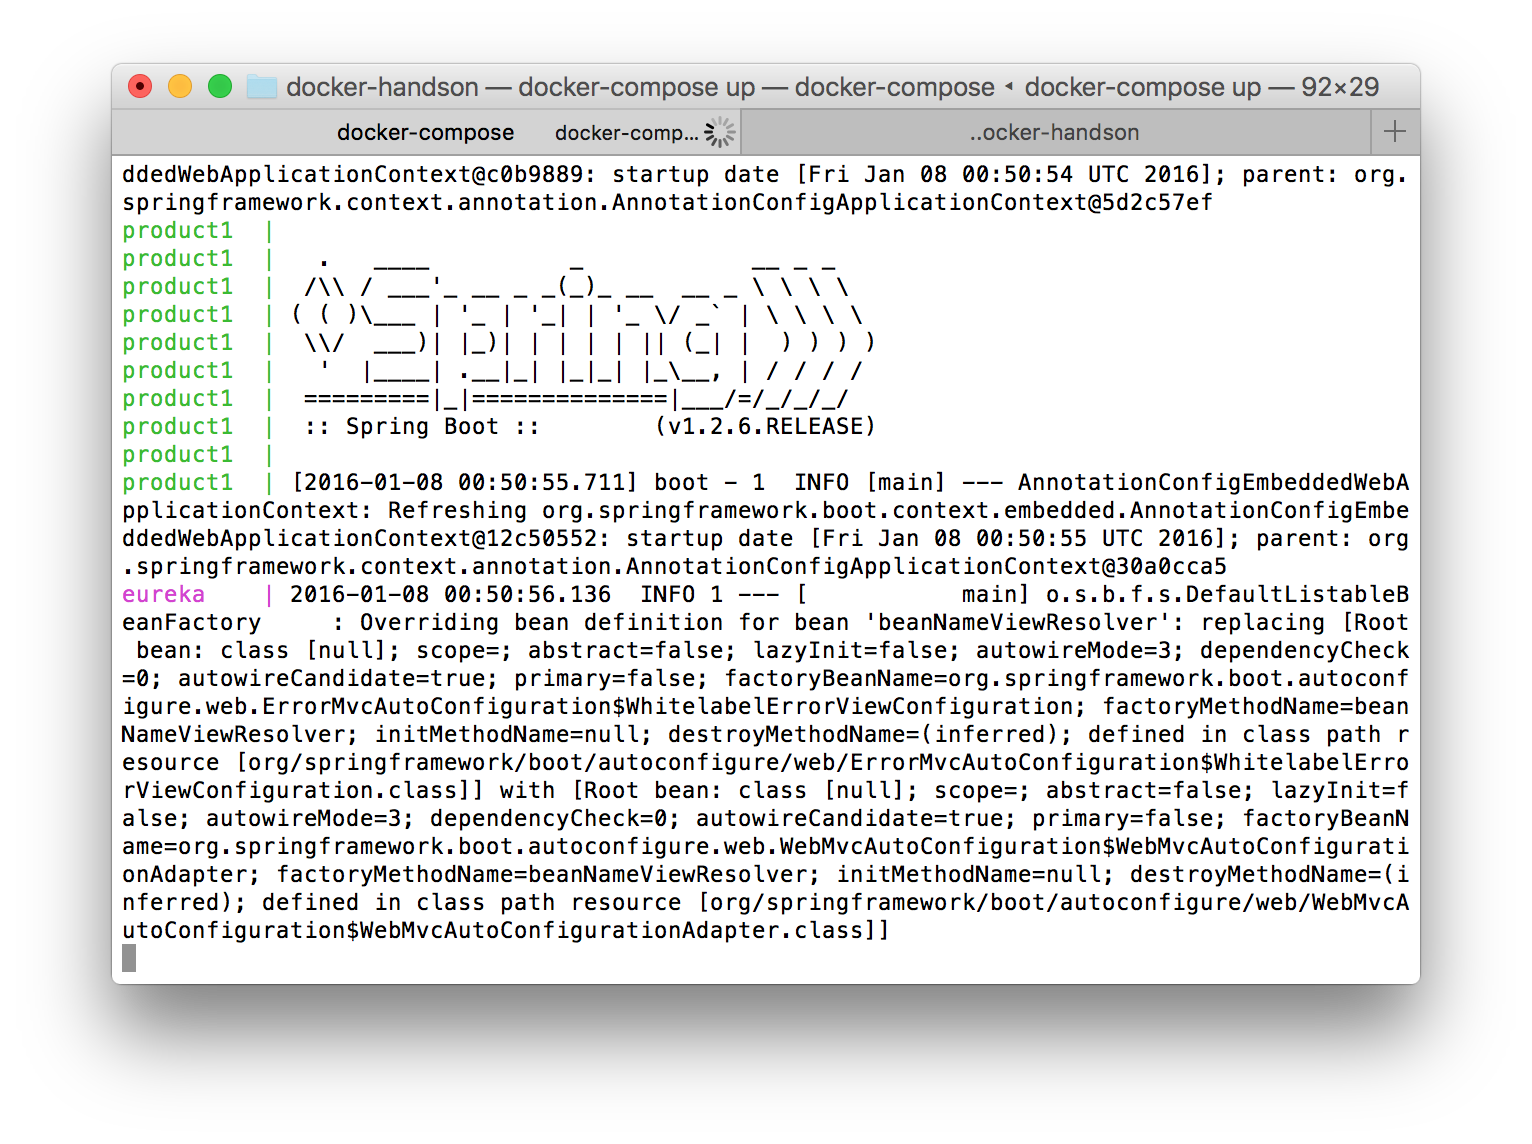
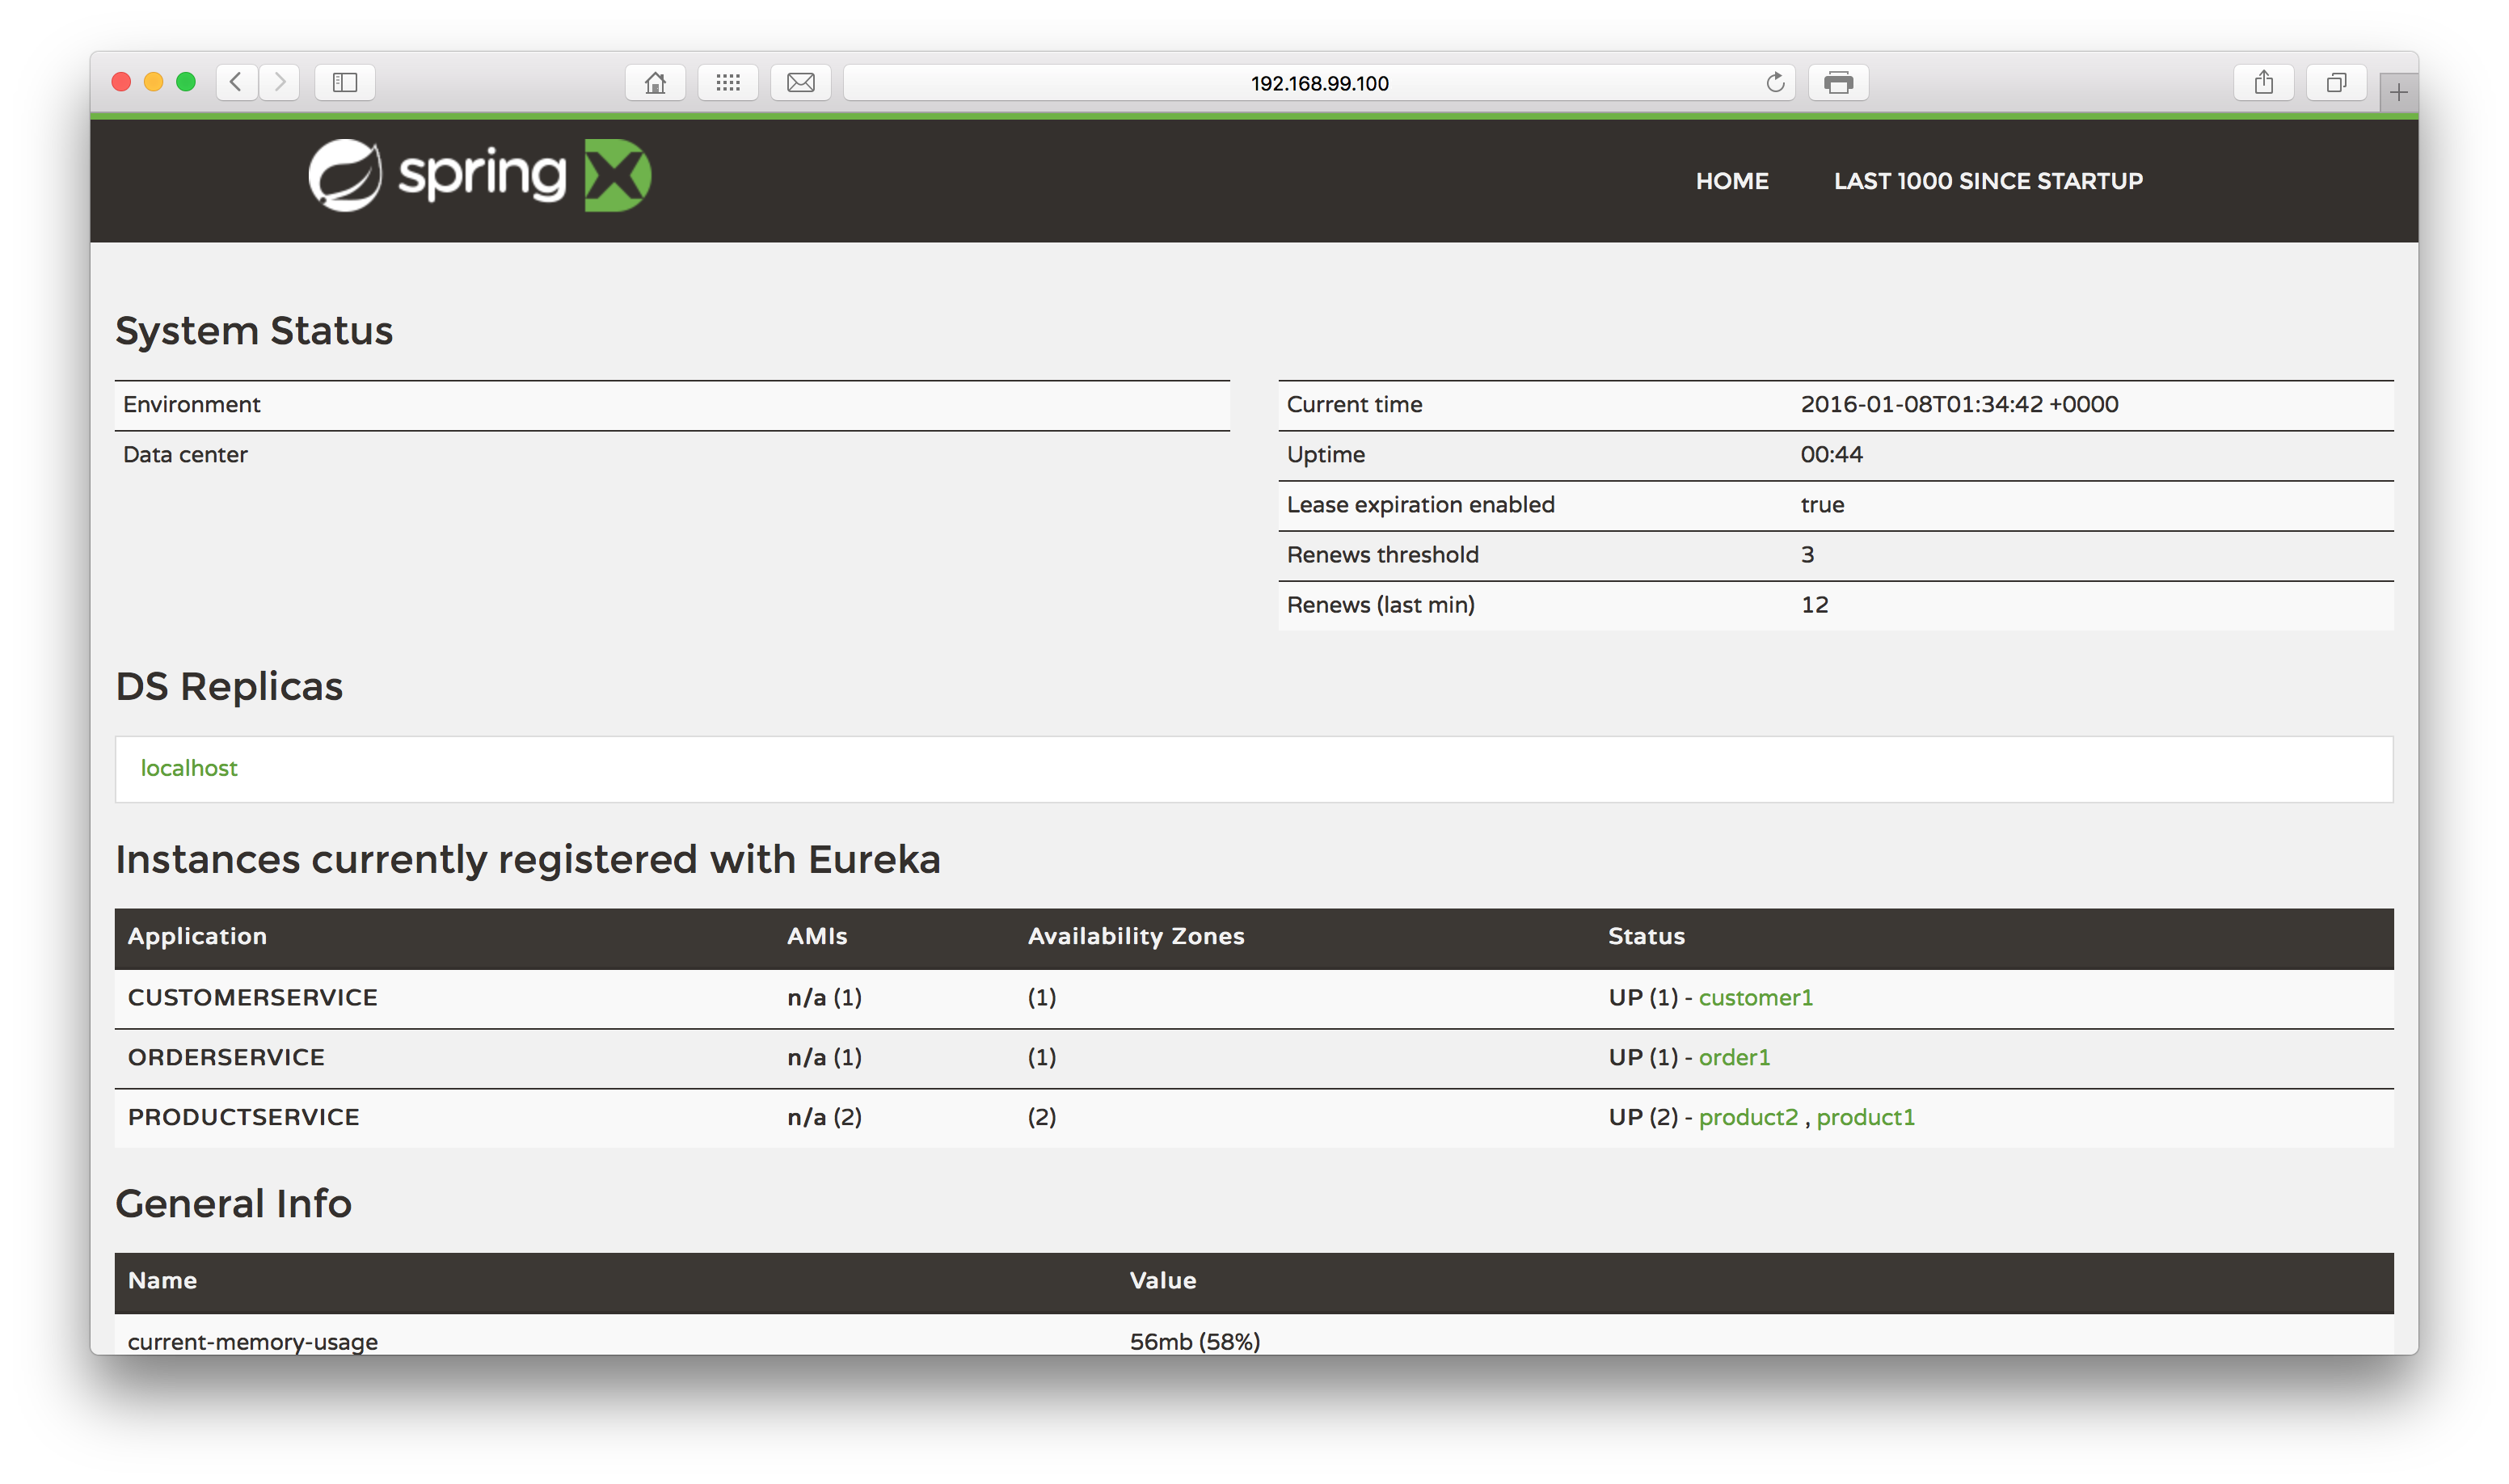
After waiting some moments we will see our containers are up. Let’s see if the microservices are up? Let’s open a browser and point it to the port 8761, using localhost or the ip used by Docker in case you are in OSX/Windows:
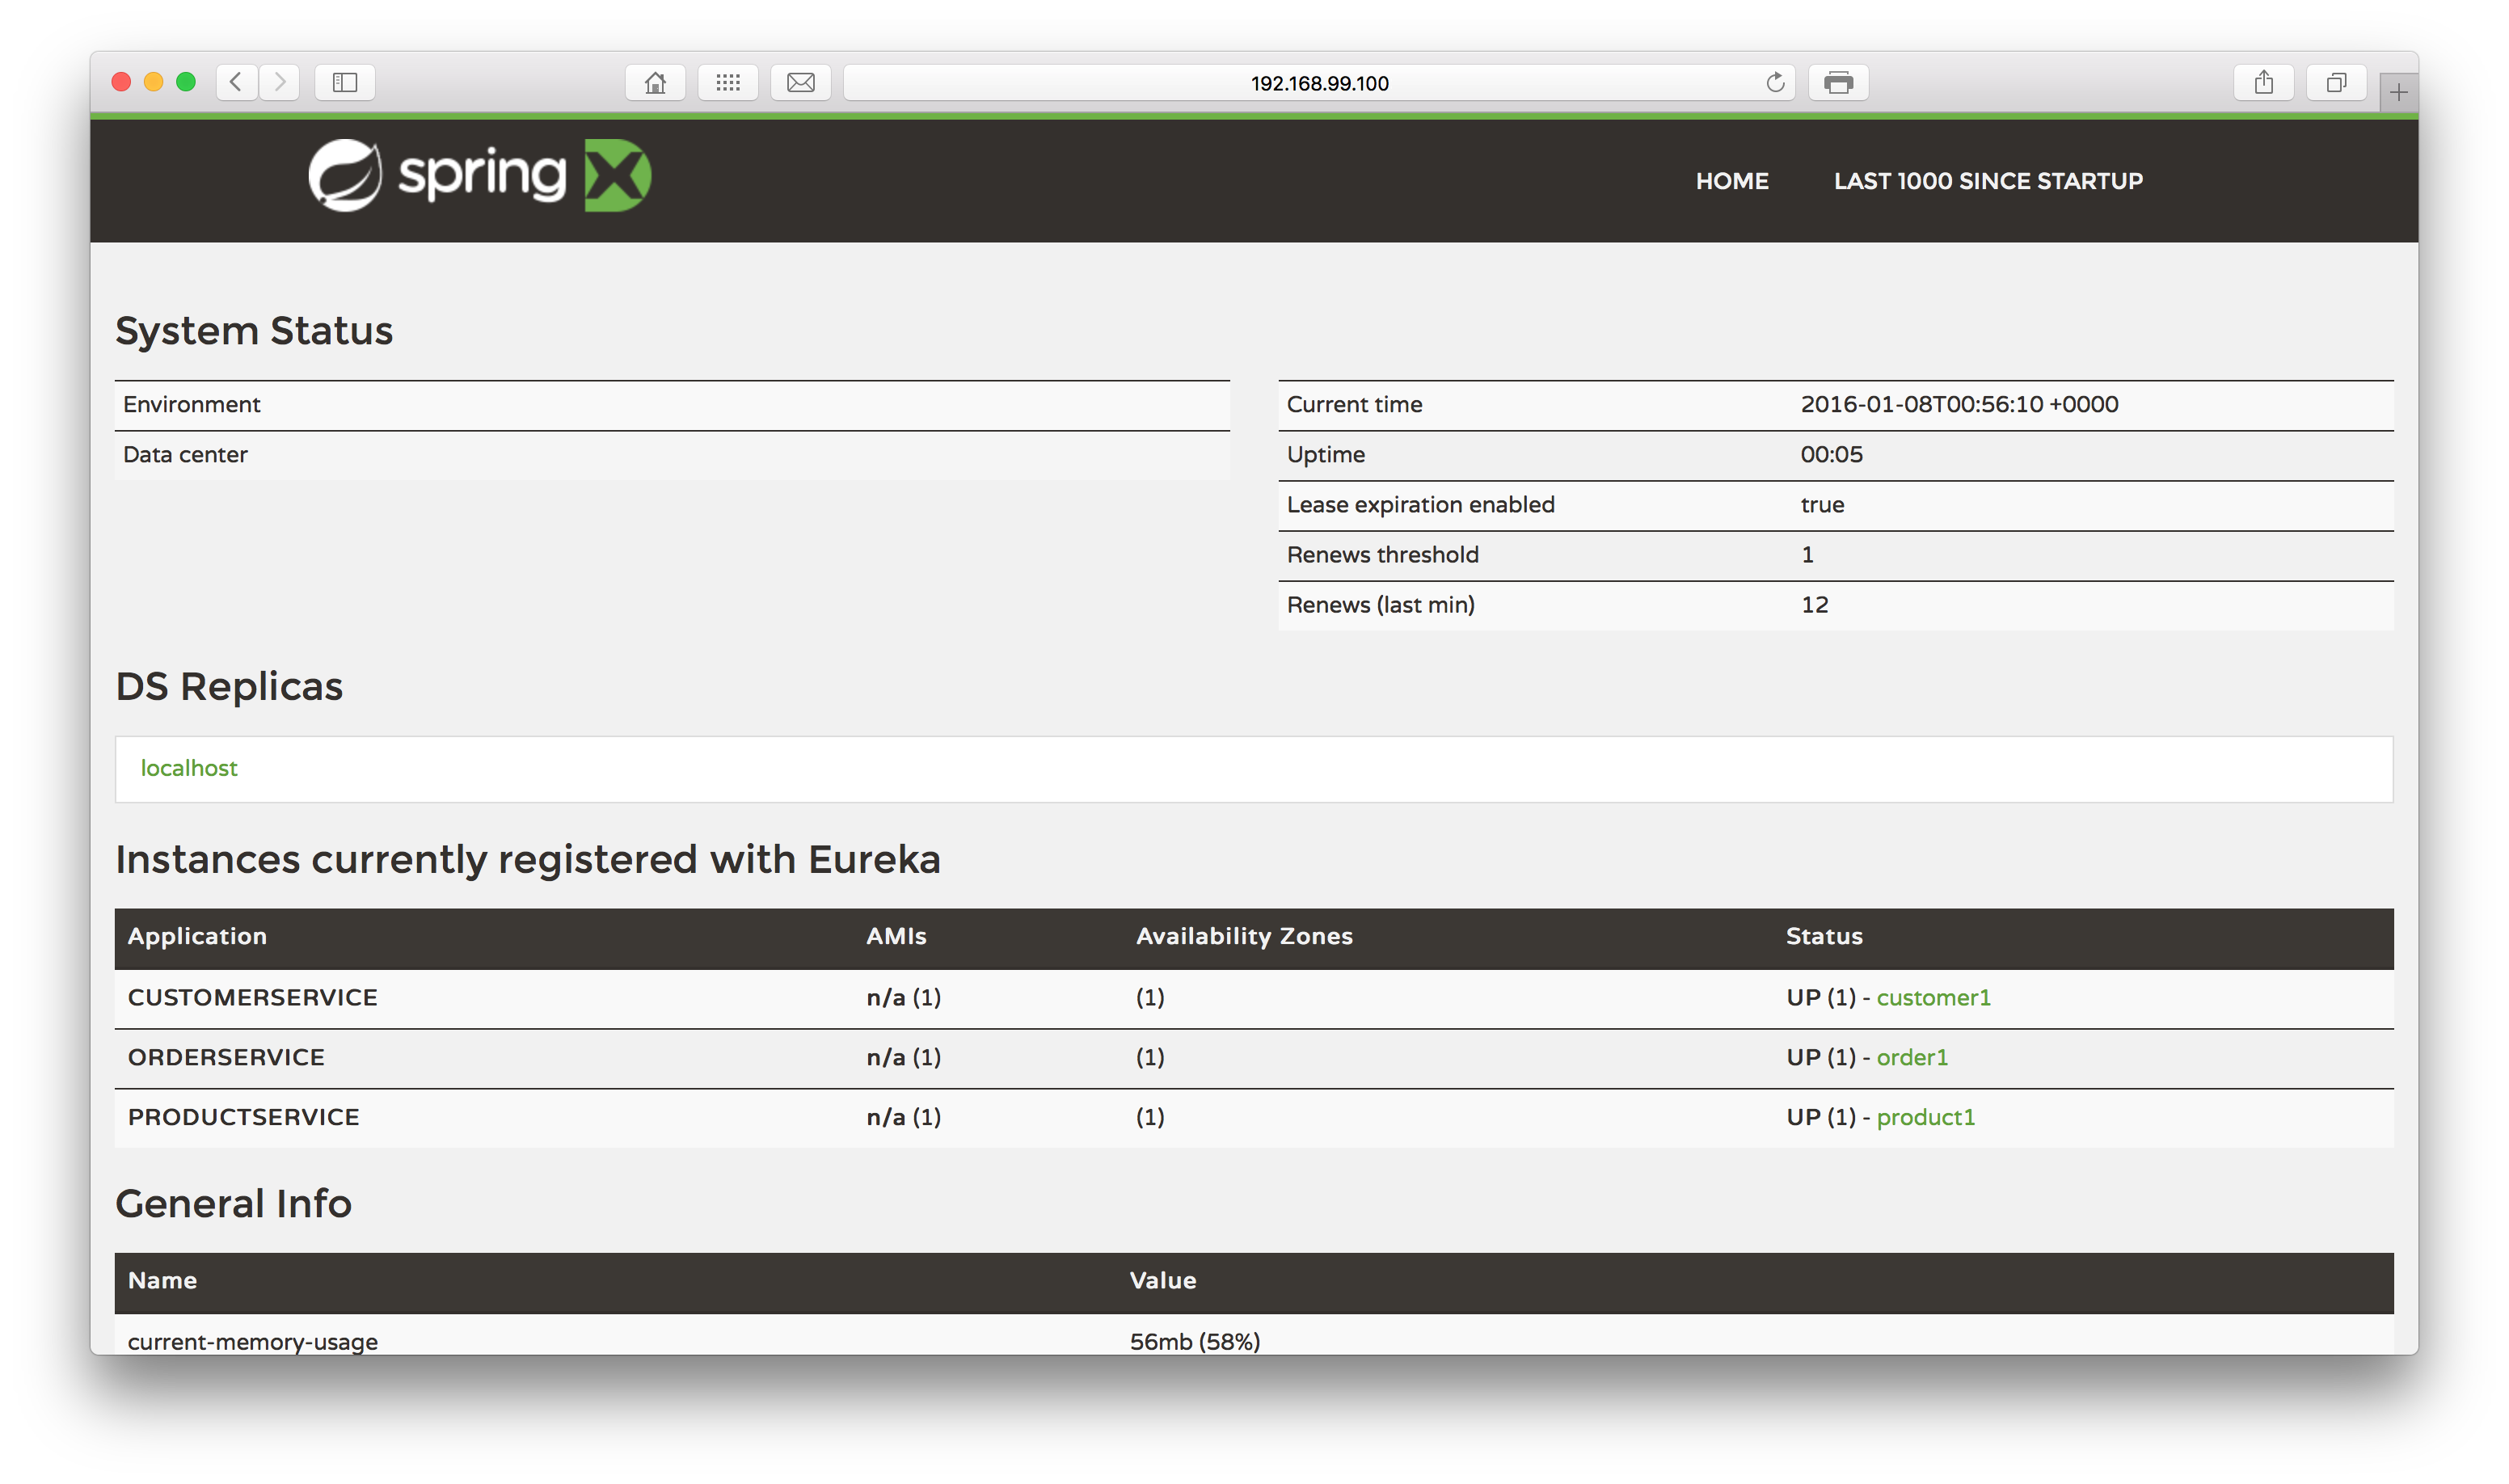
Excellent! Not only has Eureka booted up successfully, but also all of our services have registered with it. Let’s now toy a little with our stack, to test it out.
Let’s begin by making a search for a customer of ID 1 on the Customer’s service:
curl -XGET 'http://<your ip>:8080/customer/1'
This will produce a JSON response like the following:
{"id":1,"name":"Cliente 1","email":"customer1@gmail.com"}
Next, let’s test out the Product service, with a call for the details of the Product of ID 4:
curl -XGET 'http://<your ip>:8081/product/4'
This time it will produce a response like the following:
{"id":4,"sku":"abcd4","description":"Produto4"}
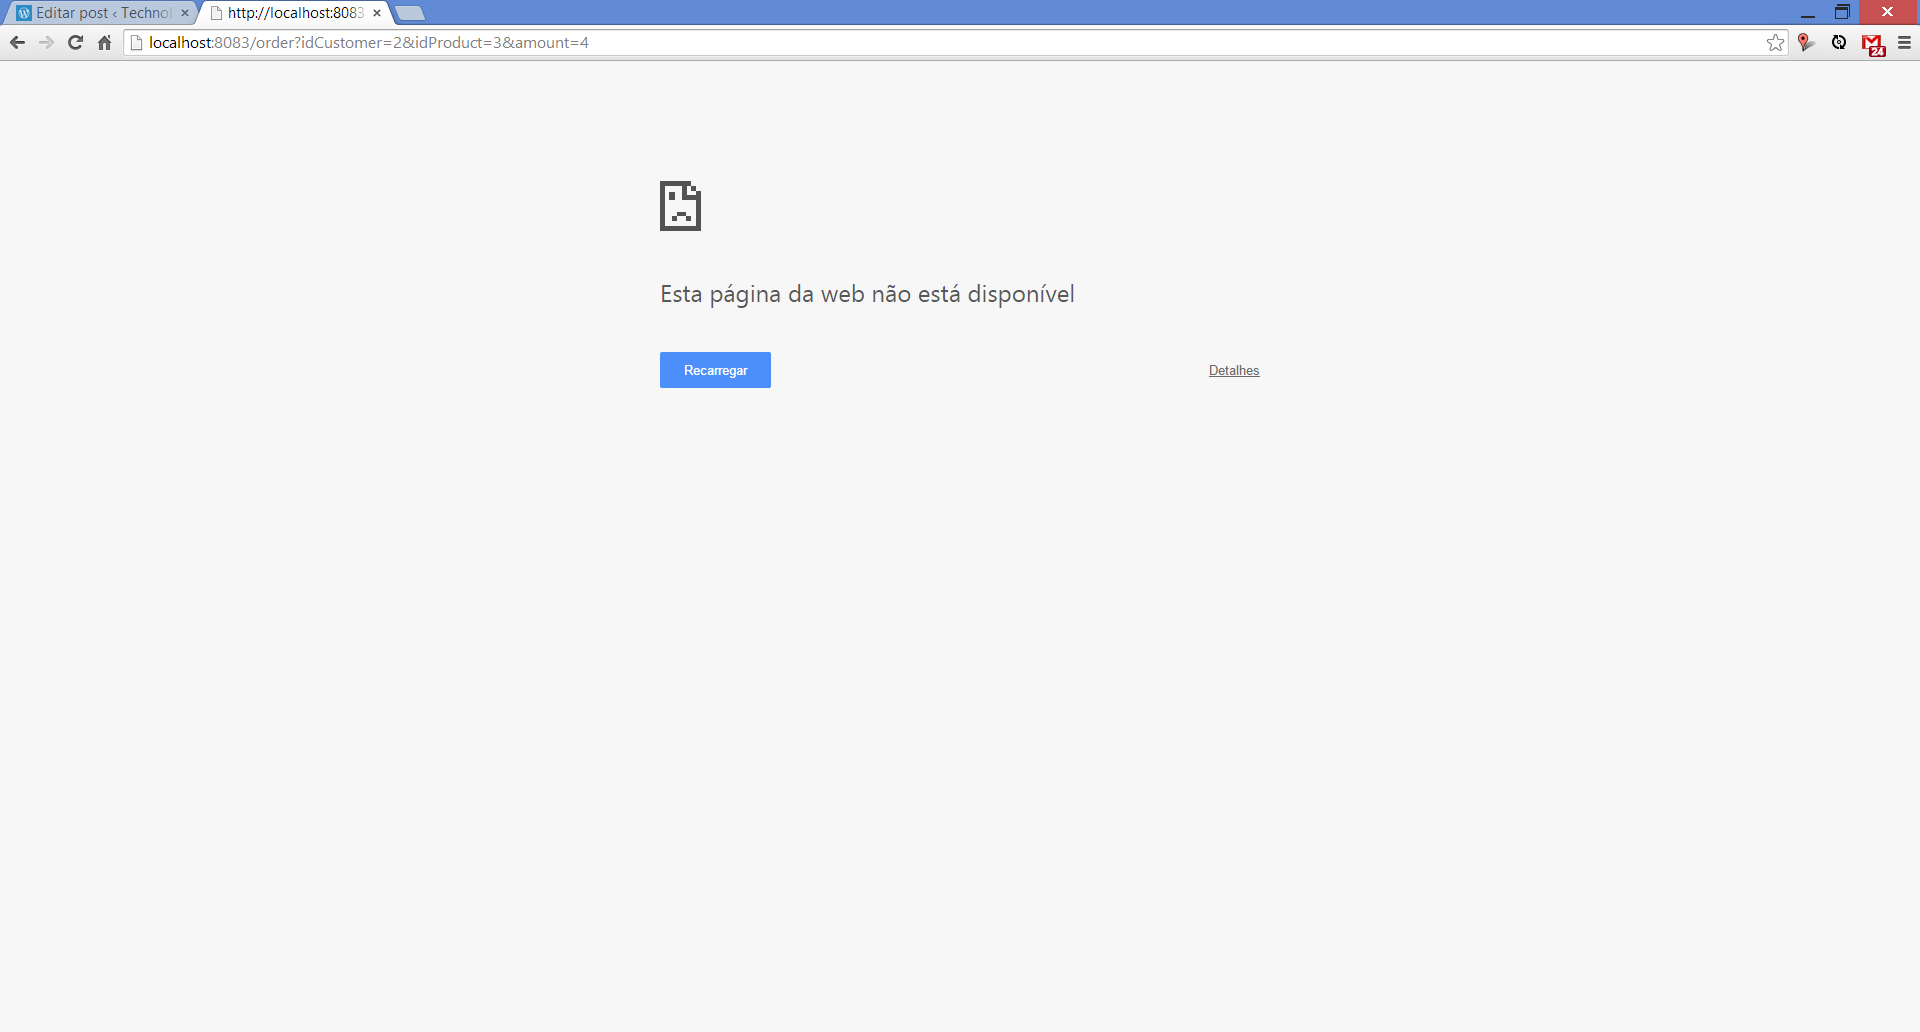
Finally, the moment of true: let’s call the Order service, that utilises our other 2 services, to see if the service’s addresses are resolved with Eureka’s help. To test it, let’s make the following call:
curl -XGET 'http://<your ip>:8082/order/2/1/4'
If everything goes well, we will see a response like:
{"id":1,"amount":4,"orderDate":1452216090392,"customer":{"id":2,"name":"Cliente 2","email":"customer2@gmail.com"},"product":{"id":1,"sku":"abcd1","description":"Produto1"}}
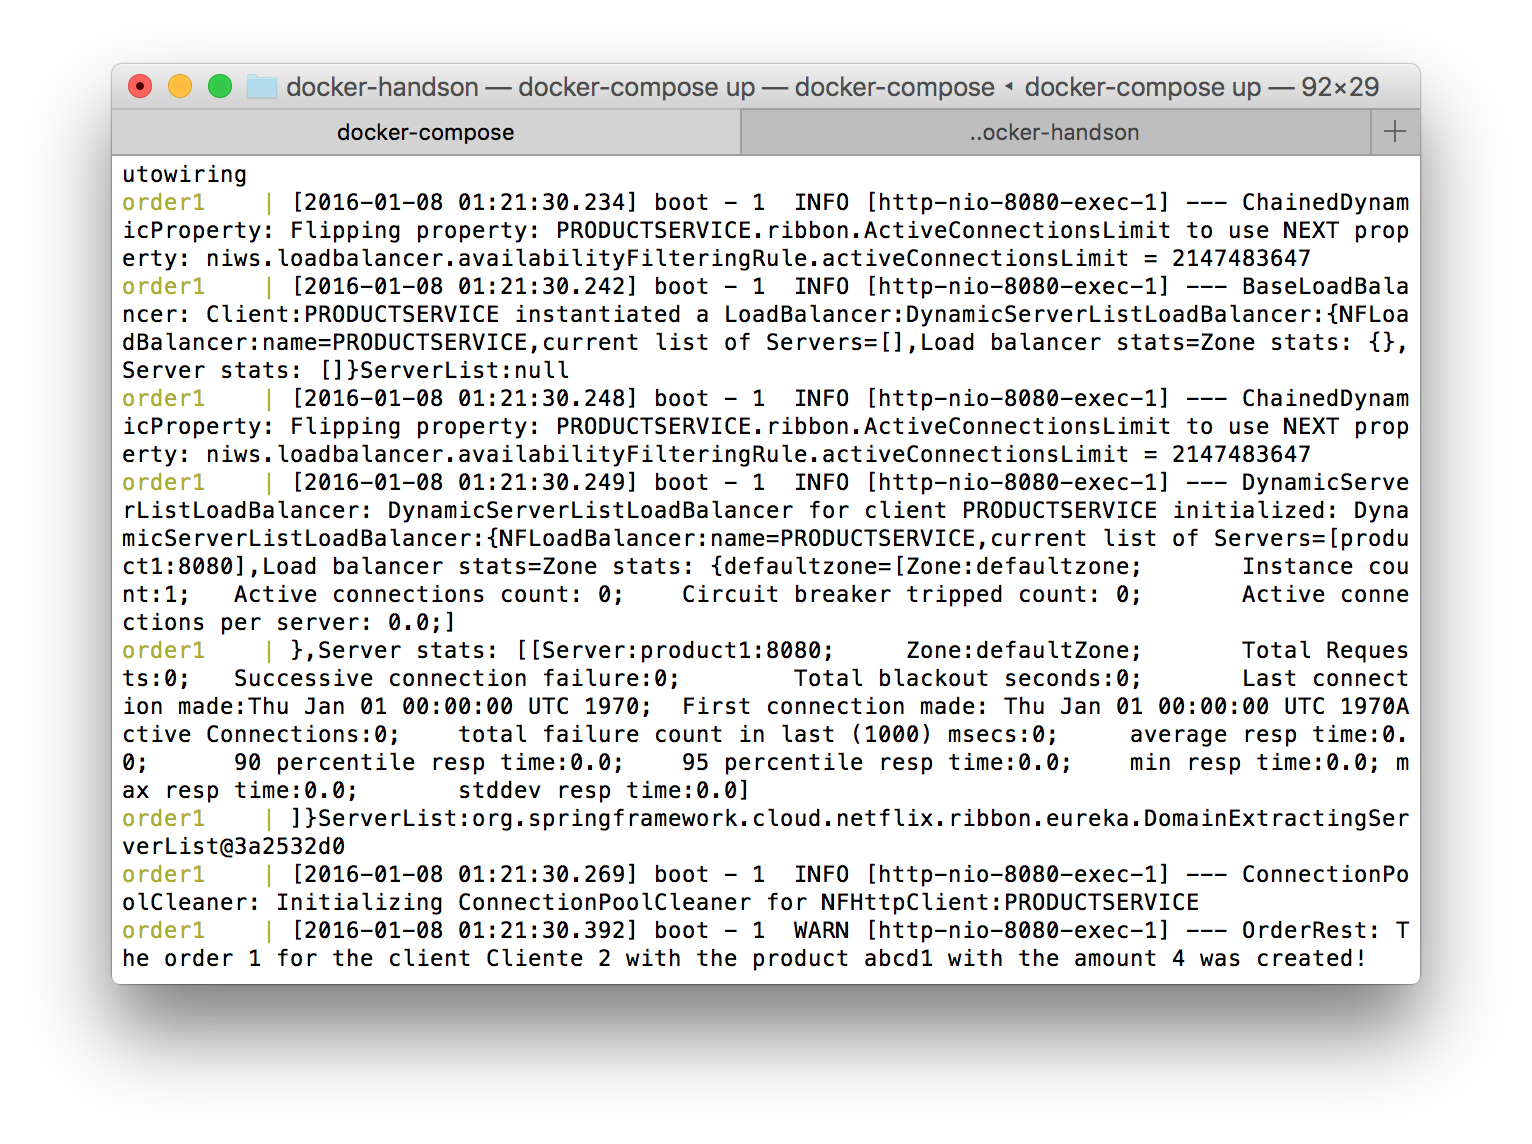
Success! But can we have further proof? If we see the logs from the Order1 container, we can see some logs showing Ribbon in action, searching for the services we need on the call and initializing load balancers, in order to serve our needs:
Let’s make one last test before closing in: let’s add one more instance of the Product’s service, to see if the new instance is registered under the same application ID. To do this, let’s run the following command. Notice that we didn’t specify the port to expose the service, since we just want to add up the instance to load balance the internal calls from the Order service:
docker run --rm --name product2 --hostname=product2 --net=microservicesnet -v /Users/alexandrelourenco/Applications/git/docker-handson:/data alexandreesl/microservices-spring-boot-base -jar /data/Product-backend/target/Product-backend-1.0.jar
If we open the Eureka web interface again, we will see that the second address is mapped:
Finally, to test the balance, let’s make a call of the previous URL of the Order service. After the call, we will see that our service is aware of both addresses, proving that the balance is implemented, as we can see on the log’s fragment bellow:
[2016-01-08 14:14:09.703] boot – 1 INFO [http-nio-8080-exec-1] — ChainedDynamicProperty: Flipping property: PRODUCTSERVICE.ribbon.ActiveConnectionsLimit to use NEXT property: niws.loadbalancer.availabilityFilteringRule.activeConnectionsLimit = 2147483647
[2016-01-08 14:14:09.709] boot – 1 INFO [http-nio-8080-exec-1] — BaseLoadBalancer: Client:PRODUCTSERVICE instantiated a LoadBalancer:DynamicServerListLoadBalancer:{NFLoadBalancer:name=PRODUCTSERVICE,current list of Servers=[],Load balancer stats=Zone stats: {},Server stats: []}ServerList:null
[2016-01-08 14:14:09.714] boot – 1 INFO [http-nio-8080-exec-1] — ChainedDynamicProperty: Flipping property: PRODUCTSERVICE.ribbon.ActiveConnectionsLimit to use NEXT property: niws.loadbalancer.availabilityFilteringRule.activeConnectionsLimit = 2147483647
[2016-01-08 14:14:09.718] boot – 1 INFO [http-nio-8080-exec-1] — DynamicServerListLoadBalancer: DynamicServerListLoadBalancer for client PRODUCTSERVICE initialized: DynamicServerListLoadBalancer:{NFLoadBalancer:name=PRODUCTSERVICE,current list of Servers=[product1:8080, product2:8080],Load balancer stats=Zone stats: {defaultzone=[Zone:defaultzone; Instance count:2; Active connections count: 0; Circuit breaker tripped count: 0; Active connections per server: 0.0;]
},Server stats: [[Server:product2:8080; Zone:defaultZone; Total Requests:0; Successive connection failure:0; Total blackout seconds:0; Last connection made:Thu Jan 01 00:00:00 UTC 1970; First connection made: Thu Jan 01 00:00:00 UTC 1970; Active Connections:0; total failure count in last (1000) msecs:0; average resp time:0.0; 90 percentile resp time:0.0; 95 percentile resp time:0.0; min resp time:0.0; max resp time:0.0; stddev resp time:0.0]
, [Server:product1:8080; Zone:defaultZone; Total Requests:0; Successive connection failure:0; Total blackout seconds:0; Last connection made:Thu Jan 01 00:00:00 UTC 1970; First connection made: Thu Jan 01 00:00:00 UTC 1970; Active Connections:0; total failure count in last (1000) msecs:0; average resp time:0.0; 90 percentile resp time:0.0; 95 percentile resp time:0.0; min resp time:0.0; max resp time:0.0; stddev resp time:0.0]
]}ServerList:org.springframework.cloud.netflix.ribbon.eureka.DomainExtractingServerList@2561f098
[2016-01-08 14:14:09.738] boot – 1 INFO [http-nio-8080-exec-1] — ConnectionPoolCleaner: Initializing ConnectionPoolCleaner for NFHttpClient:PRODUCTSERVICE
And that concludes our lab. As we can see, we builded a robust stack to deploy our microservices with their dependencies, with little effort.
Clustering container hosts
In all of our examples, we are always working with a single Docker host, our own machine on the case. On a real production environment, we can have some dozens or even hundreds of Docker hosts. In order to make all the hosts to work together, it is necessary to implement some layer that manages the hosts, making them appear as a single cluster to the consumers.
This is the goal of Docker Swarm. With Docker Swarm, we can connect multiple Docker hosts across a network, using them as a single cluster by using Docker Swarm’s interface.
For further information about Docker Swarm alongside a good example of utilization, I suggest consulting the excellent “The Docker Book”, which I describe on the next section.
References
This post was inspired by my studies on Docker with The Docker Book, written by James Turnbull. It is a excellent source of information, that I highly recommend to buy it! You can find the book available to purchase online on:
www.dockerbook.com
Conclusion
And this concludes our tour on the world of Docker. With a simple interface, Docker allows us to use all the power of the container world, allowing us to quickly deploy and escalate our applications. Never it was so simple to deploy our applications! Thank you for following me on another post, until next time.
Continue reading


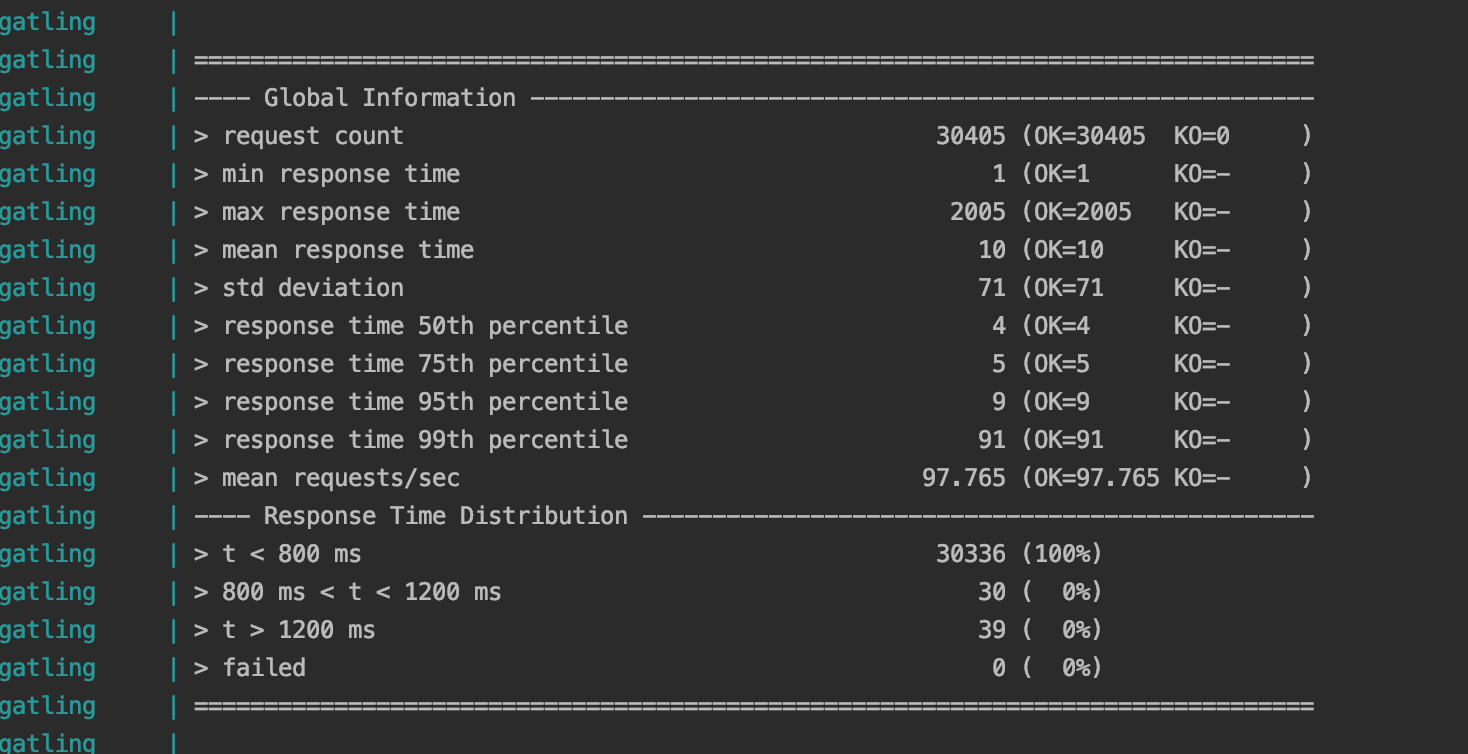

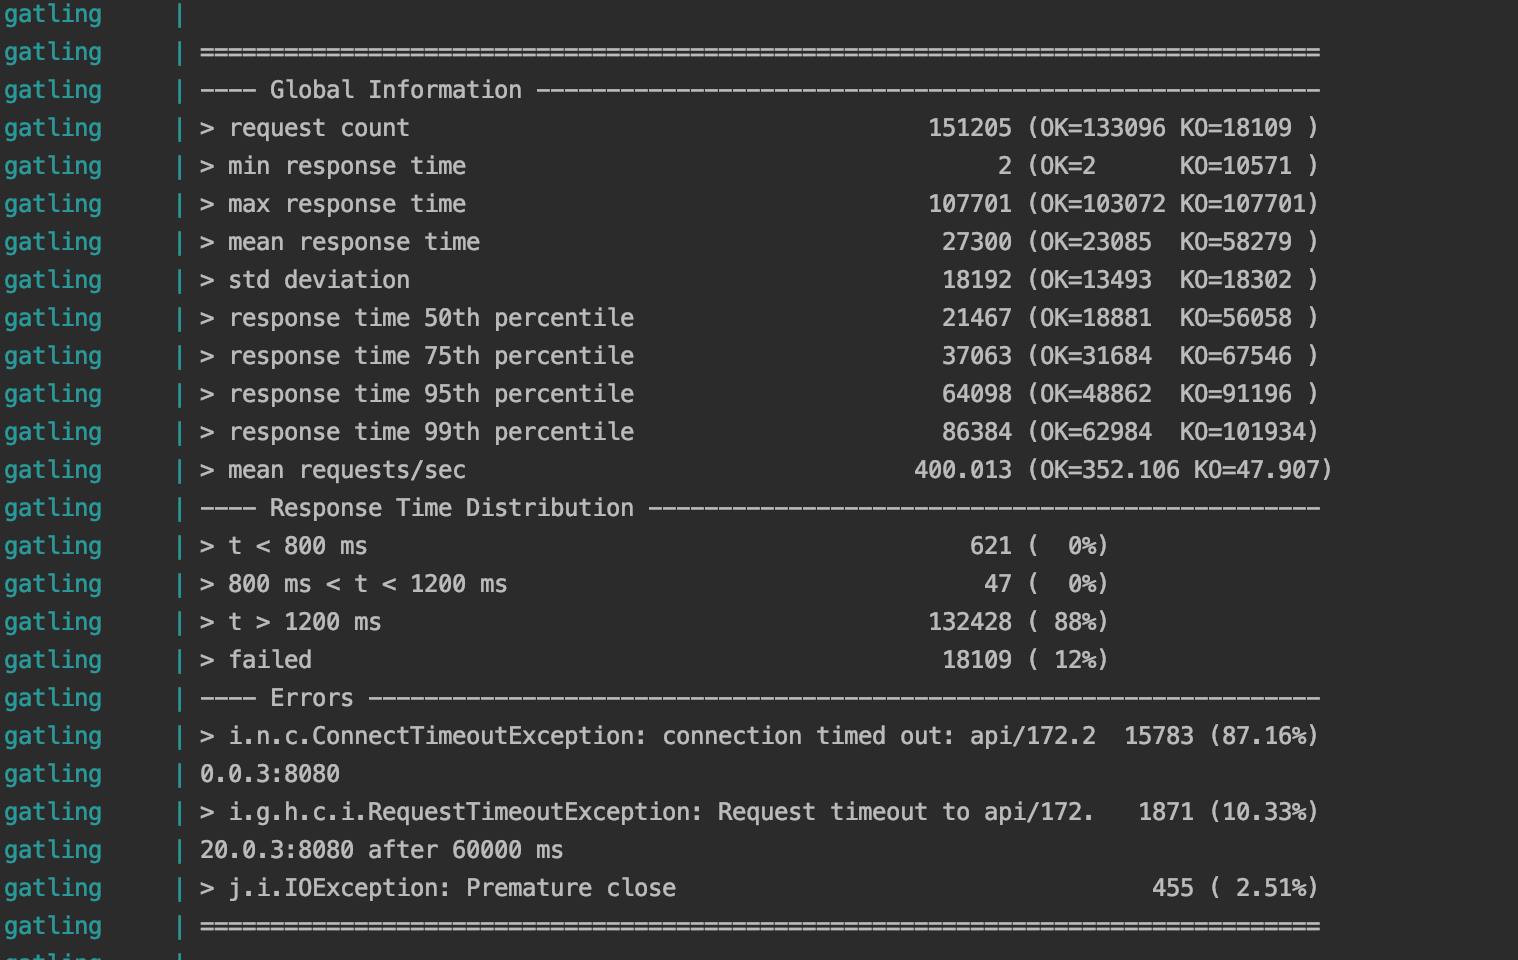 Now we got some errors! The cause, as we can see from the report, are timeouts from server threads been exhausted due to the massive amount of requests. In a real scenario, we should think of options such as horizontal balancing, reactive streams and such. But since our focus is not on API performance in the post, we will not continue for now. The main point for this little test is to show how Gatling can help us in testing the capacity of our applications.