

Hello, dear readers! Welcome to my blog. In this post, we will talk about Gatling, a Scala library designed for developing performance/stress tests. But why do we need to make such tests? Let’s find it out!
Measuring our code
It is no mystery to anyone that performance is key to any architecture, in today’s ever-growing necessity to crunch more and more massive chunks of data at high speed. So, in order to supply this demand, we need to keep an eye out for aspects concerning performance, such as network throughputs and I/O costs.
There is some debate about when to start thinking about performance, with people both defending that it should be the first thing to do, or that you should think only at later stages when the need arises.
Wherever is your opinion on this subject, the point is that, at some point, you will be prompted to think about your application performance. When this happens, a good tool that you could use for helping you in measuring the performance are performance tests, such as stress and load tests.
The difference between stress and load tests is essentially their objectives. Stress tests objective is to check how much “punishment” an application can take it before it will breakdown, or become very close to doing so. This can help to define scaling thresholds to add more instances before the breaking point is met, for example.
Load tests, on the other hand, has the objective to test how the application will behave with different loads of data, up to a massive amount that reflects a peak situation, even more than a normal peak. This can help to identify bottlenecks, such as a search endpoint which have a more complex query that won’t withstand an access peak and will become very slow at high traffic, for example.
Well, so now that we know why is good to do performance tests, why we need a tool to do that?
Why use a library for that?
Of course, we could just write a simple script that loads a chunk of threads and start firing at will at our application – let’s assume we are talking about a REST API at this point, which is the focus of our lab later on -, and just see if it breaks after a wave of HTTP requests. Easy enough, right?
The problem with this approach is that test suite features are not that simple as it seems. Not only we need to make more complex testing scenarios, such as ramping up users (to simulate increasing usage across a timeline), distributed calls on a time frame, parallelism, etc but also we need to think about reading the results itself, as it would be useful to calculate things such as percentiles, average call durations, etc.
When we use a tool such as Gatling to this end, we get all these features out-of-box, making our life much easier. Besides, since it is already made in a way that’s easy to reuse, we can make scripts that will be used across several different applications, and can even be used on CI pipelines.
What about monitoring platforms?
You could be thinking about some monitoring platforms, such as NewRelic, which already use technologies such as Java profiling to make real-time performance monitoring, pointing out issues at specific layers such as databases, for example. These platforms are excellent and should be used, no doubt about it.
However, if possible, for applications that really are performance-critical, it could pay off to make use of a tool such as Gatling, since as said before, it could be integrated to the CI pipeline, making it possible to test his performance on critical operations even before the new code is sent to Production.
So, now that we talked about the importance of performance and about what Gatling is for and why it is a good tool, let’s start with a simple lab to show his usefulness in practice.
Lab
For this lab, we will create a simple Spring Boot API, that uses Postgres as a database. It will be a simple user CRUD service, since our primary focus is not on showing how to develop an API, but on how to use Gatling to measure it.
So, for our lab we will have an API with the following endpoints:
- http://localhost:8080/user/ (POST): Creates a user;
- http://localhost:8080/user/ (PATCH): Updates a user;
- http://localhost:8080/user/{id} (GET): Searches for a user by his ID;
- http://localhost:8080/user/name/{name} (GET): Searches for a user by his name;
- http://localhost:8080/user/{id} (DELETE): Delete the user from the given ID.
The whole project is dockerized, creating an API alongside a populated database. Gatling will also run inside a container. For convenience, there is also a Makefile with the necessary commands to execute the stack. To run it, you need to have Docker and Java 11 installed and use the Makefile included on the project, as shown:
make run
If the reader doesn’t have – or want – Java installed in your machine, there is also a convenient Docker image provided on Docker hub. Just use run-docker instead of run on make and it will run everything with just Docker.
Since our focus is on Gatling, we will not enter in more discussions about Spring Boot itself and other API details. If the reader doesn’t know Spring Boot, I suggest reading this article.
To run Gatling, we will use a Docker container that will run our simulations (Gatling’s terminology for his test suites). All simulations are inside the project, on a folder called src/gatling/simulations.
Inside the gatling folder, we can also find another two folders, the first one being conf. Gatling ships with a good set of default values for configuration, so we just use this folder to set a default value for our simulations on the reports. If we don’t do this, it will keep asking for a description every time we run it. We can find all possible settings to be used on this link.
The last folder is the reports one. This folder contains the reports generated for us at every run. We will start analyzing the reports soon enough.
All coding from our lab can be found here. Now, let’s begin our simulations!
Working with Gatling
Let’s begin with our first simulation. The simulations are written on Scala. If the reader is not familiar with Scala, I suggest reading my series of articles here. Our first simulation simply makes a call for each operation of the API, as follows:
import io.gatling.core.Predef._
import io.gatling.http.Predef._
import scala.concurrent.duration._

class CrudSimulation extends Simulation {

  val httpProtocol = http // 1
    .baseUrl("http://api:8080/user") // 2
    .acceptHeader("application/json") // 3
    .userAgentHeader("Mozilla/5.0 (Windows NT 5.1; rv:31.0) " +
    "Gecko/20100101 Firefox/31.0") // 4

  val scn = scenario("CrudSimulation") // 5
    .exec(http("request_get") // 6
    .get("/1")) // 7
    .pause(5) // 8
    .exec(http("request_post")
    .post("/")
    .body(StringBody(
      """{ "name": "MytestDummy",
        | "phone":11938284334 }""".stripMargin)).asJson)
    .pause(5)
    .exec(http("request_patch")
      .patch("/")
      .body(StringBody(
        """{ "id":1, "name": "MytestDummy2",
          |"phone":11938284123 }""".stripMargin)).asJson)
    .pause(5)
    .exec(http("request_get_name")
      .get("/name/MytestDummy"))
    .pause(5)
    .exec(http("request_delete")
      .delete("/1"))
    .pause(5)


  setUp( // 9
    scn.inject(atOnceUsers(1)) // 10
  ).protocols(httpProtocol) // 11
}
Let’s introduce the simulation structure by analyzing the code:
- First, we define an http object, which will be used to set the default values for our simulation;
- Here we define the base URL for all our calls on the simulation;
- Here we define the media header that defines that all our calls will be on JSON;
- Here we define the user-agent, this is not so important on an API test, but could be useful for a website that requires testing for different browsers, for example;
- Here we create our scenario. Simulations are composed of scenarios, where calls are made;
- Here we prepare our first call. By creating an http object, we start defining the call we wish to make;
- Here we define we want to make a GET call. On the next lines, we can also see how to make POST and PATCH calls, where a request body is provided;
- Here we define a pause of 5 seconds before making the next call;
- Here we invoke setUp, which will initialize the scenario to run;
- Here we tell how we want to run the scenario. For this simple first simulation, we just want one user to make the calls;
- Here we define the protocol used in the scenario. It is here that we pass the first object we created, with all the default values we defined at first.
Gatling also offers a recorder, where you can record a browser session to simulate user iterations. This is useful when we want to create tests for a website, instead of a API. The recorder can be found here.
As we can see, is very easy to create simulations. To run the simulation, just use the following make command:
make run
Like we talked about the run command, there is also a run-docker command, if the reader just want to use Docker
After running Gatling, in the end, we will see a table like the following:

The table has information summarizing the execution. Some interesting assets are like the average, min and max response times – in milliseconds -, and percentiles. Percentiles are calculations that show for a given data load, the percentage a given value occurs. For example, on the table below, we can see that, for our 5 count requests, 50% of the requests have 24 milliseconds response time. You can read more about percentiles here.
After running, Gatling also generated an HTML report inside the aforementioned reports folder. If we open index.html, we can see not only the data we just talked about but also other information, such as active users during the simulation, response time distribution, etc.

Now, let’s make another two scenarios. We will start to really make performance tests, both on writing and reading API operations.
We start by making a refactoring. We create some traits – Traits are more or less the equivalent of Java interfaces in Scala, but with some powerful differences – to reuse code and group the scenarios together in a single simulation. First, we create GatlingProtocol trait:
import io.gatling.core.Predef._
import io.gatling.http.Predef._

trait GatlingProtocol {

  val httpProtocol = http
    .baseUrl("http://api:8080/user")
    .acceptHeader("application/json")
    .userAgentHeader("Mozilla/5.0 (Windows NT 5.1; rv:31.0) " +
      "Gecko/20100101 Firefox/31.0")

}
Next, we create a NumberUtils trait, to reuse code we will use on both new scenarios:
trait NumberUtils {

  val leftLimit = 1L
  val rightLimit = 10L
  def generateLong = leftLimit + (Math.random * (rightLimit - leftLimit)).toLong

}
After this refactoring, this is how we code our previously simulation:
import io.gatling.core.Predef._
import io.gatling.http.Predef._
import scala.concurrent.duration._

trait CrudSimulation {

  val crudScn = scenario("CrudScenario")
    .exec(http("request_get")
      .get("/1"))
    .pause(5)
    .exec(http("request_post")
      .post("/")
      .body(StringBody(
        """{ "name": "MytestDummy",
          | "phone":11938284334 }""".stripMargin)).asJson)
    .pause(5)
    .exec(http("request_patch")
      .patch("/")
      .body(StringBody(
        """{ "id":11, "name": "MytestDummy2",
          |"phone":11938284123 }""".stripMargin)).asJson)
    .pause(5)
    .exec(http("request_get_name")
      .get("/name/MytestDummy"))
    .pause(5)
    .exec(http("request_delete")
      .delete("/11"))
    .pause(5)


}
Then, we create two new scenarios, one with reading operations from the API, and another with the writing ones:
import io.gatling.core.Predef._
import io.gatling.http.Predef._
import scala.concurrent.duration._

trait WriteOperationsSimulation extends NumberUtils {

  val writeScn = scenario("WriteScenario")
    .exec(http("request_post")
    .post("/")
    .body(StringBody(
      """{ "name": "MytestDummy",
        | "phone":11938284334 }""".stripMargin)).asJson)
    .pause(5)
    .exec(http("request_patch")
      .patch("/")
      .body(StringBody(
        s"""{ "id":$generateLong, "name": "MytestDummy$generateLong",
          |"phone":11938284123 }""".stripMargin)).asJson)

}
import io.gatling.core.Predef._
import io.gatling.http.Predef._
import scala.concurrent.duration._

trait ReadOperationsSimulation extends NumberUtils {

  val readScn = scenario("ReadScenario")
    .exec(http("request_get")
      .get("/" + generateLong))
    .pause(5)
    .exec(http("request_get_name")
      .get("/name/Alexandre"))
    .pause(5)


}
Finally, we create a runner, which will set all scenarios in a simulation to run:
import io.gatling.core.Predef._
import io.gatling.http.Predef._
import scala.concurrent.duration._

class SimulationRunner extends Simulation with CrudSimulation with ReadOperationsSimulation with WriteOperationsSimulation with GatlingProtocol {

  setUp(
    crudScn.inject(atOnceUsers(1)),
    readScn.inject(constantUsersPerSec(50) during (5 minutes)), // 1
    writeScn.inject(rampUsers(200) during (2 minutes)) // 2
  ).protocols(httpProtocol)

}
Other new features we can see here are new forms of setting how Gatling will distribute the users to fire our scenarios on the simulation. In our case, we are telling Gatling to:
- Start 50 users per second along with the execution, for 5 minutes;
- Start users up to 200, evenly distributed across a 2-minute time range.
More examples of configuration scenarios can be found here.
After running the tests again, we can see we get a lot more requests made – and of course, the test gets a lot more to run – and lots of data to analyze:
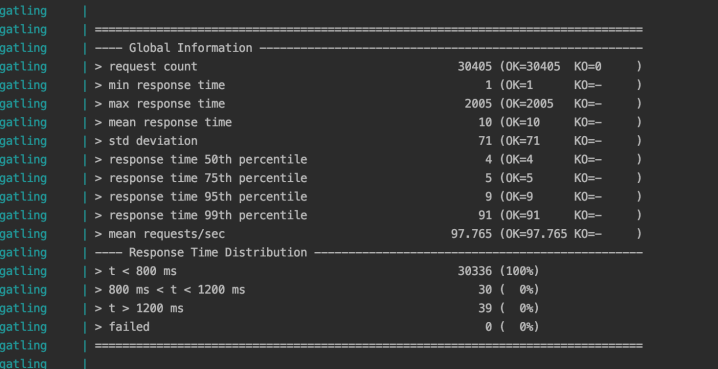
Analyzing for bottlenecks
Now, let’s see if we can use our tests to check for possible performance bottlenecks.
If we check the get by name endpoint report, we will see that the max response time is more then 1 second:
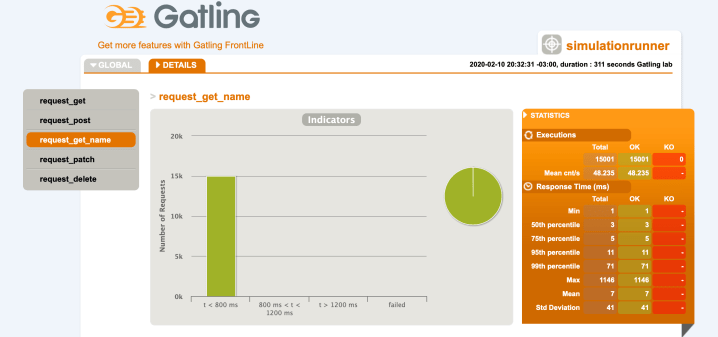
Now let’s imagine that this is not an acceptable response time for our needs since our business requirements declare that this endpoint will be heavily used by the clients. By using Gatling, we could detect the problem, before it was dispatched to production.
In our case, our most likely culprit is the database, since the API is so simple. Let’s try to improve the performance of the search by creating an index on the name field. After creating the index and re-running the tests, we can see that our performance has improved:
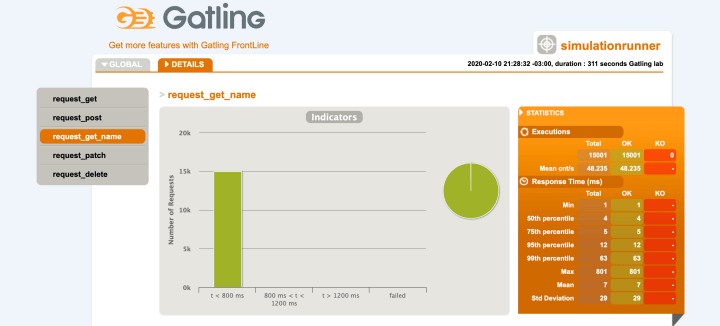
We can see that now the max response time is below 1 second, solving our performance problem.
Stressing the API
Let’s do one last test before wrapping it up. Let’s do a stress test and see how much more punishment our API can take before starting getting errors from the load.
First we increase the users injected in the scenarios:
import io.gatling.core.Predef._
import io.gatling.http.Predef._
import scala.concurrent.duration._

class SimulationRunner extends Simulation with CrudSimulation with ReadOperationsSimulation with WriteOperationsSimulation with GatlingProtocol {

  setUp(
    crudScn.inject(atOnceUsers(1)),
    readScn.inject(constantUsersPerSec(150) during (5 minutes)),
    writeScn.inject(rampUsers(500) during (2 minutes))
  ).protocols(httpProtocol)

}
Then we run:

Wow, still no failures! But of course, the degradation is perceptible. Let’s increase a little more:
import io.gatling.core.Predef._
import io.gatling.http.Predef._
import scala.concurrent.duration._

class SimulationRunner extends Simulation with CrudSimulation with ReadOperationsSimulation with WriteOperationsSimulation with GatlingProtocol {

  setUp(
    crudScn.inject(atOnceUsers(1)),
    readScn.inject(constantUsersPerSec(250) during (5 minutes)),
    writeScn.inject(rampUsers(600) during (2 minutes))
  ).protocols(httpProtocol)


}
 Now we got some errors! The cause, as we can see from the report, are timeouts from server threads been exhausted due to the massive amount of requests. In a real scenario, we should think of options such as horizontal balancing, reactive streams and such. But since our focus is not on API performance in the post, we will not continue for now. The main point for this little test is to show how Gatling can help us in testing the capacity of our applications.
Conclusion
And so we conclude our lesson. With simple code, we created a powerful tool, that it will help us in testing our API for performance and load tests. Thank you for following me on another article, until next time.
