Welcome, dear reader, to another post from my blog on technology. In this post we will discuss a framework, originally made for the Scala language, but also with a version for Java, which offers a new way of developing parallel applications: Akka.
Traditional model of parallelism: Threads
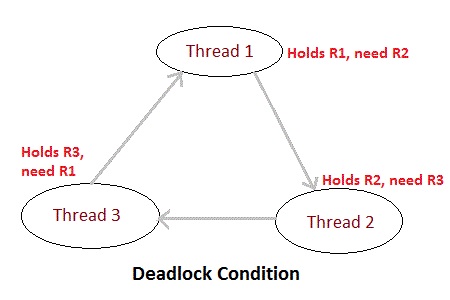
Traditionally, when we work with parallelism, we use threads, which sometimes need to share resources with each other. In order to ensure the isolation of executions, we begin to enter execution blocks with the synchronized policy. As the system grows, more and more blocks of this nature are being added, occasionally taking us to the condition of deadlocks, where processes are in a state of permanent lock, as a process attempts to access a resource that is already locked by a predecessor process of its execution flow. We can see an example of this situation in the figure below, where three threads “compete” for the use of resources and enter in a deadlock state:
Thinking about this, was developed in 1973 by Carl Hewitt, Peter Bishop and Richard Steiger, one paper called “The Universal Modular Actor Formalism for Artificial Intelligence.” This paper introduced the concept of actors, which we will speak next.
Parallelism model by actors
In the model of parallelism by actors, we have a new concept of development. In this model, all processing must be broken into logical units, called actors, each with its due role and its proper order within a flow. A simple way to understand this model is to imagine a process of real life, where the “actors” are people. Imagine a stream where a person A receives a message to be sent by letter to a person B, in this scenario, we would have the following flow of actions, in simplified form:

PS:In the model above, we can see that the actors are in a kind of hierarchy, where from a root actor, other actors are invoked. This hierarchy is the “location” of the creation of the actors within a flow, where the root actor is created within the main system thread. During the hands-on, we can see more clearly how this hierarchy works.
Hands-on
For this hands-on, we will use Eclipse Luna and Maven 3.0. First, create a simple Maven project – without defined archetype – and put our dependencies in the pom.xml file:
<project xmlns=”http://maven.apache.org/POM/4.0.0″ xmlns:xsi=”http://www.w3.org/2001/XMLSchema-instance” xsi:schemaLocation=”http://maven.apache.org/POM/4.0.0 http://maven.apache.org/xsd/maven-4.0.0.xsd”>
<modelVersion>4.0.0</modelVersion>
<groupId>br.com.alexandreesl.handson</groupId>
<artifactId>HandsOnAkka</artifactId>
<version>0.0.1-SNAPSHOT</version>
<dependencies>
<dependency>
<groupId>com.typesafe.akka</groupId>
<artifactId>akka-actor_2.10</artifactId>
<version>2.2.3</version>
</dependency>
</dependencies>
</project>
As we can see above, simply include dependence “akka-actor_2.10” to the project. In Akka, we have the concept of actors servers where we run our processes in Akka model. You can instantiate these servers and invokes them remotely, but in this example, we will start one in a standalone way, in order to maintain simplicity in learning.
To begin, let’s create the main class of the project, where we will start the actors server. The code below accomplishes this task:
package br.com.alexandreesl.handson;
import akka.actor.ActorSystem;
public class ActorServer {
public static void main(String[] args) {
ActorSystem server = ActorSystem.create(“ActorServer”);
}
}
As we can see, it is quite simple to create a actors server, with only one line. An important point in the server creation is that it creates a new thread that keeps the program running indefinitly.
In this example, we will simulate the sending of a letter from a person A to person B, as we talked throughout the post. For this, we will make the call to the first actor of the flow, ie, the person who will receive the letter and take it to the post office to send:
package br.com.alexandreesl.handson;
import akka.actor.ActorRef;
import akka.actor.ActorSystem;
import akka.actor.Props;
public class ActorServer {
public static void main(String[] args) {
ActorSystem server = ActorSystem.create(“ActorServer”);
ActorRef personA = server.actorOf(Props.create(PersonA.class),
“PersonA”);
personA.tell(“Message to be delivered “, ActorRef.noSender());
}
}
In the above code, we create a reference (ActorRef) for the actor personA and pass on the letter to the same. To create an actor, just create a class that extends the UntypedActor class, as we see below.
package br.com.alexandreesl.handson;
import akka.actor.ActorRef;
import akka.actor.Props;
import akka.actor.UntypedActor;
import akka.event.Logging;
import akka.event.LoggingAdapter;
public class PersonA extends UntypedActor {
private ActorRef postRecepcionist;
private LoggingAdapter log = Logging.getLogger(getContext().system(), this);
@Override
public void preStart() throws Exception {
super.preStart();
postRecepcionist = getContext().actorOf(
Props.create(PostReceptionist.class), “PostRecepcionist”);
}
@Override
public void onReceive(Object message) throws Exception {
log.info(“Receiving the letter”);
log.info(“Going to the post office”);
log.info(“Delivering the letter to the post recepcionist”);
postRecepcionist.tell(message, getSelf());
}
}
In the above code, we create the reference to the receptionist of the post office in the preStart event and implement the message passing to the receptionist in the actor´s main method, “OnReceive”. Within the life cycle of the actors in Akka, there are 4 events in which we can insert additional code: preStart, preRestart, postRestart and postStop. Basically, the actors have several “incarnations” (instances) that occur each time the actor ´s main method, “OnReceive” throws an exception, where according to a supervisor policy set, the actor can either be reincarnated (restart ) and finished (stop). Later on we will talk in more detail about the policies, but for now, we can see in the diagram below the life cycle of the actors:

One last point to talk about the code above is the use of Akka´s logging API where we can log some messages representing the processing to be performed by the actor. When we use the Akka API, beyond traditional information log that can be found in Java, is also recorded the actor’s hierarchy within the flow, facilitating further analysis. The remaining codes of the example are analogous to the Actor PersonA and represent only the passage of the message flow hierarchy, so below we list the rest of this first code example:
package br.com.alexandreesl.handson;
import akka.actor.ActorRef;
import akka.actor.Props;
import akka.actor.UntypedActor;
import akka.event.Logging;
import akka.event.LoggingAdapter;
public class PostReceptionist extends UntypedActor {
private ActorRef postMan;
private LoggingAdapter log = Logging.getLogger(getContext().system(), this);
@Override
public void preStart() throws Exception {
super.preStart();
postMan = getContext().actorOf(Props.create(PostMan.class), “PostMan”);
}
@Override
public void onReceive(Object message) throws Exception {
log.info(“Organizing the letters”);
log.info(“Delivering the letters to the Postman”);
postMan.tell(message, getSelf());
}
}
package br.com.alexandreesl.handson;
import akka.actor.ActorRef;
import akka.actor.Props;
import akka.actor.UntypedActor;
import akka.event.Logging;
import akka.event.LoggingAdapter;
public class PostMan extends UntypedActor {
private ActorRef personB;
private LoggingAdapter log = Logging.getLogger(getContext().system(), this);
@Override
public void preStart() throws Exception {
super.preStart();
personB = getContext().actorOf(Props.create(PersonB.class), “PersonB”);
}
@Override
public void onReceive(Object message) throws Exception {
log.info(“Go to the address with the letter”);
log.info(“Deliver the letter to personB”);
personB.tell(message, getSelf());
}
}
package br.com.alexandreesl.handson;
import akka.actor.UntypedActor;
import akka.event.Logging;
import akka.event.LoggingAdapter;
public class PersonB extends UntypedActor {
private LoggingAdapter log = Logging.getLogger(getContext().system(), this);
@Override
public void onReceive(Object message) throws Exception {
log.info(“Reads the letter”);
}
}
Finally, to run the example, we just select the ActorServer class and run the same as a Java program (run as> Java Application). The log shows the program execution:
[INFO] [12/25/2014 14:12:48.439] [ActorServer-akka.actor.default-dispatcher-3] [akka://ActorServer/user/PersonA] Receiving the letter
[INFO] [12/25/2014 14:12:48.439] [ActorServer-akka.actor.default-dispatcher-3] [akka://ActorServer/user/PersonA] Going to the post office
[INFO] [12/25/2014 14:12:48.439] [ActorServer-akka.actor.default-dispatcher-3] [akka://ActorServer/user/PersonA] Delivering the letter to the post recepcionist
[INFO] [12/25/2014 14:12:48.439] [ActorServer-akka.actor.default-dispatcher-2] [akka://ActorServer/user/PersonA/PostRecepcionist] Organizing the letters
[INFO] [12/25/2014 14:12:48.439] [ActorServer-akka.actor.default-dispatcher-2] [akka://ActorServer/user/PersonA/PostRecepcionist] Delivering the letters to the Postman
[INFO] [12/25/2014 14:12:48.442] [ActorServer-akka.actor.default-dispatcher-3] [akka://ActorServer/user/PersonA/PostRecepcionist/PostMan] Go to the address with the letter
[INFO] [12/25/2014 14:12:48.442] [ActorServer-akka.actor.default-dispatcher-3] [akka://ActorServer/user/PersonA/PostRecepcionist/PostMan] Deliver the letter to personB
[INFO] [12/25/2014 14:12:48.442] [ActorServer-akka.actor.default-dispatcher-2] [akka://ActorServer/user/PersonA/PostRecepcionist/PostMan/PersonB] Reads the letter
As we can see above, all messages were processed in the order of the implemented flow. An important point to note is that the processing of messages by the actors is asynchronous, that is, if we put more messages, the actors will not wait for the end of the processing to process the next message. To illustrate, let’s modify the main class and include a message loop:
.
.
.
for (int i = 0; i < 10; i++)
personA.tell(“Message to be delivered ” + i, ActorRef.noSender());
With the above modification, if we execute the program again, we will have the following log:
[INFO] [12/25/2014 14:16:33.584] [ActorServer-akka.actor.default-dispatcher-2] [akka://ActorServer/user/PersonA] Receiving the letter
[INFO] [12/25/2014 14:16:33.584] [ActorServer-akka.actor.default-dispatcher-2] [akka://ActorServer/user/PersonA] Going to the post office
[INFO] [12/25/2014 14:16:33.584] [ActorServer-akka.actor.default-dispatcher-2] [akka://ActorServer/user/PersonA] Delivering the letter to the post recepcionist
[INFO] [12/25/2014 14:16:33.584] [ActorServer-akka.actor.default-dispatcher-2] [akka://ActorServer/user/PersonA] Receiving the letter
[INFO] [12/25/2014 14:16:33.584] [ActorServer-akka.actor.default-dispatcher-2] [akka://ActorServer/user/PersonA] Going to the post office
[INFO] [12/25/2014 14:16:33.584] [ActorServer-akka.actor.default-dispatcher-3] [akka://ActorServer/user/PersonA/PostRecepcionist] Organizing the letters
[INFO] [12/25/2014 14:16:33.584] [ActorServer-akka.actor.default-dispatcher-2] [akka://ActorServer/user/PersonA] Delivering the letter to the post recepcionist
[INFO] [12/25/2014 14:16:33.584] [ActorServer-akka.actor.default-dispatcher-3] [akka://ActorServer/user/PersonA/PostRecepcionist] Delivering the letters to the Postman
[INFO] [12/25/2014 14:16:33.584] [ActorServer-akka.actor.default-dispatcher-3] [akka://ActorServer/user/PersonA/PostRecepcionist] Organizing the letters
[INFO] [12/25/2014 14:16:33.584] [ActorServer-akka.actor.default-dispatcher-3] [akka://ActorServer/user/PersonA/PostRecepcionist] Delivering the letters to the Postman
[INFO] [12/25/2014 14:16:33.585] [ActorServer-akka.actor.default-dispatcher-3] [akka://ActorServer/user/PersonA/PostRecepcionist] Organizing the letters
[INFO] [12/25/2014 14:16:33.585] [ActorServer-akka.actor.default-dispatcher-3] [akka://ActorServer/user/PersonA/PostRecepcionist] Delivering the letters to the Postman
[INFO] [12/25/2014 14:16:33.587] [ActorServer-akka.actor.default-dispatcher-4] [akka://ActorServer/user/PersonA/PostRecepcionist/PostMan] Go to the address with the letter
[INFO] [12/25/2014 14:16:33.587] [ActorServer-akka.actor.default-dispatcher-4] [akka://ActorServer/user/PersonA/PostRecepcionist/PostMan] Deliver the letter to personB
[INFO] [12/25/2014 14:16:33.587] [ActorServer-akka.actor.default-dispatcher-3] [akka://ActorServer/user/PersonA/PostRecepcionist/PostMan/PersonB] Reads the letter
[INFO] [12/25/2014 14:16:33.587] [ActorServer-akka.actor.default-dispatcher-4] [akka://ActorServer/user/PersonA/PostRecepcionist/PostMan] Go to the address with the letter
[INFO] [12/25/2014 14:16:33.588] [ActorServer-akka.actor.default-dispatcher-4] [akka://ActorServer/user/PersonA/PostRecepcionist/PostMan] Deliver the letter to personB
[INFO] [12/25/2014 14:16:33.588] [ActorServer-akka.actor.default-dispatcher-4] [akka://ActorServer/user/PersonA/PostRecepcionist/PostMan] Go to the address with the letter
[INFO] [12/25/2014 14:16:33.588] [ActorServer-akka.actor.default-dispatcher-4] [akka://ActorServer/user/PersonA/PostRecepcionist/PostMan] Deliver the letter to personB
[INFO] [12/25/2014 14:16:33.588] [ActorServer-akka.actor.default-dispatcher-3] [akka://ActorServer/user/PersonA/PostRecepcionist/PostMan/PersonB] Reads the letter
[INFO] [12/25/2014 14:16:33.588] [ActorServer-akka.actor.default-dispatcher-4] [akka://ActorServer/user/PersonA/PostRecepcionist/PostMan] Go to the address with the letter
[INFO] [12/25/2014 14:16:33.588] [ActorServer-akka.actor.default-dispatcher-3] [akka://ActorServer/user/PersonA/PostRecepcionist/PostMan/PersonB] Reads the letter
[INFO] [12/25/2014 14:16:33.588] [ActorServer-akka.actor.default-dispatcher-4] [akka://ActorServer/user/PersonA/PostRecepcionist/PostMan] Deliver the letter to personB
[INFO] [12/25/2014 14:16:33.588] [ActorServer-akka.actor.default-dispatcher-3] [akka://ActorServer/user/PersonA/PostRecepcionist/PostMan/PersonB] Reads the letter
[INFO] [12/25/2014 14:16:33.588] [ActorServer-akka.actor.default-dispatcher-4] [akka://ActorServer/user/PersonA/PostRecepcionist/PostMan] Go to the address with the letter
[INFO] [12/25/2014 14:16:33.588] [ActorServer-akka.actor.default-dispatcher-4] [akka://ActorServer/user/PersonA/PostRecepcionist/PostMan] Deliver the letter to personB
[INFO] [12/25/2014 14:16:33.588] [ActorServer-akka.actor.default-dispatcher-4] [akka://ActorServer/user/PersonA/PostRecepcionist/PostMan] Go to the address with the letter
[INFO] [12/25/2014 14:16:33.588] [ActorServer-akka.actor.default-dispatcher-3] [akka://ActorServer/user/PersonA/PostRecepcionist/PostMan/PersonB] Reads the letter
[INFO] [12/25/2014 14:16:33.588] [ActorServer-akka.actor.default-dispatcher-4] [akka://ActorServer/user/PersonA/PostRecepcionist/PostMan] Deliver the letter to personB
[INFO] [12/25/2014 14:16:33.588] [ActorServer-akka.actor.default-dispatcher-3] [akka://ActorServer/user/PersonA/PostRecepcionist/PostMan/PersonB] Reads the letter
[INFO] [12/25/2014 14:16:33.588] [ActorServer-akka.actor.default-dispatcher-4] [akka://ActorServer/user/PersonA/PostRecepcionist/PostMan] Go to the address with the letter
[INFO] [12/25/2014 14:16:33.588] [ActorServer-akka.actor.default-dispatcher-4] [akka://ActorServer/user/PersonA/PostRecepcionist/PostMan] Deliver the letter to personB
[INFO] [12/25/2014 14:16:33.588] [ActorServer-akka.actor.default-dispatcher-4] [akka://ActorServer/user/PersonA/PostRecepcionist/PostMan/PersonB] Reads the letter
As seen above, executions of the actors interspersed with each other, demonstrating the asynchrony of executions.
Transactions & fault tolerance
The reader may be wondering how the Akka address issues such as transactional code and fault tolerance in cases of executions in which exceptions occur during execution.
For transactional, Akka provides another component called “akka-Transactor”, which uses classes like the Coordinator, where we create code defined as “atomic”, ie, that must be performed in its entirety, or have your changes aborted in failure cases.
To the question of fault tolerance, the Akka provides the concept of supervisors, where an actor can also be a supervisor. When an actor is also a supervisor, it implements a policy that will affect all actors under the supervisor. In our example of hands-on, if we put for example the receptionist as a supervisor, the policy will be applied to both the postman and the personB, which are the next actors in the running. We have in the framework various supervisory models, where actors can either be “reincarnated” or finalized. In addition, you can also define whether the policy will be performed (restart / stop) for all supervised actors, or just for the actor that failed.
To illustrate the use, let’s add the following code snippet in the receptionist actor:
.
.
.
@Override
public SupervisorStrategy supervisorStrategy() {
return new OneForOneStrategy(-1, Duration.Inf(),
new Function<Throwable, Directive>() {
public Directive apply(Throwable t) throws Exception {
return OneForOneStrategy.restart();
}
});
}
In the passage above, we define a policy for all actors below the receptionist, where in case of failure, the actor that failed will be restart.
To simulate a fault, modify the code in personB actor:
package br.com.alexandreesl.handson;
import scala.Option;
import akka.actor.UntypedActor;
import akka.event.Logging;
import akka.event.LoggingAdapter;
public class PersonB extends UntypedActor {
int counter = 0;
private LoggingAdapter log = Logging.getLogger(getContext().system(), this);
@Override
public void preRestart(Throwable reason, Option<Object> message)
throws Exception {
log.info(“THE PERSONB IS BOOTING!”);
super.preRestart(reason, message);
}
@Override
public void onReceive(Object message) throws Exception {
log.info(“Reads the letter”);
if (counter % 2 != 0)
throw new RuntimeException(“ERROR!”);
counter++;
}
}
When we run the example again, we have the following execution log, showing the implementation of the policy:
[INFO] [12/25/2014 14:23:54.807] [ActorServer-akka.actor.default-dispatcher-2] [akka://ActorServer/user/PersonA] Receiving the letter
[INFO] [12/25/2014 14:23:54.807] [ActorServer-akka.actor.default-dispatcher-2] [akka://ActorServer/user/PersonA] Going to the post office
[INFO] [12/25/2014 14:23:54.807] [ActorServer-akka.actor.default-dispatcher-2] [akka://ActorServer/user/PersonA] Delivering the letter to the post recepcionist
[INFO] [12/25/2014 14:23:54.807] [ActorServer-akka.actor.default-dispatcher-3] [akka://ActorServer/user/PersonA/PostRecepcionist] Organizing the letters
[INFO] [12/25/2014 14:23:54.807] [ActorServer-akka.actor.default-dispatcher-2] [akka://ActorServer/user/PersonA] Receiving the letter
[INFO] [12/25/2014 14:23:54.807] [ActorServer-akka.actor.default-dispatcher-3] [akka://ActorServer/user/PersonA/PostRecepcionist] Delivering the letters to the Postman
[INFO] [12/25/2014 14:23:54.807] [ActorServer-akka.actor.default-dispatcher-2] [akka://ActorServer/user/PersonA] Going to the post office
[INFO] [12/25/2014 14:23:54.807] [ActorServer-akka.actor.default-dispatcher-3] [akka://ActorServer/user/PersonA/PostRecepcionist] Organizing the letters
[INFO] [12/25/2014 14:23:54.807] [ActorServer-akka.actor.default-dispatcher-2] [akka://ActorServer/user/PersonA] Delivering the letter to the post recepcionist
[INFO] [12/25/2014 14:23:54.807] [ActorServer-akka.actor.default-dispatcher-3] [akka://ActorServer/user/PersonA/PostRecepcionist] Delivering the letters to the Postman
[INFO] [12/25/2014 14:23:54.807] [ActorServer-akka.actor.default-dispatcher-3] [akka://ActorServer/user/PersonA/PostRecepcionist] Organizing the letters
[INFO] [12/25/2014 14:23:54.807] [ActorServer-akka.actor.default-dispatcher-3] [akka://ActorServer/user/PersonA/PostRecepcionist] Delivering the letters to the Postman
[INFO] [12/25/2014 14:23:54.807] [ActorServer-akka.actor.default-dispatcher-2] [akka://ActorServer/user/PersonA] Receiving the letter
[INFO] [12/25/2014 14:23:54.807] [ActorServer-akka.actor.default-dispatcher-2] [akka://ActorServer/user/PersonA] Going to the post office
[INFO] [12/25/2014 14:23:54.807] [ActorServer-akka.actor.default-dispatcher-2] [akka://ActorServer/user/PersonA] Delivering the letter to the post recepcionist
[INFO] [12/25/2014 14:23:54.807] [ActorServer-akka.actor.default-dispatcher-3] [akka://ActorServer/user/PersonA/PostRecepcionist] Organizing the letters
[INFO] [12/25/2014 14:23:54.807] [ActorServer-akka.actor.default-dispatcher-3] [akka://ActorServer/user/PersonA/PostRecepcionist] Delivering the letters to the Postman
[INFO] [12/25/2014 14:23:54.807] [ActorServer-akka.actor.default-dispatcher-2] [akka://ActorServer/user/PersonA] Receiving the letter
[INFO] [12/25/2014 14:23:54.807] [ActorServer-akka.actor.default-dispatcher-3] [akka://ActorServer/user/PersonA/PostRecepcionist] Organizing the letters
[INFO] [12/25/2014 14:23:54.807] [ActorServer-akka.actor.default-dispatcher-2] [akka://ActorServer/user/PersonA] Going to the post office
[INFO] [12/25/2014 14:23:54.807] [ActorServer-akka.actor.default-dispatcher-3] [akka://ActorServer/user/PersonA/PostRecepcionist] Delivering the letters to the Postman
[INFO] [12/25/2014 14:23:54.807] [ActorServer-akka.actor.default-dispatcher-2] [akka://ActorServer/user/PersonA] Delivering the letter to the post recepcionist
[INFO] [12/25/2014 14:23:54.807] [ActorServer-akka.actor.default-dispatcher-2] [akka://ActorServer/user/PersonA/PostRecepcionist] Organizing the letters
[INFO] [12/25/2014 14:23:54.808] [ActorServer-akka.actor.default-dispatcher-2] [akka://ActorServer/user/PersonA/PostRecepcionist] Delivering the letters to the Postman
[INFO] [12/25/2014 14:23:54.808] [ActorServer-akka.actor.default-dispatcher-2] [akka://ActorServer/user/PersonA/PostRecepcionist] Organizing the letters
[INFO] [12/25/2014 14:23:54.816] [ActorServer-akka.actor.default-dispatcher-2] [akka://ActorServer/user/PersonA/PostRecepcionist] Delivering the letters to the Postman
[INFO] [12/25/2014 14:23:54.816] [ActorServer-akka.actor.default-dispatcher-2] [akka://ActorServer/user/PersonA/PostRecepcionist] Organizing the letters
[INFO] [12/25/2014 14:23:54.816] [ActorServer-akka.actor.default-dispatcher-2] [akka://ActorServer/user/PersonA/PostRecepcionist] Delivering the letters to the Postman
[INFO] [12/25/2014 14:23:54.817] [ActorServer-akka.actor.default-dispatcher-5] [akka://ActorServer/user/PersonA/PostRecepcionist/PostMan] Go to the address with the letter
[INFO] [12/25/2014 14:23:54.817] [ActorServer-akka.actor.default-dispatcher-5] [akka://ActorServer/user/PersonA/PostRecepcionist/PostMan] Deliver the letter to personB
[INFO] [12/25/2014 14:23:54.817] [ActorServer-akka.actor.default-dispatcher-2] [akka://ActorServer/user/PersonA/PostRecepcionist/PostMan/PersonB] Reads the letter
[INFO] [12/25/2014 14:23:54.817] [ActorServer-akka.actor.default-dispatcher-2] [akka://ActorServer/user/PersonA/PostRecepcionist/PostMan/PersonB] Reads the letter
[INFO] [12/25/2014 14:23:54.817] [ActorServer-akka.actor.default-dispatcher-5] [akka://ActorServer/user/PersonA/PostRecepcionist/PostMan] Go to the address with the letter
[INFO] [12/25/2014 14:23:54.817] [ActorServer-akka.actor.default-dispatcher-5] [akka://ActorServer/user/PersonA/PostRecepcionist/PostMan] Deliver the letter to personB
[INFO] [12/25/2014 14:23:54.818] [ActorServer-akka.actor.default-dispatcher-5] [akka://ActorServer/user/PersonA/PostRecepcionist/PostMan] Go to the address with the letter
[INFO] [12/25/2014 14:23:54.818] [ActorServer-akka.actor.default-dispatcher-5] [akka://ActorServer/user/PersonA/PostRecepcionist/PostMan] Deliver the letter to personB
[ERROR] [12/25/2014 14:23:54.823] [ActorServer-akka.actor.default-dispatcher-2] [akka://ActorServer/user/PersonA/PostRecepcionist/PostMan/PersonB] ERROR!
java.lang.RuntimeException: ERROR!
at br.com.alexandreesl.handson.PersonB.onReceive(PersonB.java:29)
at akka.actor.UntypedActor$$anonfun$receive$1.applyOrElse(UntypedActor.scala:167)
at akka.actor.ActorCell.receiveMessage(ActorCell.scala:498)
at akka.actor.ActorCell.invoke(ActorCell.scala:456)
at akka.dispatch.Mailbox.processMailbox(Mailbox.scala:237)
at akka.dispatch.Mailbox.run(Mailbox.scala:219)
at akka.dispatch.ForkJoinExecutorConfigurator$AkkaForkJoinTask.exec(AbstractDispatcher.scala:386)
at scala.concurrent.forkjoin.ForkJoinTask.doExec(ForkJoinTask.java:260)
at scala.concurrent.forkjoin.ForkJoinPool$WorkQueue.runTask(ForkJoinPool.java:1339)
at scala.concurrent.forkjoin.ForkJoinPool.runWorker(ForkJoinPool.java:1979)
at scala.concurrent.forkjoin.ForkJoinWorkerThread.run(ForkJoinWorkerThread.java:107)
[INFO] [12/25/2014 14:23:54.823] [ActorServer-akka.actor.default-dispatcher-2] [akka://ActorServer/user/PersonA/PostRecepcionist/PostMan/PersonB] THE PERSONB IS BOOTING!
[INFO] [12/25/2014 14:23:54.868] [ActorServer-akka.actor.default-dispatcher-2] [akka://ActorServer/user/PersonA/PostRecepcionist/PostMan/PersonB] Reads the letter
[INFO] [12/25/2014 14:23:54.868] [ActorServer-akka.actor.default-dispatcher-2] [akka://ActorServer/user/PersonA/PostRecepcionist/PostMan/PersonB] Reads the letter
[ERROR] [12/25/2014 14:23:54.868] [ActorServer-akka.actor.default-dispatcher-2] [akka://ActorServer/user/PersonA/PostRecepcionist/PostMan/PersonB] ERROR!
java.lang.RuntimeException: ERROR!
at br.com.alexandreesl.handson.PersonB.onReceive(PersonB.java:29)
at akka.actor.UntypedActor$$anonfun$receive$1.applyOrElse(UntypedActor.scala:167)
at akka.actor.ActorCell.receiveMessage(ActorCell.scala:498)
at akka.actor.ActorCell.invoke(ActorCell.scala:456)
at akka.dispatch.Mailbox.processMailbox(Mailbox.scala:237)
at akka.dispatch.Mailbox.run(Mailbox.scala:219)
at akka.dispatch.ForkJoinExecutorConfigurator$AkkaForkJoinTask.exec(AbstractDispatcher.scala:386)
at scala.concurrent.forkjoin.ForkJoinTask.doExec(ForkJoinTask.java:260)
at scala.concurrent.forkjoin.ForkJoinPool$WorkQueue.runTask(ForkJoinPool.java:1339)
at scala.concurrent.forkjoin.ForkJoinPool.runWorker(ForkJoinPool.java:1979)
at scala.concurrent.forkjoin.ForkJoinWorkerThread.run(ForkJoinWorkerThread.java:107)
[INFO] [12/25/2014 14:23:54.868] [ActorServer-akka.actor.default-dispatcher-2] [akka://ActorServer/user/PersonA/PostRecepcionist/PostMan/PersonB] THE PERSONB IS BOOTING!
[INFO] [12/25/2014 14:23:54.868] [ActorServer-akka.actor.default-dispatcher-2] [akka://ActorServer/user/PersonA/PostRecepcionist/PostMan/PersonB] Reads the letter
[INFO] [12/25/2014 14:23:54.868] [ActorServer-akka.actor.default-dispatcher-2] [akka://ActorServer/user/PersonA/PostRecepcionist/PostMan/PersonB] Reads the letter
[ERROR] [12/25/2014 14:23:54.869] [ActorServer-akka.actor.default-dispatcher-5] [akka://ActorServer/user/PersonA/PostRecepcionist/PostMan/PersonB] ERROR!
java.lang.RuntimeException: ERROR!
at br.com.alexandreesl.handson.PersonB.onReceive(PersonB.java:29)
at akka.actor.UntypedActor$$anonfun$receive$1.applyOrElse(UntypedActor.scala:167)
at akka.actor.ActorCell.receiveMessage(ActorCell.scala:498)
at akka.actor.ActorCell.invoke(ActorCell.scala:456)
at akka.dispatch.Mailbox.processMailbox(Mailbox.scala:237)
at akka.dispatch.Mailbox.run(Mailbox.scala:219)
at akka.dispatch.ForkJoinExecutorConfigurator$AkkaForkJoinTask.exec(AbstractDispatcher.scala:386)
at scala.concurrent.forkjoin.ForkJoinTask.doExec(ForkJoinTask.java:260)
at scala.concurrent.forkjoin.ForkJoinPool$WorkQueue.runTask(ForkJoinPool.java:1339)
at scala.concurrent.forkjoin.ForkJoinPool.runWorker(ForkJoinPool.java:1979)
at scala.concurrent.forkjoin.ForkJoinWorkerThread.run(ForkJoinWorkerThread.java:107)
[INFO] [12/25/2014 14:23:54.869] [ActorServer-akka.actor.default-dispatcher-5] [akka://ActorServer/user/PersonA/PostRecepcionist/PostMan/PersonB] THE PERSONB IS BOOTING!
[INFO] [12/25/2014 14:23:54.869] [ActorServer-akka.actor.default-dispatcher-5] [akka://ActorServer/user/PersonA/PostRecepcionist/PostMan/PersonB] Reads the letter
[INFO] [12/25/2014 14:23:54.869] [ActorServer-akka.actor.default-dispatcher-5] [akka://ActorServer/user/PersonA/PostRecepcionist/PostMan/PersonB] Reads the letter
[ERROR] [12/25/2014 14:23:54.869] [ActorServer-akka.actor.default-dispatcher-5] [akka://ActorServer/user/PersonA/PostRecepcionist/PostMan/PersonB] ERROR!
java.lang.RuntimeException: ERROR!
at br.com.alexandreesl.handson.PersonB.onReceive(PersonB.java:29)
at akka.actor.UntypedActor$$anonfun$receive$1.applyOrElse(UntypedActor.scala:167)
at akka.actor.ActorCell.receiveMessage(ActorCell.scala:498)
at akka.actor.ActorCell.invoke(ActorCell.scala:456)
at akka.dispatch.Mailbox.processMailbox(Mailbox.scala:237)
at akka.dispatch.Mailbox.run(Mailbox.scala:219)
at akka.dispatch.ForkJoinExecutorConfigurator$AkkaForkJoinTask.exec(AbstractDispatcher.scala:386)
at scala.concurrent.forkjoin.ForkJoinTask.doExec(ForkJoinTask.java:260)
at scala.concurrent.forkjoin.ForkJoinPool$WorkQueue.runTask(ForkJoinPool.java:1339)
at scala.concurrent.forkjoin.ForkJoinPool.runWorker(ForkJoinPool.java:1979)
at scala.concurrent.forkjoin.ForkJoinWorkerThread.run(ForkJoinWorkerThread.java:107)
[INFO] [12/25/2014 14:23:54.869] [ActorServer-akka.actor.default-dispatcher-5] [akka://ActorServer/user/PersonA/PostRecepcionist/PostMan/PersonB] THE PERSONB IS BOOTING!
I encourage the reader to go deeper in these and other subjects of the framework
Conclusion
And so we conclude our post on the Akka framework. With a very interesting concept and a extensible parallel processing model, the framework is a good option that should be evaluated by all developers and architects who want to explore other ways beyond the traditional thread pool. Many thanks to all who have accompanied me in this post, until next time.
Continue reading


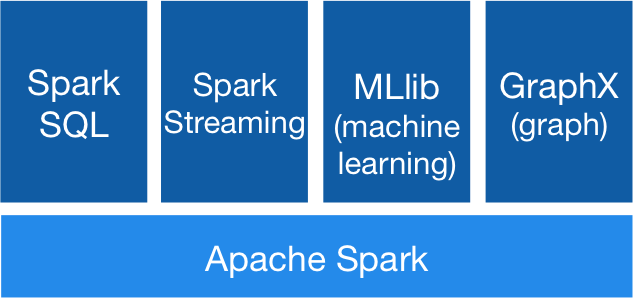
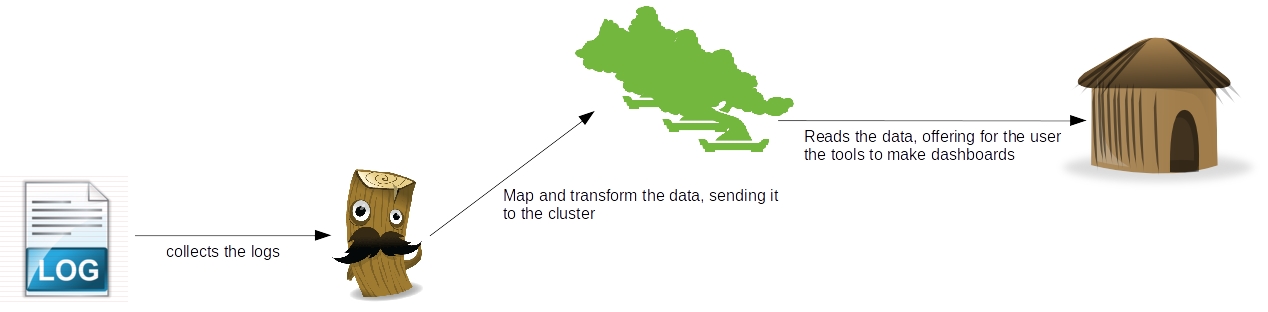 As we can see, there’s a clear separation of concerns between the tools, where which one has his own individual part on the processing of the log data: